Camper Van Pros And Cons – Key Things You Should Know

A camper van is an excellent choice for those looking to travel lightly in a small vehicle. It’s a great option for traveling long distances with greater ease than it would be in a larger vehicle. Camper vans have become popular as unique and amazing van conversions have been shared online through social media and other means.

A camper van can either be a custom DIY type of van or it could be one that you have purchased from a reputable manufacturer that has already been converted. Either way, you end up with a small home-on-wheels that you can either use for camping or living in for short periods of time. It might even serve as your primary living residence as you travel the country where you live or even beyond the borders of your own country.

A van makes a great vehicle for those who are not satisfied with the status quo and are looking to pave their own path and travel to new and exciting places. If this sounds like you, then perhaps a camper van would be the choice for you. There are a lot of great things about owning a camper van but as with anything, there are some caveats that go along with it.

After traveling in my camper van for a few years now, I have put together a list of pros and cons that might help you decide whether this lifestyle is the way to go or not. Of course, everyone’s pros and cons list will be different but this is my experience throughout the time that I have traveled and enjoyed some adventure.

Pros

1.) They are Small and Easy To Drive

If you look at other options on the market, a camper van stands out as one of the easiest ways to drive a home-on-wheels. Due to its small size, you can easily travel anywhere you want without being concerned with whether you will fit into a place. Camper vans generally range from 18-25 feet in total length and can fit into nearly any location that you choose to park. Even a large van will be easier to drive and park than a larger class of RV.

An average-size camper van can fit into a standard parking space with no problem. You can pull into a parking lot and park beside other cars just as if you were in a passenger vehicle. I have done this many times as I have pulled into a store parking lot or a restaurant. Once parked, I can pick up my takeout order from the restaurant and then come back out and eat my meal in my van just like I’m at home.

If you are looking for something easy and small to travel in, a van will be one of the best choices that you can find. There are smaller choices of campers on the market but none that contain a drivable living area all in one structure.

2. They Provide an All-in-One Solution

As mentioned previously, there are smaller options, but those smaller options are usually trailers or truck campers that require you to have a separate vehicle to use them. Having a living area and a driving area in one space allows you to go from the driver’s seat to your living area without ever going outside. This can be beneficial when the weather is bad or safety is a concern.
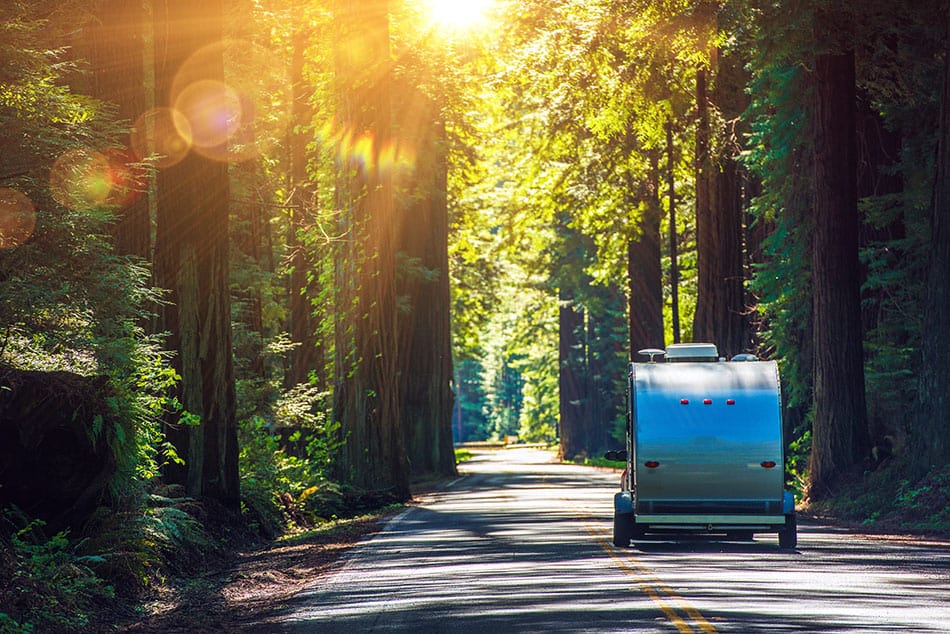
Small travel trailer being pulled
A travel trailer can be small but you need a vehicle to pull it

Beyond that, the pure convenience of this is probably the biggest benefit.

3. They Get Great Gas Mileage

For the most part, camper vans get great gas mileage and are going to be much better than any other types of motorhomes. In comparison, a Class A or Class C motorhome has more weight to haul and requires more work from the engine which in turn uses more gas along the way. The compact size of a camper van allows it to travel lighter and use less gas in the process. This is great news for those who want to spend less on fuel and perhaps do something better for the environment.

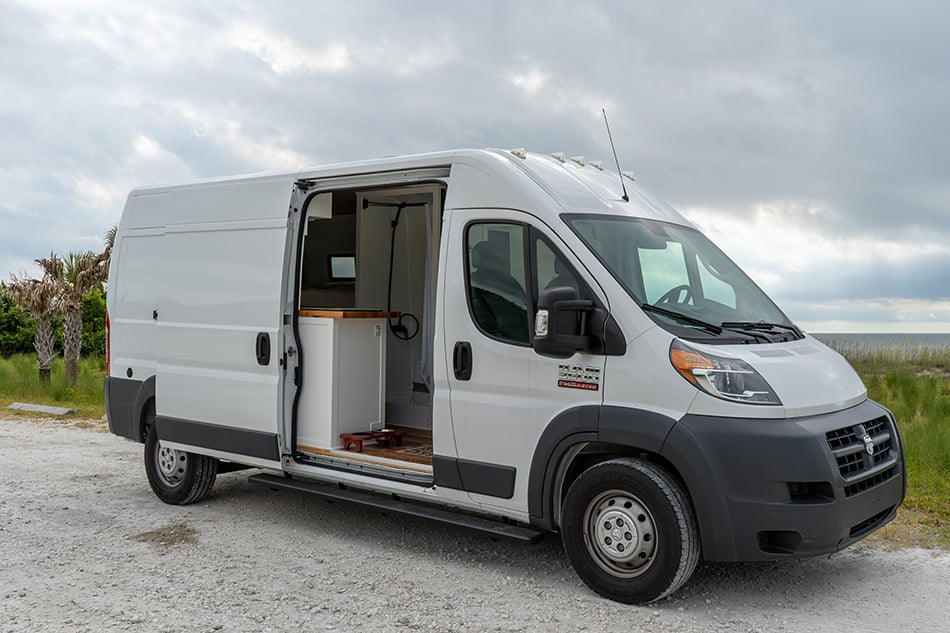
You can expect to get around 20 MPG in most modern camper vans as this is what I have averaged throughout all of my travels with my RAM Promaster van. Most newer models of vans are very fuel-efficient and will give you a great way to travel without worrying about high-priced gas bills.

4. Easy To Remain Stealthy

Whether you are looking to be stealthy or not, traveling in a camper van will be a way to travel that doesn’t make you stick out like a sore thumb. Being able to park easily in parking lots and other locations allows you to park without getting lots of attention from others. Depending on what your van looks like, people may not even think twice about it and they may just assume it is another work van of some kind.

Being stealthy like this allows you to pull into a parking lot, move from the driver’s area to the living area without anyone knowing. You can then eat meals, take a nap, watch TV, or whatever else you like. I have done this many times during daytime hours. As people are coming and going, I’m enjoying life in my little home without anyone even knowing.

5. They Are Fun

Having a camper van is so much fun! It gives you a way to pack up and go on a trip easily without having to fuss around with large cumbersome vehicles. I have had so much fun over the years in my van as I have been able to travel places I would not have gone otherwise. If I had to pull a larger RV around, I would not have as much interest in going to some of the places I have been to.

While the living space of a large RV can be inviting, moving it from place to place is nowhere near as easy.

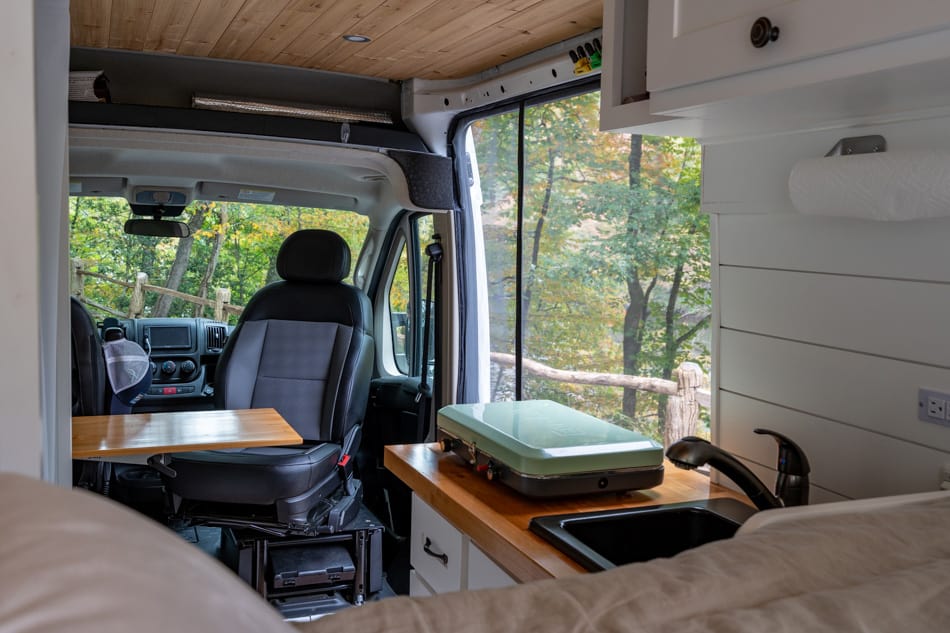
It’s a fun experience pulling into a secluded location knowing that your van is fully decked out as a fully-functional home environment that allows you all the conveniences of our modern-day lives, yet be secluded in nature.

I look forward to every time I go on a trip.

6. They Are Convenient

We’ve already discussed how small and easy-to-drive a van is, which goes along with the overall convenience of the camper van. Once you get to a location, you just pull in and everything is done. This is unlike a larger RV that is going to take more work to get it set up and leveled. With a travel trailer, you’ll have to do more work to get it all set up by connecting and disconnecting from your vehicle.

A camper van is a walk in the park. It’s so convenient to pull into a location and not have to do anything. You can simply turn the key off and you are home as long as the place is level.

I have been to locations where warnings were given for RVs over a certain size not being able to fit or get in and out of a location. I did not have to worry about this knowing that my van will be fine.

Camper van at campground

7. They Are Safer Than Other Options

A camper van will provide some safety because it will allow you to shimmy out of a sketchy situation rather quickly. If you happen to be parked in an area where you don’t feel comfortable, all you need to do is jump in the driver’s seat, turn the key and take off.

This might be a little more difficult with a larger motorhome and especially with a trailer that needs to be re-connected to your vehicle. A pop-up camper will need to be broken down, a truck camper will require you to get out of the living space and walk around the vehicle into the driver’s area.

All of these things will put you at risk of having to get out of the vehicle in an area that may not be safe to do so. With a van, you never have to leave the living space and can remain more protected. While I have never encountered a situation like this, it’s always in the back of my mind when I travel. I try to always park in a way that will allow me to escape easily if needed.

8. They Provide a Small Space for Limited Stuff

One might initially think that the small size of a van is a con. However, I believe it to be more of a benefit because it only gives you space for limited stuff. You can easily clear the clutter from your life when you have less space to clutter up.

Traveling lightly with fewer belongings frees you up to enjoy the experience even more. It takes a burden off your shoulders, gives you limited options to decide on, and allows you to simplify your life. This doesn’t mean that you have to do without but it allows you to prioritize those things which are most important to you while leaving the not-so-important things behind.

9. They Make a Great Conversation Starter

I’ve never been on a trip when someone didn’t approach me about my van conversion. Anytime I have been parked in a more public location with my side door open, I get the occasional passers-by who like what they see and want to ask questions. It could be someone who wants to do the same thing or has always dreamed of the lifestyle. It might even be other van lifers who can spot another one a mile away.

Whoever they may be, once people have caught a glimpse inside your van’s living area, you are likely to have some conversations about it. This can certainly be welcoming on the road as you are often secluded from others. The occasional conversation can help to overcome loneliness.

Cons

1. They Are Small

I’ve already mentioned above how having a small space can be a good thing. However, it can also be bad because the small area does not allow for lots of elbow room or have space for lots of people. It can get very tight in the living area of a small camper van. You aren’t able to pack as much for a trip and for those who live in a van full time, their lives have to be re-arranged a little to accommodate this reality.

For short trips, it’s not a big deal but staying for weeks and months on end in a small camper van can become tight, and depressing, especially if multiple people are involved. This is why it’s important to consider the layout of the van before purchasing one or converting one of your own. As an example, a van that has lots of windows and storage will allow it to feel bigger than it actually is.

2. The Bathroom Situation

Even though lots of camper vans have bathrooms, it can still be a challenge making them work for you. It is especially challenging if multiple people are traveling. It’s one of the only things that I hate when my wife and I travel together. The small space often creates a predicament where one person has to leave the van to give the other person their private time. Beyond that, it can sometimes be difficult to discard the waste after using the toilet.

It’s certainly a talking point and a pain point amongst van lifers everywhere which is why a lot of them opt to use only public restrooms. Cassette toilets work great and compostable toilets are even better if you plan on using them for numbers one and two.

3. They Can Be Expensive

One would think that the small size of a van would make it one of the least expensive options on the market. However, this is far from true. A camper van is among one of the most expensive types of RVs. It can become outrageously expensive if you choose a luxurious model on the market. Learn here why camper vans are so expensive.

They can become very pricey, specifically, if you choose a brand new one, a converted one that has been tricked out, or a professionally manufactured one. To save money, you’ll want to shop for a used one or take on the challenge of DIYing one yourself which is what I chose to do.

By converting one yourself, you can start with an empty shell and then spend as much or as little as you want.

4. Insurance

Unless you have purchased a proper Class B RV that is titled as an RV, insurance can be a little tricky. This will all depend on where you live and the laws within your locale. A van conversion that isn’t titled as an RV will likely only be able to get standard car insurance for the vehicle itself. This may not cover the conversion part of the van or the contents inside.

If something were to happen, you might lose out on all the money you had spent on the van conversion. If someone were to break in and steal something, you’d be at a loss for anything taken. This is something to consider when you are on the market to purchase a van.

Living in a Van Full-Time

Living in a van full-time can certainly have its benefits but there are also plenty of downsides to doing so. The best way to live in a van full-time is to make a plan and only stick to that plan. Your plan may be to save up and live and travel in your van for a year so that you can travel and see sights you may have never seen otherwise.

It’s a great way to live fully and make sure you are well-traveled. However, living full-time for years to come isn’t always a great option. It may work for some but there are some cons to doing this. Here are just a few cons that are part of living full-time in a van.

  1. Your van is losing value. A vehicle loses value which is the opposite of a standard sticks-and-bricks home. Living full-time for a long time in a van will not allow you to build equity.
  2. Loneliness. It can get lonely out on the road and living this lifestyle by yourself.
  3. Inconvenience. While a van can be convenient for short periods, it becomes inconvenient the longer you live in it. Things like showering, washing clothes, storing groceries, and constant cleanup becomes a chore and it can get quite old.
  4. The temperatures can be brutal. A van doesn’t have the same temperature-controlled environment that a house does. There’ll be times when you are freezing and times when you are burning up. This can become a challenging battle to maintain a level of comfort.

Summary

Whether you live in your van full-time or just use it occasionally, it does offer many pros. However, as seen throughout this article, there are many cons that go along with it. This is the way it is with anything and especially with campers. There are always good and bad points with anything in life and you’ll have to find a balance that works best for you.

I thoroughly enjoy traveling in my van BUT I wouldn’t want to live in it full-time. I enjoy taking short trips and even some longer ones but I love knowing that I can always come back home when I am done. It allows me to venture out and enjoy life but always return to the safety of my home.

If you are young or don’t own a home yet, a van is a great way to help you get away, see the world, and decide on a place you’d love to live your life.

Class B RV With Fixed Bed – Pros And Cons

A Class B RV is small inside and offers limited space for premium furniture layouts. Because of this, many van floorplans make use of a bed that folds away or converts into another useful area such as a couch, dining area, or another type of sitting area when the bed is not in use. The idea is to save space or to be able to use that space for something else rather than it being wasted by a bed that isn’t being used.

The problem with this, however, is that it is an inconvenience for you to pack away your bedding after you have slept for the night and then store the bedding somewhere so that the bed platform can be converted to the secondary piece of equipment. This is an inconvenience that you don’t have with a fixed bed. Unlike a convertible bed, a fixed one provides you with a place to sleep and it stays that way. It does not allow you to convert it into anything else. The good thing about this is that you don’t have to worry about setting up the bed each day or storing the bed coverings and then re-covering the bed when it’s time to use.

Some may argue that making the bed is just as much trouble on a fixed bed as it would be to put the bed covers away on a convertible one. However, I have to disagree with this having traveled with both types in the past. My personal preference leans towards a fixed bed because I like the convenience of it always being ready to lay down on without having to convert it from another position.

Motorhome Fixed Bed or Not?

This is a preference that will be different for everyone and each person will have their own reasoning. For the most part, a motorhome with a fixed bed will be more convenient for those looking to have their bedding area set up and ready to go at all times.

A bed that is not fixed, however, is great for those who want to utilize every square inch of their living space and are not concerned with the extra work involved in the constant tear down and setup of their bed.

Most larger RVs such as a Class A or a Class C as well as most larger or average-sized travel trailers contain a fixed bed.

Since these RVs are larger and have more space to work with, a fixed bed is usually the best option for creating a comfortable and convenient place to sleep. The bed is always fixed and set up but there is usually a good amount of storage space underneath. Besides that, larger RVs generally have a separate bedroom area where the bed stays fixed at all times.

The only exception is a spare bed that may be located elsewhere within the RV. Oftentimes, a dinette converts into an extra bed so that a visitor can stay the night and have space to sleep. If you have children traveling with you, they are likely the ones who will be using it and the setup and teardown could become a daily chore if that is the case. That’s just something you’ll have to live with if you expect to travel with a family.

A camper van, on the other hand, is not as well-equipped as far as space goes to allow for a fixed bed to be set up at all times. When you factor in the size of a queen or king bed, you will be using a lot of valuable space inside the van if you choose a fixed option. For small vans, it makes sense to have some type of convertible bed that can easily stow away or convert into something else when not using it for sleep.

In larger vans, you can easily get away with having a fixed bed and this makes the whole process more convenient in some cases. Having a fixed bed allows you to have a lot of storage underneath that bed so it’s not a total loss when you are not using the bed.

As for my camper van, my pull-out fridge is located underneath my fixed bed as well as all my garage storage. This space gets used quite well and I’m not sure where I would put all the stuff I carry if I didn’t have this space available. I’m not sure I would do it any other way assuming I was starting over with the same size van.

If I was going to use a smaller van such as a 144″ Sprinter, I may consider using a layout where the bed converts into a dining area in the rear of the van.

Pros of a Fixed Bed

1) It’s Always Ready

With a fixed bed, it’s always ready for you to crash on it and go to sleep without the worry of having to convert from couch to bed or vice versa. Unlike a non-fixed bed, you have to spend time putting it together. For those who are involved in outdoor activities or other adventures, putting your bed together is not something you want to be doing after a long hike or other strenuous activity. It’s nice to have everything ready to go at all times.

2) It’s More Convenient

It’s more convenient to always have the bed set up. The bed in my camper van is somewhat of a catchall area when not used for sleeping. You can often find clothes and other odd accessories on my bed and wedged in between pillows when I travel. It’s an easy place to keep items from sliding and moving all over the place.

3) It’s Easier To Build

If you are building your own camper van, having a fixed bed will be much easier to build. A bed that converts into something else will take more planning and execution to pull it off and make it work as it should. A fixed bed, on the other hand, only needs to mount to some supports and stay sturdy enough for regular use. In this case, there isn’t much to think about when building it.

4) One Continuous Comfortable Mattress

If you have a bed that converts to something else, chances are the cushions will serve multiple purposes. These cushions will need to be fitted together to form the mattress which will cause uncomfortable areas that may be felt when lying down. This is not as comfortable as sleeping on a comfortable mattress that serves one purpose. You can make it more comfortable by adding a mattress topper or thick blanket but this is just more stuff that will be packed into your van.

Cons of a Fixed Bed

It Takes Up a Lot of Space

Perhaps the only negative of a fixed bed is that it takes up a lot of space in an RV that doesn’t have a lot of space to spare. Many people have a queen-size or larger bed inside their van. These are quite large and take up a lot of space in the living area. As mentioned above, space underneath the bed is often utilized so nothing goes to waste.

Keep in mind that if your bed is always set up, it is going to take up that amount of space all the time. If you are looking for a lot of walking around room, a van with a fixed bed will not provide as much as one that folds away. You’ll have to decide for yourself whether you are willing to take up a certain amount of space for the convenience of having a bed that is always set up.

Tall People May Suffer

Class B RVs that have fixed beds often require you to sleep sideways in the van. This doesn’t offer a lot of room and may be a no-go for those who are taller than around 6 feet. I’m around 5′ 10″ and I have a couple of inches to spare on each side of mine. I’m fine with my bed and the space it provides but this is something to consider if you are taller.

A convertible bed may offer more space depending on which way it is situated within the van.

Examples of Vans With Fixed Beds

1) Custom Ram Promaster Van

Bed in the rear of camper van

For my van, I used a full-size bed frame that I built and it contains a full-sized mattress that measures 54″ x 75″. This bed is always set up and I don’t need to do anything other than pull the covers down, hop in, and go to sleep. When I awake in the morning, I just pull the covers back up as neatly as I want them and I’m done.

The good thing about my setup is that I have a comfortable mattress that doesn’t have uncomfortable areas where cushions have butted up against each other. Instead, it is one solid piece that is comfortable no matter how I stretch out on it.

Most all Class B RVs that have a fixed bed has it located in the rear of the rig. This makes a great area for it and it is often combined with a storage area underneath. I modeled mine after some of the popular ones on the market as well as from other van lifers who have built them before me.

2) Roadtrek Simplicity SRT

The Simplicity SRT has a comfortable fixed queen bed that also doubles as a place with storage. Underneath the bed, you’ll find additional storage so that you can neaten your space up. The bed works great for those who aren’t too tall. A person that is taller than about 5′ 10″ may find that there isn’t enough room on this one.

3) Coachmen Galleria 24A

The Galleria 24A has a fixed bed but it’s a little different from what you might usually find. Rather than one large mattress, it contains two separate sleeping sections that each have a power incline. This allows you to lounge upright in the bed in a comfortable position before going to sleep for the night.

The bed platform itself is fixed and doesn’t move or convert into another piece of furniture. It also has storage that can be accessed from the top of the bed. This area serves as a great lounging, sleeping, and storage area all in one.

Examples of Vans With Non-Fixed Beds

Non-fixed beds probably make the most sense in a small space such as what a Class B offers. However, in my opinion, it shouldn’t be complicated to convert and it should take a minimal amount of time. Otherwise, it becomes a hassle and defeats the purpose of making for a better experience. The following vans have beds that convert but are not overly complicated to work with.

1) Sportsmobile Classic

The Sportsmobile Class has a simple bench seat that converts easily into a bed. It only takes a few seconds to turn the bench into a flat area where a couple of people can sleep lengthwise. If I were to build a convertible bed, this is the way I would want it. I love how simple and quick it converts. You have a comfortable bench to sit on during the day and a comfortable bed to sleep on at night. This van also has an upstairs bed to make use of if you are in an area where you can raise the pop-up roof.

2) Winnebago Solis

The Solis has a dining area in the rear of the van that converts into a bed. It’s also very simple to convert since the bed frame folds up against the wall. The cushions remain on the bed when folded and are there as you pull it down. Add some warm covers and pillows and it makes a nice comfortable bed.

3) Roadtrek Zion

Similar to the Winnebago Solis above, the Zion has a dining area in the rear that turns into a large bed. The rear benches flatten out on each side in order to create this bed. I’m not sure how comfortable this bed is since I prefer one solid mattress but it does give you a nice roomy place to lay down.

Conclusion

A fixed bed in a Class B RV can be great for some people but others may prefer more space. Many people couldn’t be bothered with the chore of having to convert a bed constantly. It just adds more work to your trip. If you have a simple-to-convert one, such as the Sportsmobile classic above, this makes the job much easier. However, it still may require some work to get the covers properly fitted each time.

It comes down to what you are looking for in a bed. If you want more space then a bed that is not fixed will allow you to get that part of the living space out of the way when not using it. This will free up a section of your van to be able to move more freely or utilize it for another type of feature.

If you have a decent-sized van, having a fixed bed will certainly be more convenient and allow you to enjoy your trip rather than fiddling around with tearing down and setting up beds all the time.

This area of a camper van is debated nearly as much as having a bathroom and shower in a van is. Some people want a fixed bed and some would rather have a space that serves multiple purposes. Take a look at both types and decide on what works best for you and your layout and your needs. After all, you are the one who is going to be using it and other people’s opinions of this type of setup won’t matter once you hit the road.

Cassette Toilet Pros And Cons – 3 Best Options

As I have traveled around in my camper van, I have gotten a lot of usage out of my portable cassette toilet. It has been a good friend to me and has always been there when I needed it. I’m not one to settle for public options so having a toilet like this in my van when I travel makes a huge difference. It’s perfect for the small space that I have in my van.

These types of toilets are perfect for small-sized RVs and they give you the option of having a usable toilet anywhere you go. They tend to be popular with van lifers and those utilizing other small RVs. For the most part, they work great and offer many benefits for those who use them. However, there are some negatives to using these types of toilets that you may not have thought of.

First, a distinction needs to be made about what a cassette toilet is.

A cassette toilet is a fixed toilet in an RV that utilizes a “cassette” or waste tank in which the waste is stored in. To empty, you will usually access this cassette from outside of the RV via an access door. All the dirty work is done outside of the living area.

However, there are also portable toilets that utilize the same cassette type of waste tank. They work the same way and the only difference is the portability. I have always referred to these portable toilets as cassette toilets since they have the same functionality as the fixed type. This article will be mostly about these portable toilets rather than fixed ones but many of the pros and cons apply to both.

All of these are based on my own experience so your results may vary.

Pros

1) They Are Cheap

The best thing about a cassette toilet is that it is a cheap solution for being able to include a toilet in your RV or another camping setup. It can easily be stored anywhere and either used for a temporary situation or as a permanent solution. You can get a good cassette toilet for less than $100. When you compare this to alternative options, you will see yourself spending much less than you would otherwise.

In comparison, a good composting toilet will cost nearly $1000 and will also need to be installed with ventilation. A compostable option is going to be the better choice in the long run but if you are trying to save money, a cassette toilet will get the job done. There is nothing special to do with one of these units. You don’t need to vent it or set it up in a particular space. It can be moved from place to place as needed.

A toilet that is completely plumbed as you find in many larger RVs is usually not an option in a smaller RV. While these make great choices and will work almost identically to a home toilet, they are not a feasible solution for small camping enclosures. On the other hand, a can be used in any type of rig that you are traveling in.

I have used a cassette toilet in my van for the entire time that I have owned it and, for the price I paid for it, it has been a great solution.

2) They Are Small

The size of a cassette toilet allows it to be set up nearly anywhere. There are many different sizes depending on the brand and model you choose so the choice is yours. You aren’t limited to a large size that may not fit in your living space. Instead, you can choose the perfect one for your living space and one that will fit well in the space you have for it.

Of course, the smaller the toilet that you choose, the less comfortable it is likely to be. A full-sized model will give you the feeling of sitting on your home toilet. A smaller one will be easier to find a place for but may not be as comfortable as the larger one would be.

Whether you have a camper van, truck camper, travel trailer, or a tent, a cassette toilet can tag along and not use up a large amount of space.

3) Easy To Maintain

A cassette toilet is easy to maintain and only requires that you dump them regularly, clean them as you would your home toilet, and utilize deodorizing chemicals while in use. There are plenty of products on the market that make it a simple process when maintaining them.

I typically use Cassette Tank Cleaner from Thetford and water to rinse out my waste holding tank and regularly use deodorizing packets when the toilet is in use. It keeps the smells to a minimum and I can use it for a few days without dumping it.

4) Easy To Dump

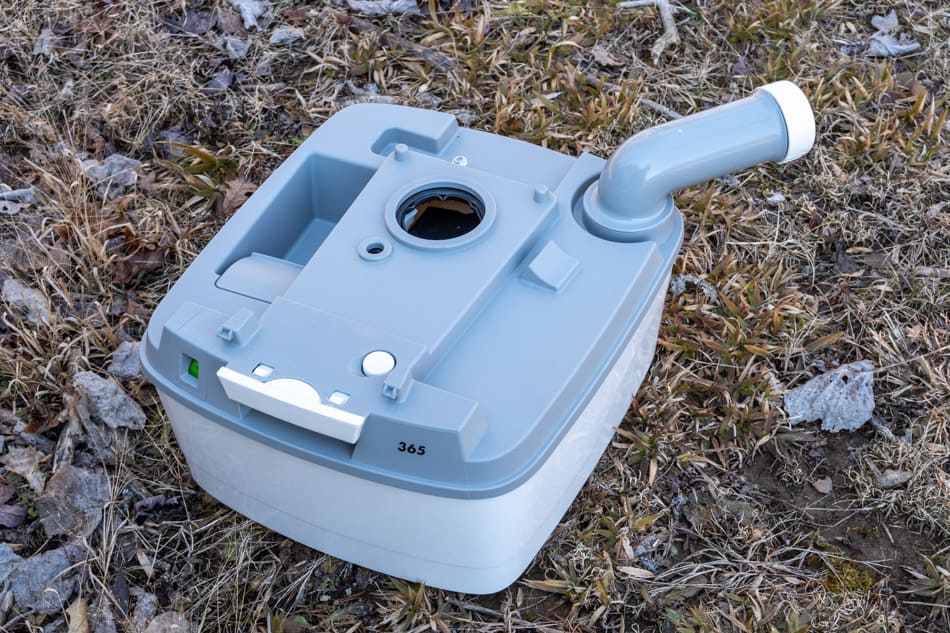
When a cassette toilet is ready to be dumped, it’s just a matter of unscrewing the cap of the drain and dumping it into an approved dumping site. Each toilet is different but the Thetford cassette toilet that I own has a simple arm that unfolds, a screw cap that unscrews, and a button that you hold to increase airflow while dumping. You simply turn the toilet upside down and allow the waste to drain from the tank.

Cassette toilet waste tank sitting in grass

If you have used deodorizing products, there is usually not a smell other than the smell of the product unless you allow it to go too long between dumpings.

5) Easy To Hide

Whether you have a dedicated bathroom area or just a pull out drawer, a cassette toilet can hide away nicely in nearly any space. I have a dedicated space for mine in my van but many people hide them away when not in use. Since they are so compact, they can usually go in a cabinet or under a bed or seating area. When ready to use, you can easily take them out and set them up for use.

While you can find other options that may be easy to hide, it’d be hard to find such a solution that is so close to the standard toilets we are used to using. A Luggable Loo or a Cleanwaste GO Anywhere Toilet are also easy to hide but they don’t give you that toilet feel. They have more of a temporary feel to them. It’s nice to have a more substantial solution like a cassette toilet that is still small enough to hide away when not in use.

6) They Are Mobile

A cassette toilet can be removed from your RV and used anywhere else you please. If you happen to be going on a tent camping trip, just pull it out and put it in your vehicle. Now you have a portable toilet to use while out in the woods. These can have multiple uses and can also be used for children or in remote cabins or other areas where plumbing may not be available.

The beauty of a toilet like this is that it isn’t attached to anything. It need not be vented, plugged-in, or plumbed. It’s all self-contained and you can pick it up and go at a moment’s notice if needed. This makes it great for people who rent RVs. It’s nice to have your own little toilet that you can bring along. Whether you use the toilet provided in the rented RV or not, having a spare one that only you and your family have used is a nice bonus.

Cons

1) They Can Get Nasty if Not Maintained Properly

Although typically not a problem, a cassette toilet can get downright rank if you don’t tend to it very well. If you choose not to use deodorizing chemicals while using it for liquids and solids, you are in for a real treat. If you choose to use only water, it’s best to dump it daily as soon as possible after using it, especially if you allow solids into the waste holding tank. On the other hand, using chemicals will allow you to use it longer and not experience the horrible smells.

I use mine for liquids only so it hasn’t been an issue for me. The seals, when working correctly, keep the smells away from the living area. However, if you allow a cassette toilet to fill up too far and leave waste in it for too long, it could be a nasty experience when you finally do dump it.

2) They Can Be Awkward to Dump

Besides the smells, dumping the toilet may present some awkward situations. Many people dump these in public restrooms which can feel weird as you are carrying the toilet into the restroom with you. You may get some looks and people turning up their noses. It can be a constant search for a place to dump if you are not in a campground that has a dumping station.

It’s best to dump these at a dumpsite as you would any other RV. You can simply dump it down the sewage pipe at the campground and not have to worry about anything being awkward. However, if you are a boondocker or someone who doesn’t frequent campgrounds, you may have to be creative with your dumping techniques.

Whatever you do, don’t dump it out onto the ground! It’s best to find a suitable place to dump it using proper sewage rather than spread it onto the ground for others to walk over. It’s not sanitary and just plain rude!

3) Some Are Not Comfortable To Sit On

One of my biggest gripes about this type of toilet has been how uncomfortable the seat is. I usually don’t spend much time on it but if you sit on it, you will instantly notice the difference between it and a standard home toilet seat. Some models do have a full-sized seat but the small model I have does not.

The seat on my Thetford 365 is not a full-sized one and can be quite uncomfortable after a few minutes. Consider this as you shop for one.

4) Seals and Parts Wear out

While cheap, a cassette toilet is just a plastic box that has a couple of different compartments; one for freshwater, one for wastewater. They also have moving parts that allow you to pump water and flush. My Thetford 365 lasted a little over a year before the lip seal needed to be replaced.

After a year of minimal use, the lip seal on mine began to leak so the freshwater bowl would no longer hold water. The seal had shriveled up and become useless.

Cassette toilet lip seal close up

As you can see from the picture above, the seal in my toilet is completely shriveled and will not hold water in the bowl. This makes it useless for containing water the way it should and then allowing you to flush that water into the waste tank when finished.

It also provides no seal from the wastewater contained in the bottom of the toilet. I am currently in the process of replacing this seal in hopes of making it brand new again. This happened to my toilet with minimal usage and it being kept in my house when not in use. It has always been kept in a temperature-controlled environment and always cleaned properly before storage.

Perhaps I just got a dud or maybe I did something wrong. I always used approved chemicals so not sure what happened. Whatever the case, parts wear out on these types of toilets and will need to be addressed.

Best Portable Cassette Toilets for Van or RV

Luxury Option – Thetford 565e

The Thetford 565e is the King of all the Porta Potti models of cassette toilets made by Thetford. This toilet provides you with a standard-sized seat that has the same look and feel as what you may be used to in your home bathroom. It is also a similar height so it will feel as though you are sitting on your throne at home. This toilet is also the most expensive version of the Porta Potti models.

Features of this toilet include:

  • Electric flush
  • Holds 4.5 gallons of freshwater, 5.5 gallons of wastewater
  • Integrated toilet paper holder
  • Waste tank level meter to keep you from overflowing
  • Comfortable seat with a height of 17.6 inches which is about an inch taller than my toilet in my home bathroom
  • Battery-powered electric flush
Thetford 565e toilet

Space Saving Option – Thetford 365

The Thetford 365 is a bit smaller than the 565e mentioned above. Although it contains the same size as the wastewater holding tank at 5.5 gallons, the freshwater tank only holds 4 gallons. It is also smaller in size and the small footprint of this option is why I chose it for my van. It sits perfectly in the location that I built for it. The only problem with this model is that the seat is not as comfortable.

Features of this toilet include:

  • Comfortable height of 16 inches which is nearly exactly the height of my home toilet
  • Water level indicator for the wastewater tank
  • Piston pump flush which makes it easy to flush the toilet with good pressure
  • No electric parts – great for those who prefer manual operation
Thetford 365 toilet

Budget Option – Camco Travel Toilet

The Camco Premium Portable Travel Toilet provides a usable toilet that is small and has minimal features with less holding capacity. If you have a small space, this will work well but the best thing about this toilet is that it will be lower in price than the other ones mentioned above. If you are looking to add a cassette toilet to your camper, this one will allow you to do it without breaking the bank.

Features of this toilet include:

  • Comfortable seat height at 16 inches high
  • 2.6-gallon holding tank which isn’t as big as the ones mentioned above but big enough for most people’s usage.
  • Lower cost than the toilets above
Camco travel toilet

Bottom Line

I have gotten a lot of usage out of my cassette toilet and it has been a great addition to my van. These types of toilets come in handy for situations where you need something small. Small RVs and those utilizing tents in more primitive settings will be happy with this type of toilet. For the most part, the benefits outweigh the negative aspects of them but as you have seen from above there are some things that you should watch out for and know before deciding on purchasing one.

No matter what toilet you have, there are always going to be cons associated with it. Mobile toilets do not offer the same out-of-sight and out-of-mind feature that our home plumbing does. These are often disgusting and messy to deal with.

A cassette toilet makes the job as easy as possible and as clean as possible. They only hold a small amount of waste so it forces you to dump them often. While this may be inconvenient, it ensures that it will not reach a level that is hard to manage.

If you are on the fence about using a cassette toilet, know that these toilets work great for what they are intended for. Just keep them clean, dump them often and you shouldn’t have any problems at all other than the occasional part that goes bad, as I have had.

Van Conversion Food Pantry – Food Storage Cabinet

One of the most difficult parts of traveling in a camper van is working with the small space that it provides. It can sometimes be challenging to find room for storage, especially if multiple people are traveling. This can be especially true of food which often requires a lot of space. While refrigerated items are usually not a big deal, dry ingredients often find their way into whichever crevice they’ll fit in.

Some vans have cabinets for this but if not, you will generally end up putting things just wherever they will fit. You may also end up going light on groceries and food just because you don’t have the storage. Going light on food does have a few benefits.

Going to the grocery more often when you are traveling means public restroom time. Many van lifers don’t have a toilet in their van and often use this time to take care of things. However, if you have facilities in your camper van, this is of no benefit to you.

For those who boondock often, it’s great to be able to store food that will last for days or even a week or more. This is what I wanted to achieve with my van. I wanted a dedicated area that was a pantry for storing food items only. I didn’t want to just put food in overhead cabinets or other areas that were designed for clothing or other accessories. The pantry that I settled on allows me to store my food and know where everything is located at any given time.

Although my pantry is rather small, it does allow me to pack enough food into it for 3-4 days with no worries. A pantry can easily be built into a van conversion by using some creative methods. Whether it’s a slim cabinet that goes from floor to ceiling or a space-saving slide-out option, there are plenty of ways to build something useful.

I’ll use mine as an example of how simple it is to build a useful pantry designed for storing food.

Building A Pantry in a Van

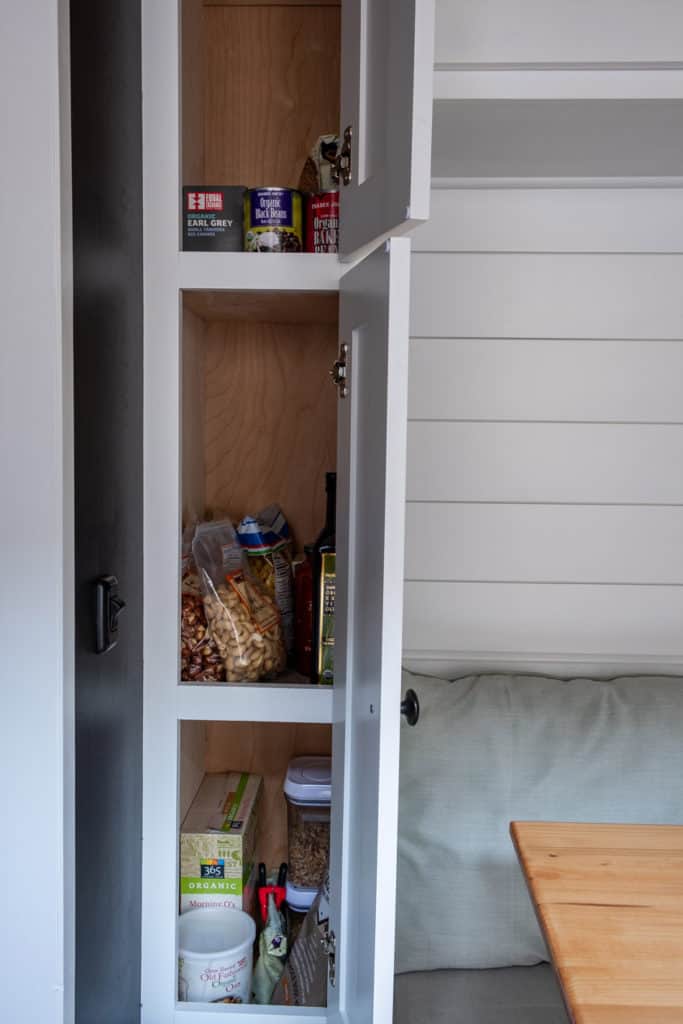
Vertical view of pantry in van

To build a pantry in your van, you’ll need to figure out the best location. Ideally, it will go near your kitchen area or dining area. In reality, since a van is so small, it can go anywhere. Since you are usually only an arms reach from most anything in a van, the best location is subjective.

Some people even choose to store food in portable storage totes that can then be stored in other unused areas, such as the garage area. This allows you to keep food out of the way until you need it. It also allows you to easily pick and pull ingredients for cooking both indoors and outdoors.

To build a small pantry in your van, you may consider doing something similar to what I have done in my van. I chose to create a narrow shelving system that is positioned next to my shower and is part of my dinette. This area is out of the way and still allows me to use the dinette seating but gives me additional storage that’s handily accessed from my kitchen area.

When I’m cooking, all I need to do is turn around, open a cabinet door and all of my food items are organized. While not as large as a pantry in a house, the items you do store will be easily accessible and you can easily re-stock this area as needed to make items handier for when you do need them.

Van food pantry rough build

The structure of my pantry was built using 1/2 inch plywood. I build it as a standalone cabinet and then installed it in the van once completed. It’s a simple cabinet with two static shelves in it. If you want to improve on what I did, you could choose to make the shelves adjustable.

Van pantry during construction

I finished it off the exact way I did my overhead cabinets. This consisted of installing cabinet facings and shaker-style doors. The look of the cabinet matches the style seen throughout the rest of my van. I split it up into two doors to make for more interest and I didn’t want such a long door that might warp in the changing temperatures.

Food pantry opened and closed

I also added shelf liners and this allows food to be stored without ever moving around.

The bottom area of my pantry is a little larger and can store bigger items while the top two shelves are smaller but can still hold a good amount of food. I can also store food in my lower cabinet that is built just off the floor. Items in here generally consist of items that might be awkward or bulky such as potatoes, onions, and dog food.

Van pantry bottom shelf

The items that can be a little more neatly stored can be placed on the upper shelves of my cabinet. This is a simple system that has been my solution and has worked well on all of my trips thus far.

Ways To Improve

After using this pantry for a while now, there is room for improvement but overall, I have been happy with it. However, there are a few things I might change if I wanted to improve the setup.

  1. Use adjustable shelves. If I only add small items in each shelf location, it leaves a lot of space where additional food could be stored if I had the shelves to do it with. This may not seem like a big improvement, but in a small area, every square inch matters. Multiple shelves that could easily be adjusted, removed, or added would be helpful.
  2. Add bungee netting under shelves and inside the door. This is an upgrade I will be making soon but it has only been on my wishlist for now. Bungee netting installed under shelves would allow for adding small items that may be awkward to store. This might include items such as instant oatmeal packets, sugar packets, ketchup packets, etc.

You can adjust this type of pantry based on your needs. If you don’t need as much food, you can build a smaller or slimmer one. You may be someone who hardly needs any storage because you keep everything in your fridge and freezer if equipped. I do this as well but there is also limited room in those compartments so additional space makes a difference. My wife and I spent 4 days on a trip recently and we had enough groceries for the entire trip contained within my pantry and top-load fridge and freezer combo.

If you have a small fridge or you use a lot of dry ingredients, a pantry like this or a dedicated cabinet comes in very handy.

Perhaps the best tip I have with food storage is to store all food items in the same area. It’s frustrating not having enough of a food storage area that you end up packing food items into areas where clothes are stored. This makes a nightmare out of cooking and just distracts from the overall feel of a home.

Tips For Storing Food in a Camper Van

  • Store all food items in the same area. It makes more of a homey feel when you have all food items stored in the same area. This way, you won’t be digging through cabinets and chucking clothes just to find a can of beans.
  • Plan for enough storage. Understand how much you normally eat and the max amount of storage that you might need for trips. Obviously, the more people you have or the longer your trip, the more difficult it will be to determine this. It sure is handy to have enough space to neatly organize a food pantry when out on the road. It is especially handy when boondocking and you don’t want to leave camp just to go in town to a store somewhere. You may not even be nearby a store when out in the boonies so plenty of storage will make your trip more pleasant.
  • Make sure it’s secure. Food items can be heavy and depending on what you are storing, might end up crashing on the floor and rolling around your van. Be sure you have planned an area that allows for food items to be stored safely. I created bumpers with the cabinet facing so that items can not roll out. As long as I don’t stack items on top of each other, I have never had a problem.
  • Use Shelf liners. Using a good shelf liner will help to keep your food secure. I used Gorilla Grip liner in my pantry and my food stays in the same place no matter how wild I drive.
  • Purchase the largest fridge and freezer combo that you have space for. You can store a lot of food in a fridge and freezer which makes it easy to know exactly where everything is at. There have been times when nearly everything I took with me was stored here. This allowed me to keep my pantry empty and I was able to store other items in this area.

Conclusion

Having a pantry in a camper van is a great way to keep food items separate from everything else you are storing. While some people just store food wherever it can go, or even in a plastic tote, it is handy to have a dedicated area where you don’t have to dig and look around to find something.

Put some thought into your layout as you are building it and build a pantry in an area that allows for easy access when you are in the area where you will be needing the food the most. Although a camper van is a small space, you still want to maintain a sense of convenience rather than having to move things out of the way or climb up into the bed to get to a cabinet. It makes the process much easier if everything has its place.

While a camper van is small, food storage need not be a problem if planned out accordingly and you utilize and maximize every square inch of your van with a lot of thought.

Camper Van vs Pop-Up Camper

As a child, I often went camping in a pop-up camper. I thought it was so cool to hook a small box-on-wheels up to the truck and head off into a week’s worth of camping at the lake. I loved the idea of easily pulling this little trailer around and then turning it into a larger camper once we got to our location. Although it wasn’t as fancy as some of the other campers in the campground, it had all that we needed.

A pop-up camper is akin to a tent but better. With a pop-up camper, you have a hard shell that easily expands into a roomy space with soft fabric sides (usually). Although, probably not a great idea to use one of these in bear country, they can be great for the casual camper who doesn’t need a lot of space.

The cool thing about pop-up campers is their space-saving design. They make a great choice for those looking to use it occasionally and then store it when not in use. A pop-up trailer camper will easily fit into a regular-sized garage.

You may be wondering why anyone would even compare these two types of camping solutions. After all, they are much different. I certainly agree that they are quite different. However, they do have some things in common and many who choose van life might also see the benefit of choosing a pop-up camper as an option.

  • They both have a small living space.
  • They are both minimal in design.
  • Both are easy to travel with.
  • They are designed for a couple of people.

Camper Van & Pop-Up Camper Similarities

There are a surprising number of features that make these two types of campers similar. If you are in the market for something with a small living space, either may work for you.

Small Living Space

A pop-up camper is not a large camper. Compare a typical pop-up to a camper van and you’ll see that both offer a livable space but not one that will accommodate a large family. The typical living area inside a pop-up camper will be very similar to what you will find in a camper van. Both usually have a decent amount of amenities but you’ll likely need something bigger if comfort and maximum room to stretch out is your goal.

A Cozy Space For a Minimal Amount of People

As a kid, I went camping with my best friend every year. We took a pop-up camper but only his parents got to sleep in it. My friend and I slept in a tent outside. This was probably for multiple reasons but one of those reasons is that the space is really designed for a minimal amount of people. We would gather in the pop-up camper each morning for breakfast. However, there was barely enough room for all four of us to eat.

The size of these types of camping solutions is perfect for a person or two but more than that and it can get very crowded inside. The same can be said for a camper van. The size of the living space really makes it best suited for one or two people. I’m perfectly fine in my van by myself but throw in another person and it starts to get crowded.

With that being said, a small space like this makes for a cozy place when out in nature.

Minimal Design

The design of small camping spaces like this doesn’t usually include fancy features that you might find on larger RVs. While the space can be well laid out and useful, it’s not going to offer the level of elegance that you might expect from a larger rig.

My van is set up as a basic living structure. Although it does contain everything you could need, it doesn’t go above and beyond with entertaining features. The same can be said with a pop-up camper. It gets the job done for such a small package but if you are looking for an elaborate setup, you may want to keep looking further.

Easy For Traveling

Rather than a cumbersome large travel trailer, a pop-up camper allows you to have a spacious environment that folds down into a manageable, towable box-on-wheels. Pulling a small trailer like this is much easier than pulling a larger trailer. It also doesn’t require a powerful vehicle to be able to pull it. Since they are lightweight, nearly any vehicle will be capable of pulling them. Compare this to a camper van and you’ll find that both are quite easy to maneuver around when compared to other options.

A camper van is the smallest type of drivable RV. A standard van, like the RAM Promaster that I drive, is not much different from a standard-sized vehicle. It makes parking in regular parking spots possible. Likewise, you’ll find it easier to park your vehicle with a pop-up camper in tow than you will if you are towing a large travel trailer.

Camper Van & Pop-Up Camper Differences

Although they have some similarities, there are a few discernible differences when considering these two types of camping solutions.

A Camper Van is Drivable

The most obvious difference between these two types of RVs is that one is drivable and one is not. A pop-up camper will need to be towed with another vehicle. However, this may not be a bad thing if you already have a vehicle anyway. If you are looking to travel lightly, a small pop-up camper could be just what you need without spending a ton of money.

It’s definitely nice to have a motorhome that is a vehicle and living area all in one place. However, many people like to separate the two. Just because you have to pull a pop-up camper with another vehicle doesn’t mean it is difficult to travel with. As mentioned earlier, the small size makes it easy to tow.

A Camper Van is Always Set Up

When comparing these two options, the winner for the most convenient has to be the camper van. With a camper van, you just get in and get going. Once you arrive at your location, you can simply walk from the driver’s seat to the living area and begin to enjoy your stay.

On the other hand, with a pop-up camper, you will have some setup to do before you can enjoy it. Setting a pop-up camper up is not difficult but it does take some time. It’s usually just a matter of parking it, leveling it, and then raising the roof! This is usually accomplished with a hand crank. There are final supports and braces that need to be installed but it really isn’t difficult to do.

Setting up a pop-up camper is just an added inconvenience but it can be part of the fun.

A Camper Van is Usually Self-Contained

A pop-up camper isn’t always self-contained depending on the model that you choose. They won’t always be equipped with toilets and showers. The space inside simply doesn’t allow for it. However, since these are usually parked at a campground, it isn’t a problem. Most campers who don’t have access to these amenities inside their camper make use of the ones provided at the campground. It’s just part of the experience of “roughing it.”

Camper vans can be the same way although many camper vans on the market come with toilets and showers installed. Just like any other motorhome, these drain into a gray or black water tank so that you can dump them later. This makes them completely self-contained.

A Pop-Up Camper Has Soft Sides (Usually)

Most of the pop-up campers on the market feature soft sides that create the walls of the camper. While the base of the camper is solid, the walls and ceiling that are cranked out are generally made of a material similar to that of a tent.

These would not be optimal in an area where bears may be. Not only that but they may also present a problem in colder weather.

Price

The price is usually what determines the type of RV you will choose. There may be a substantial difference between the price of a camper van and a pop-up camper. This will depend on what route you go and what type you choose to buy. Buying a brand new camper van may set you back $60k – $100k or more. Compare that to the relatively low cost of a pop-up camper at around $15k – $20k for a really nice one.

The prices are even less if you choose used models but you will still end up paying more for a van than you will a pop-up camper. Since you will probably already have a vehicle to tow it, a pop-up camper will usually be the lowest cost option.

Bottom Line

While these two are vastly different, they also share a lot in common. If you are in the market for a camper van, this article probably won’t sway you. However, if you own a vehicle capable of pulling a pop-up camper, you could save a lot of money for a nice, compact living space.

A pop-up camper won’t be as convenient but it will still allow you to enjoy easy travels or just some quality time away with your family in the great outdoors. They make great low-cost options for those looking to spend time doing some occasional camping.

Van Conversion Light Switches: Choosing and Installing

A conversion van will usually have all of the necessary components needed for a living space. This includes lighting and a way to control the lighting. Light switches are commonly installed in the walls similar to what you will find in a home. Unless you have simple lighting that has built-in switches, you’ll need some kind of switch to control each light circuit that you install.

I went back and forth on this particular part of my van build because I was torn between simple switches and more advanced options. On one hand, I wanted something a little more modern than the standard options on the market. However, on the other hand, I wanted to keep my build simple so there would be less to go wrong in the future.

There are a few different options to choose from that are popular with van builders. These options vary from simple on and off switches to ones that are touch-sensitive.

In the end, I chose the most simplistic option on the market. The ones I chose include a simple toggle switch that only has two options: on and off. These are just like the ones that turn the lights on and off in a home, only much smaller and designed for a 12-volt circuit. The only exception to my simplicity rule was that I opted for a couple of switches that included dimmers. Since the LED lights I installed are dimmable, I wanted to be able to control this feature using switches.

Van Conversion Light Switch Options

Light switch options will vary depending on the system that you have installed. However, with most systems being built around a standard 12-volt system, there are a few popular options that most would consider. The following options were on my list when I began the process of installing the lighting system in my van.

Lights With Built-In Switches

These are the simplest types of lights and switches to work with since everything is already built-in. All you need to do is connect the light to a power source and then everything else should work as intended. There is no fussing around with installing switches separate from the lights. If you are going with a minimal setup and only need a few lights in key areas, these may be your best option.

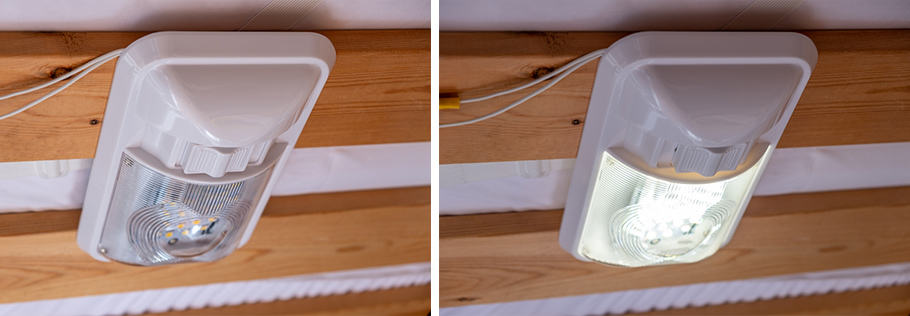
LED lights with built-in switches

The lights pictured above (affiliate link) are installed in my garage area and were simply wired to my 12-volt power source. As you can see, the built-in switch allows me to turn each one on independently and they were super easy to install. These work great in areas where you need extra light but want a simple install. They were the obvious choice for my garage area since they could be flush mounted and it doesn’t really matter how they look.

Simple On/Off Switch

When you think of turning on your lights, you may think of just using a simple on and off switch. These are standard in most homes and allow you to either turn the light fully on or fully off with the flick of a switch. These are basic toggle switches (affiliate link) that complete a circuit when turned on and then break the circuit when turned off.

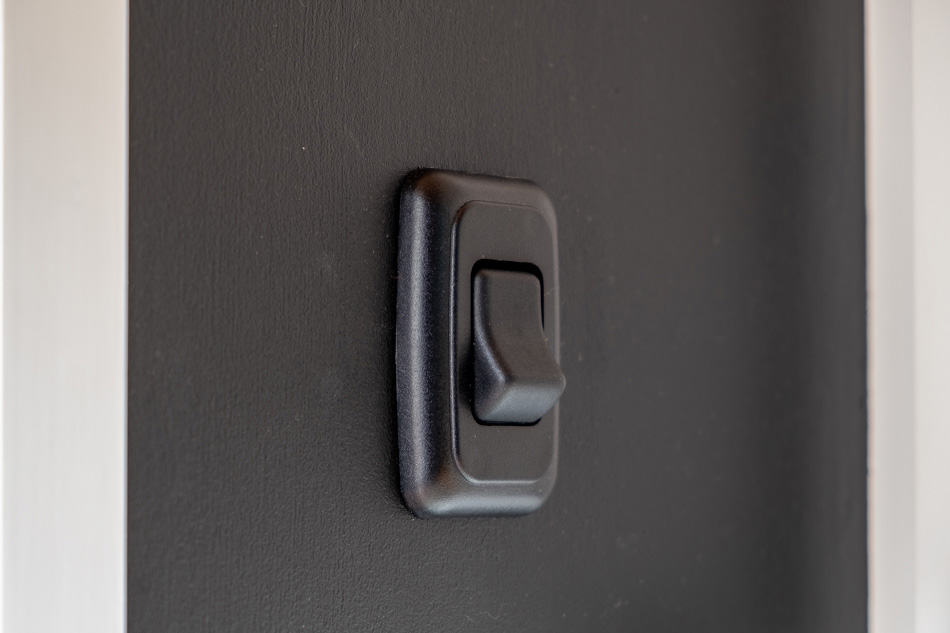
On/off light switch

These are the best choice if you have a lighting system that needs no dimming control. I have a simple switch like this installed in my shower because I only wanted the light to be on or off when using it in that location. These types of switches are cheap, small, and easy to install.

Simple On/Off Switch with Dimming Control

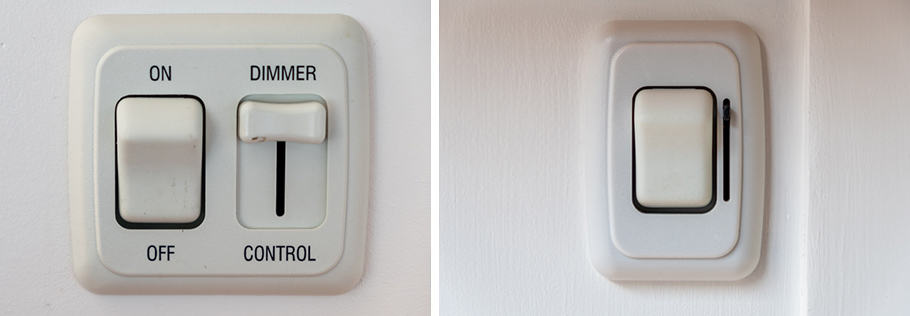
Similar to a simple on and off switch except it has a dimming slider that allows you to control the brightness of the lights. These types of switches come in different shapes, sizes, and looks. One of the most popular options for RVs and van conversions is the option as seen in the following picture.

Dimming light switches

While these have somewhat of a dated look to them, they work great, they are reliable, and are small enough to fit into the thin walls of a camper. They are also easy to connect to a light circuit. I used both types in my van build and they control my main light circuits in my van.

Large dimmer switch (affiliate link)

Small dimmer switch (affiliate link)

Touch Activated Light Switches

Similar to the dimming switches above, these offer the same functionality with a different interface. These are a bit more elegant and have a modern feel to them. If this is important to you, you may want to see if these will fit into your van build. These switches will give an updated look to your van conversion.

Touch. activated switch

You can also use a switch that is similar to the previously mentioned switches that I installed in my van. These switches look similar but they have touch functionality rather than a switch and slider control.

Dimmer switch

Installing Light Switches In Van Conversion

To install light switches, you’ll need a circuit of lights that the switch will control. LED is the best choice for those seeking low energy usage along with a long-lasting solution that will give plenty of bright light. Many LED lights are dimmable so having a dimmable switch will allow you to enjoy all the benefits that they offer.

Once you have a light circuit that is installed in a parallel circuit, you can commence installing the switch to control it.

For a simple switch, you’ll need a ground wire along with a hot wire that will attach to the back of the switch.

For a dimmable switch, it will be just a little more complicated. You’ll need a ground wire along with a hot wire and a neutral wire to control the dimming feature.

Let’s look at how my switches are installed.

On/Off Switch

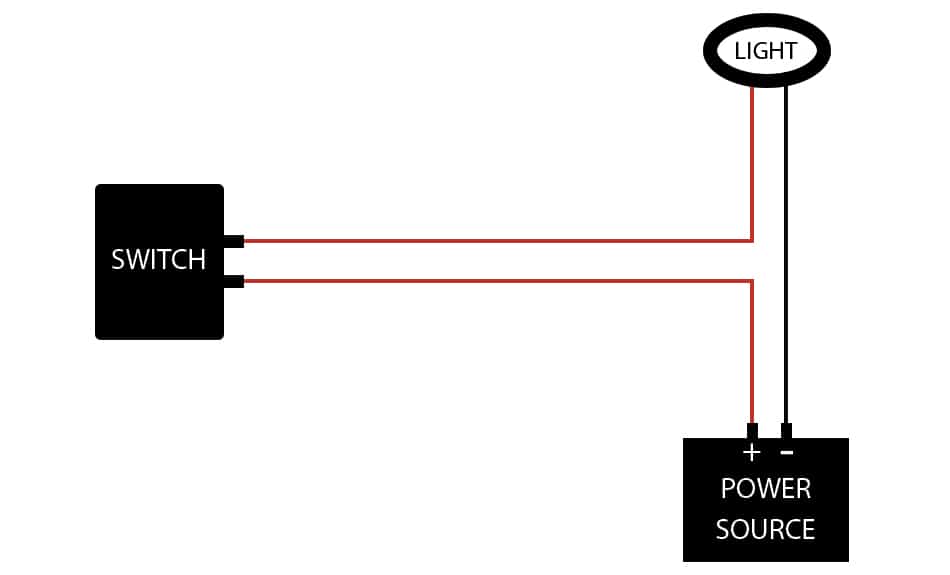
For my shower, I installed one light on the ceiling. The wires for this light run down the wall to where the switch is located. From the switch, I have two wires that run to my power source. This leaves me with two wires from the light and two wires that run to the power source (4 wires total).

Installation

The black (ground) wires get connected together so that it creates one wire that goes straight from the light to the power source. In theory, you can run this ground wire directly from the light to the ground of your power source.

The red (hot) wires will be connected to the light switch and will allow you to open and close the circuit.

Diagram of van conversion light switch

I only had one light for this on/off switch circuit but it will be the same whether you have one light on the circuit or multiple lights on the circuit. If connected in parallel, you will end up with two wires coming from the circuit.

Once connected, the switch simply allows you to close or open the circuit. When the circuit is closed, electricity can flow to the lights from the power source. When the circuit is opened, electricity will not flow and the lights will not operate.

Dimmable Switch

A dimmable switch will work just like the standard switch with an additional wire for operating the dimming feature. As an example, I used a dimmable switch for my main living area. This area contains four LED lights that are all connected together in a parallel circuit. This means that all the reds are connected together and all the blacks are connected together leaving me with one red and black wire.

Installation

The black wire of the switch will combine with the ground wires in the circuit and connect to the ground or negative terminal on your power source.

The red wire connects to the positive side of your power source, which in my case is my fuse block that is connected to my Goal Zero Yeti 1400.

The dimmable switch that I used also has a white wire. The white wire will connect to the hot side of the light circuit (red wire in my case). See the image below for a diagram of my connections.

Van conversion dimmable light switch diagram

Once connected, the dimmer will control how much electricity is flowing to the light circuit. If you have the dimmer at full power, all the voltage will get through to the lights causing them to fully light up. If the dimmer is at 50%, only 50% of the voltage will get through to the lights and they will only shine at 50% brightness.

Most light switches will contain instructions so be sure you are installing your switches according to their instructions. While the concept will be the same for most switches, the execution may differ. Some switches may have wire leads that hang out while others may have screw terminals that you’ll need to place the wire in and tighten down. Some may have different colored wire colors than mine did. Either way, light switches are easy to install and will provide you with a convenient way to control the lighting within your van.

Conclusion

There are lots of different options to choose from for switches to control the lights. Every van build is different and each builder has different needs. I preferred to use the most simple solution because they were cheap, easy to install, and there isn’t much that can go wrong with them. They give you a satisfying click when you turn them on and off so there is no question as to whether the switch worked. Other than normal wear and tear from switching the lights on and off, I don’t foresee any issue with these simple switches.

11 Reasons To Buy An RV

While there are a lot of reasons that you shouldn’t buy an RV, I would like to look at why an RV might be a good purchase. Whether you are considering a small camper van, a travel trailer, or a large Class A motorhome, there are benefits to owning each.

While people often shudder at the price of an expensive RV, whether or not it is worth it will ultimately depend upon how much you will use it. It’s a big decision and with some RVs, you are going to have to spend a lot of money for ownership. You probably have a lot of doubt building up as you wonder whether it’s a good decision or not.

While many will tell you to avoid the purchase, I’d like to be the positive one and tell you why you SHOULD purchase one. However, these reasons are just my opinion as someone who has owned RVs and spent years working for one of the largest camping and RV dealers.

I currently have fun traveling in my camper van and enjoy it much more than any other type of travel. It brings a whole new level of enjoyment to my trips.

While you are doing your research and learning about why you shouldn’t purchase an RV, take the time to consider the 11 reasons below. They might just help to balance out your list and give you enough confidence to go for it!

11 Reasons To Buy An RV

1) You’ll Have The Time Of Your Life!

There is no doubt that traveling in my camper van has been one of the most amazing things I have ever done! In fact, I have been camping in lots of different RVs over the years and have always had lots of fun. It’s just hard to beat what an RV has to offer in terms of getting you away from the norms of life yet still allowing for some of the same routineness.

It’s unlike camping in a tent and for those who aren’t keen on “roughing it,” an RV can be a great compromise. You’ll still get to spend time outdoors but you’ll do so in luxury. Imagine being able to pack up your home and head to whatever location you wish to go. This is the benefit that you’ll enjoy by owning an RV.

An RV can take you anywhere (depending on the size and type) and can allow you to see things you might not ordinarily see. You’ll have the time of your life as you drive to locations and enjoy the leisurely lifestyle that is so popular within the community. An RV provides you with the opportunity to reduce stress, live life to the fullest, and enjoy every second of it.

2) Traveling Will Feel More Like Home

One of the worst parts of traveling is spending time in someone else’s bed. The typical vacation involves you spending time in hotels or rental homes that just aren’t home to you. You have to lug around a suitcase and then either live out of it or spend time setting up some semblance of home.

While it can be fun to break away from ordinary life and live in a strange place for a few days, too much of this can get old. This is where an RV will come in as the clear winner when compared to normal vacation travel. An RV allows you to take your home with you no matter where you go. Whether you are at the beach, in the mountains, east coast, or the west coast, your home will be set up the same.

You can count on your clothes being in the same closet, your pots and pans in the same drawer, your favorite chair being there just the way you like it. Home will be set up the same in your RV wherever you go and you won’t have to spend time getting used to a strange location.

3) You Might Save Money

Saving money with an RV isn’t always possible or even expected depending on the type of RV you have. However, it is possible to save money if you purchase a good used RV and then live with the intention of saving money. If you plan on doing a lot of traveling, an RV can be a great way to do it while spending less money. The cost of stays at RV parks are much less than stays at hotels.

Of course, there are other costs associated with owning an RV that could add up so you’ll need to do the research before assuming money will be saved. Insurances, poor fuel efficiency, repair costs, and depreciation will all need to be considered. However, when you compare RV travel with other types of travel, you may be surprised at how much money you can save.

There are many ways to ensure that you are saving all that you can while living the lifestyle. Cooking your own meals, choosing lower-cost destinations, boondocking, and choosing an RV with great fuel economy are just a few.

4) You Might Make Money

When you own an RV, you own something that other people might want to use without buying for themselves. This means that you may be able to rent out your rig to others. By doing this, you will be able to earn some additional income from something that might otherwise sit dormant for periods of time.

I wrote a post here about renting out your RV. There are some things you should know before doing it and it’s definitely not for everyone. However, it’s a great option if you want to recoup some of the costs of RV ownership.

You might not make enough to pay for the RV itself but it can provide you with an additional income to supplement the cost of the RV.

5) Less Stress

How stressful is it to drag your luggage through an airport, stand in crowded lines, and deal with all the other stresses involved on trips? It’s getting worse and worse as more people are flying and more restrictions are being put into place. Taking a flight can be a nightmare and might make you want to pull your hair out if you aren’t the patient type.

On the other hand, traveling in an RV is like living life on your terms. You have your home on wheels and there is no checking in, no waiting in lines, no dealing with other rude people. You just hop in and go wherever it is you are going. The only trouble you might have are crowded roadways but you can always plan around that.

There may also be the occasional overcrowded RV park but even those are better than crowded airports.

The point is that you have options with an RV. You can avoid crowds and the normal stressors that might be present on normal vacations. There is a sense of peace that goes along with having all of your belongings with you no matter where you go. It always makes me feel less stressed knowing that I don’t even have to stop somewhere to find a bathroom. The flexibility you have when traveling in an RV makes it a more pleasant experience.

6) You’ll Have A Cleaner Stay

Owning an RV gives you a clean place to stay no matter where you go. Just knowing that you are the only one sleeping in your bed can be the reason for more satisfaction over staying in hotels and other places. You’ll enjoy the fact that others aren’t sleeping in your bed, sitting in your chairs, using your bathroom, and doing gross things in the same living space as you.

This is a typical concern of travelers as they check-in and out of hotels in hopes that the room they are staying in has been properly cleaned. You don’t have control over the cleanliness you may experience and the only option you’ll have is to complain to management, or leave for a different place.

With an RV, you are in control! It’s your environment inside and yours alone. You will know how clean it is because you and your family are the only ones inside. This makes for a more pleasant stay knowing that you are in control of everything that goes on inside your living space.

7) More Family Time

Family RV trips can be a lot of fun as you travel to different places with your loved ones close by your side. It gives you the perfect opportunity to share some amazing experiences with your family. You’ll be packed in close and tight with each other. While this may lead to some uncomfortable situations and general annoyances, you’ll make some wonderful memories along the way.

Families that travel on RV trips spend a lot of time at the campground or enjoying the outdoors together. It’s a relaxing experience and there is plenty of time to enjoy the simple things like playing games and just enjoying each other’s company.

While some children might get bored with the whole idea, there are many ways you can add variety and fun to the schedule. Traveling in an RV with a family can give you the perfect opportunity to spend quality time together. It’s a fun way to add a different type of vacation to your family’s repertoire.

8) You’ll Vacation More

Having an RV gives you an always-ready option for going on short excursions. Rather than the once-a-year vacation that families typically enjoy, you’ll be ready to get away for a weekend anytime throughout the year. What’s more, you’ll also spend less on these short trips depending on where and how far you travel.

I go on lots of weekend trips in my camper van because it’s just so easy to load up and head out. I can plan on staying at a Harvest Hosts location, a Hipcamp location, or find an RV park off the beaten path. I can head out for a few days and spend a minimal amount of money. The only costs may be the cost of my location or goods purchased at a business.

With this convenience, you are more likely to take more time for enjoying it. Packing the family into the RV where everything is already set up is much easier than driving somewhere in a car and paying for hotel stays. Besides that, you paid a good amount of money to obtain the RV in the first place so you’ll want to use it as often as possible.

9) Travel With Your Pets

Dog lying on camper van bed

One of the main reasons I love to travel in my camper van is that my dog can go with me. It’s more comfortable for her to be in a place she knows than to take her from new place to new place. She knows that the camper van is home and her food and water bowls are always in the same spot. It gives her more of a feeling of home when we are traveling and helps to take the edge off. She is naturally very anxious on trips and being in the camper van helps her, even if just a little.

Besides that, it’s easier to deal with a pet in a larger RV than it is when traveling in a passenger car. Since space isn’t as cramped, the pet can stretch out rather than be packed in the back seat or your lap.

Most RV parks are dog friendly and the RV community, in general, is full of pet lovers. You will see many dogs and cats with other RVers if you spend much time out on the road. It’s why many of them choose the lifestyle. It makes a great way to travel with your furry friends and include them in the family fun.

10) No More Public Bathrooms

Finding a place to stop and use the bathroom may be a thing of the past once you own an RV. For me, it has been a great part of the whole experience. If I feel the urge to go, a stop at a rest stop or a service station is all I need. The only difference is, I only use the location to park and I never have to leave my van. I do my business in my van and then I’m on my way without having to deal with public restrooms.

I really miss it during the times when I am traveling without my camper van. I find myself wishing that I could just pull over and have that same convenience that I have been spoiled with. I like my privacy so having a toilet in my van is one of the best parts.

11) You Can Live In It Full-Time

Not only can you enjoy owning an RV for the fun adventures it can take you on, but it can also be your primary residence. Living in an RV is a popular option that many people are choosing in this day and age. Many people retire and hit the road full-time in their RV. Most large RVs have everything you need to live a comfortable life while traveling to anywhere you wish. With an RV, you are no longer confined to an area that you may or may not like. Instead, you can travel to different locations and enjoy life in whatever location you desire.

An RV can also be used as a temporary living arrangement if needed. If you are having work done on your home or building a new house, your RV can serve the purpose of a temporary home while you wait. Although not as livable as a large home, an RV can give you a permanent shelter to travel in and spend time crossing off items on your bucket list.

Bottom Line

An RV can be a great purchase if you buy it for the right reasons. However, if you are expecting to purchase an RV, use it for a while, and then sell it, you will likely lose money. You will have to be okay with this before you decide to purchase. Purchasing an RV is almost always a bad investment so you will need to justify the purchase in other ways unrelated to coming out ahead financially.

An RV isn’t right for everyone and many people would list an RV as something that they regretted purchasing. This is subjective and will all depend on your intentions. If you have a longing to get out and explore the great outdoors, an RV can be a great start towards achieving this. However, if you have never been on an RV trip before, you might consider renting one before you pull the trigger on buying one.

While an RV isn’t right for some people, it’s perfect for others. If you have the budget for one, do your research and choose one that is best suited for you and your family. The best one for you will be judged by the cost, size, type, ease of use, future sell-ability, and other factors that you deem important. After you have done your research, chosen the perfect RV, you can look forward to enjoying some awesome adventures with it!

How Much Does A Van Conversion Cost? A Detailed Breakdown

Converting a van to a camper can be a costly undertaking. Many people don’t realize just how expensive it can be. Until you have gone through the process, you might not understand how costs can add up. It’s important to have a budget and know beforehand about some of the additional costs that you may run into along the way.

A van conversion will cost in the range of $5,000 to $25,000 and beyond. The final cost of a conversion will depend on the complexity and quality of the build. A DIY conversion will be the most affordable but may end up less than stellar if you are not experienced.

The problem with determining the exact cost of a van conversion is that there are an unlimited amount of floorplans and features that you might choose. Along the way, you may decide on doing something different than you had originally planned for. This can cause additional costs and they keep adding up if you keep veering from your original plan.

With the popularity on the rise for van conversions, unique ideas are being seen all over the internet that might make you reconsider yours. It might cause you to spend more money changing it into the new cool idea you saw.

In this article, I would like to share with you the approximate amount that I spent on my van conversion. This was a challenging process and the initial budget I had set was surpassed throughout the build process.

VAN COST

$23,300

CONVERSION COST

$10,000

TOTAL COST

$33,300

SectionPrice
Insulation$904.17
Flooring$358.92
Ventilation$493.00
Ceiling$375.89
Walls$270.58
Kitchen$1571.60
Cabinetry$215.00
Bed$344.00
Dinette$534.00
Shower/Toilet$345.97
Electric$2163.26
Plumbing$293.49
Upgraded van features$994.29
Miscellaneous items$800.00
Tools$400
$10,064.17

Let’s look closer at each different area of my van layout and how much was spent in each area. This won’t be an exact accounting for every piece that was included in the build. Instead, it will include most of the larger items with some estimated numbers for smaller, miscellaneous items.

Hopefully, this will give you an idea about how much yours is likely to cost. If you are planning to build something similar to what I have, your cost may be similar. However, you can certainly do it for cheaper and of course, you can always spend MUCH more on it.

Planning A Van Conversion

I have learned from experience that planning a van conversion should be well thought out and based on YOUR needs. Make a plan and stick to it if you expect to come in on budget and time. It’s also a good idea to sketch a design beforehand. Many people do this in different ways. I chose to use my iPad, Apple Pencil and an app called GoodNotes. I was not exact in my dimensions and only wanted a general idea of what my finished layout would look like.

I created an entire notebook dedicated to each part of my van build and created sketches along the way. This helped me to stay on track rather than leaving me scratching my head about what I was going to do next.

You can take this design process as far as you want and even make it exact using online software like Sketchup. However you choose to sketch your design, be sure and plan as much as possible. Staring a difficult task like converting a van needs a solid plan or else it will become overwhelming. Flying by the seat of your pants is no way to create a fully functional conversion van.

Once you have your plan, it will be time to determine your budget and then stay as close to it as you can. To give you an idea of what it might cost, I have laid out my entire van build below and have included the cost of each section. As you can see from above, my total van build was around $10,000.

The following breakdown will help you to see exactly where those costs came from.

Cost Breakdown

Below you’ll find the products and prices that I paid for each section of my van build. While your results may vary, this should help to give you an idea of what it might cost if you do a similar build as I did.

Initial Van Purchase

$23,300

I purchased my 2017 RAM Promaster 2500 159″ wheelbase van in 2018. It was only a year old and had 27,000 miles on it. It took me a while to find the perfect van for my needs but as soon as I did, I jumped on it. Learn more about the process of finding my van here.

van conversion parked near beach

Insulation

ProductPrice
20 feet Thinsulate$250.00
30 feet Thinsulate$365.00
3m Adhesive spray (3)$30.00
GAF (3) 1 inch poly iso boards$60.00
Sound deadener & roller$138.00
Refelctix$61.17
$904.17

I also used insulation on the floor which is counted in the flooring calculation below.

I went all out on insulation because I wanted to make sure that it would stay as cool as possible in the summer. I live in a hot and humid part of the country and summers get very hot. In reality, no amount of insulation will keep you comfortable in the summer heat inside a metal van. However, having a good amount of insulation is better than not having enough.

The other reason I may have gone overboard on insulation was that I wanted it to help deaden noises. I was able to achieve a good amount of sound deadening utilizing sound deadener and Thinsulate. These two products combined helped to create a quieter ride along with a quieter interior at the campsite.

Flooring

ProductPrice
Furring strips$30.00
Plywood sub floor$78.00
2 1/2 inch boards polyiso$20.00
Great Stuff$3.50
Paint$8.00
JB Weld$15.00
Liquid Nails$10.00
Permatex Liquid metal filler$4.42
Vinyl Plank FLooring$190.00
$358.92

This was the real start of the van build as I did quite some work to build up a subfloor in order to put in floor insulation and vinyl planks. I patched holes, painted the floor, and had it looking brand new before I ever began the floor building process. I probably did more than I needed to on this part and could have saved a little time and money. However, I wanted the foundation to be near perfect before I started the rest of the build.

Ventilation

ProductPrice
Maxxair Fan$203.00
Lap Sealant$10.00
Butyl Tape$15.00
Metal Jigsaw blades$10.00
CR Laurence window$245.00
Rustoleum paint$10.00
$493.00

Ventilation is such an important part of a van conversion. You might not realize it if you have never lived in a van but once you begin traveling in one, you’ll want plenty of ventilation. My main ventilation comes from my Maxxair fan on the roof and one vented window in the rear of the van above my bed. Air circulates nicely throughout the van using this combination.

Ceiling

ProductPrice
1/4 in. x 3-1/2 in. x 96 in. Cedar V-Plank$115.50
Poplar board for back 1×6$15.39
Acegoo recessed lights (8 lights)$70.00
Rivet nuts$25.00
Bolts$30.00
Furring$25
Wiring for lights$25
Switches for lights$70
$375.89

The main cost of my ceiling was the cedar planks along with the recessed lighting. I made sure to install enough lighting so that the small living space would be nice and bright. The cedar planks are cheap enough and look great in a van build but be aware that you’ll need to purchase more than you need if you go this route. Unfortunately, a lot of the pieces in the box are unusable. I saved these pieces and cut them into smaller pieces to be installed inside my overhead cabinets.

Walls

ProductPrice
Shiplap (12 planks)$57.08
1 Gallon of paint$30
1x2x8 trim (3)$11.00
1x3x8 trim (1)$6.00
1x6x8 trim board$11.50
Misc. (screws, spackle, trim)$75
Furring$80
$270.58

My walls mainly consist of furring strips and shiplap. I did it in sections and it was difficult to keep track of since there was a lot of time that went by between sections. The walls weren’t very costly and you could even make it more affordable if you just cover it in a sheet of thin plywood or other solid material.

Kitchen

ProductPrice
Sink$78.96
Faucet$100.37
Sink base build$100.00
Butcher block countertop$100.00
Drawer slides/handles$75.00
Refridgerator – Dometic CFX 75DZW$782.27
36″ Refridgerator slides$80.00
Eureka Stove$40.00
Pots & pans$60.00
Plates, cups, silverware$60.00
Kitchen utensils / Tools$35
Misc. (Screws, bolts)$60.00
$1571.60

The kitchen is usually one of the costliest projects during a van conversion. The cost of it will depend on how fancy you want it. Including a built-in oven with a connected propane tank will cost more than my simple cooking setup did. Mine is basic but useful for me. The main cost was the refrigerator which I got for a deal.

Besides that, I did the work myself and built all of my cabinets, the sink base, and drawers.

Conversion van kitchen view

Overhead Cabinetry

ProductPrice
Wood for cabinets$120.00
Screws & bolts$25.00
Door hinges$50.00
Door handles / knobs$20.00
$215.00

I built a lot of cabinets in my van and they provide a great amount of storage. The main cost of cabinets is the wood to build them with. This isn’t always easy to estimate but you can assume that you will need more than you actually do. Wood isn’t very expensive and you are likely to use it all somewhere during your build. Besides the wood, hinges, knobs, and other items will make up the bulk of the cost for building cabinets throughout your van.

Bed

ProductPrice
Wood$40.00
Ikea Slats$30.00
Full size mattress$125.00
Mattress cover$39.00
Mattress encasement$30.00
Misc. parts (bolts, screws, etc.)$20.00
Bedding, Sheets, Etc.$60.00
$344.00

The bed was quite simple to build and was one of the first things I did. It gave me a great sense of satisfaction to have gotten the first major framing project done. While the cost wasn’t much, you can see how the cost of parts begins to add up. The bed itself was super cheap to frame up and turn into a sturdy bed.

I went pretty minimal so there wasn’t much room for me to save money on this part of the build. I did go overboard on the mattress covers because I didn’t want any kind of dampness getting to the bed. I encased it in a waterproof cover and then an extra cover on top of that. Essentially there are two waterproof covers on the bed but you don’t feel them when you lay on the mattress. It just feels like a comfortable mattress.

If you are building a bed that converts to something else, you will probably spend more than I did. However, you may also save money in other parts where I didn’t.

Inside camper van looking out at ocean

Dinette

ProductPrice
Lagun table mount$189.00
Banquette bench (custom built)$100.00
Seat cushions$150.00
Wood for pantry$40.00
Tabletop & finishing$35.00
Misc parts (screws, shims, wood)$20.00
$534.00

My dinette is one of the most used areas in my van and I love the way I set it up. I’m not sure I’d do it any different than I did it. I built the entire bench area and it is a great place to sit and have meals, or just relax.

Shower / Toilet

ProductPrice
24 x 32 Shower Pan$156.97
HEPVO Trap$33.00
Shower strainer$8.00
3/4 x 2 x 4 plywood for floor$28.00
Thetford cassette toilet$100
Light switch/wiring$20
$345.97

I went all out on my shower because I am often in remote locations and I do a lot of hiking, biking, and other outdoor adventures. My shower allows me to wash off easily, hang wet clothes and gear, and also gives me a private area to use the toilet. I did all of this for an affordable price but it sure wasn’t easy!

Electric

ProductPrice
15 ft MC4 Cables$30
MC4 Branch Connectors$8.47
MC4 to Anderson Connector$34.99
(2) 100 Watt Panel$305.26
Coroplast$22.98
Goal Zero Yeti 1400$1526.35
MC4 Branch connectors (no cables attached)$6.79
1.5 foot exension cable$9.26
Renogy MC4 assembly tool$6.35
Cable glands$10.39
Goal Zero Regulated cable$30.00
100ft 14-2 wire$46.94
Fuse Block$41.00
Split loom$4.89
Terminal to Anderson cable$20.00
Fork Wire terminals$7.00
Terminal block$5.87
Romex wire 12-2 (25 ft)$19.26
10 gauge wire 5 ft & terminal ends$19.46
Heat Shrinks$8.00
$2163.26

This was my favorite part of the whole build because I got to geek out on the whole solar setup. While I didn’t build a super expensive system as many people do, I built what was right for me and my needs. This was the most expensive part of the build and it was mainly due to the solar generator that I used.

You can usually expect to pay in the thousands for a good solar setup in a van so know that before you get started. If you choose a custom solar setup capable of delivering enough power to run your life full-time, the price tag can get very expensive.

Buying Tip

If you can time this to where you are purchasing these parts around the holidays, you might be able to get great deals. I got my Goal Zero Yeti 1400 for a lot cheaper around Black Friday than I would have any other time of year. Between the Yeti 1400 and the flexible solar panels, I saved over $500 from what I would have normally paid so be aware that these types of items often go on sale at various times of the year.

Plumbing

ProductPrice
Water pump$83.32
Accumulator tank$37.48
Water pump filter$15.00
Silencing kit$20.19
Plumbing PEX$10.00
PEX fittings, crimps$10.00
16 gallon freshwater tank$72.50
5 gallon graywater tanks (3)$45.00
$293.49

Plumbing was quite a challenge for me! Installing a water system in a van was not a standard job so finding parts that worked was often difficult. I spent a lot of time at The Home Depot in the plumbing aisle trying to figure out how to piece my system together. I purchased things I didn’t need, returned them, and repeated the process until I was successful.

Looking back now, I realize that the plumbing system was quite simple and next time I’ll know better. I used PEX and highly suggest it if you are converting your own van. It’s so easy to work with and the seals are rock solid as long as you have the right tool and fittings. I have one freshwater tank that supplies my entire van including the shower and the kitchen sink.

Upgraded Van Features

ProductPrice
Swivel Seat mount passenger$265
Rearview camera with housing$139.95
Sony stereo system kit$324.34
Running boards$265
$994.29

I didn’t spend a lot of money upgrading my van as I wanted to put more money into the actual living area. Many people deck out their vans with fancy upgrades like new rims, tires, roof racks, etc. While I may add some of these in the future, I chose to keep it simple for my initial build.

However, there were a few things I needed to upgrade. Mainly, I needed a backup camera because my van didn’t come with one. I also installed a new stereo unit that would display the camera view and allow me to use CarPlay. Besides that, some of these other items I installed and consider van upgrades were much needed for a better experience.

Upgrades are going to relative to your build and desires. You may not require anything which will be good for your bottom line.

Miscellaneous & Uncategorized

Total: $600.00

There were lots of miscellaneous items in my build that just didn’t really have a category. I ended up putting them into a miscellaneous category in a spreadsheet. These included screws, bolts, spacers, various cuts of wood, and other oddities. These types of things add up over the course of a van build and you will find that it can become difficult to keep up with all the odd parts you are buying.

After a while, the difficulty of the van build was on my mind more than keeping track of every little part. These “nickel & dime” items add up quickly but are difficult to keep track of unless you are super meticulous with your tracking game. I will admit that I failed in this department but it’s all part of the experience.

That’s why it’s so important to realize in the beginning that you will probably spend more than you think you will. You’ll be buying small parts here and there to solve a problem and the small costs will become a large part of the overall cost in the end.

I tracked a lot of these items but I estimated a lot of them as well. The point is to realize that there will be uncategorized items throughout your build that will add up.

Tools

Total: Approximately $400

Unless you have a shop stocked with every tool known to mankind, you will probably need to purchase or borrow some along the way. I had to purchase a few items that were necessary to get the job done. These weren’t super expensive and they made the job so much easier.

Most of the tools that I purchased were not one-off tools that I will only use once and never again. Instead, they are useful items that I have already used around the house and will use many more times in the future.

The tools I purchased included items like:

  • Miter saw
  • Kregg Jigs
  • Saw blades
  • Nail gun
  • Staple gun
  • Rivet nut tool
  • Drill bits
  • Tape measure
  • etc.

Bottom Line

After all was said and done with my camper van, I had tallied up a total of around $10,000 and it’s gone well above that now. I have continued to add and fix things along the way so, in reality, a van conversion is never really completed. Just like a home, you’ll find that something different will work better and you’ll renovate areas from time to time.

Beyond that, you’ll discover that some of the things you did during your build were just plain stupid. I have had a few problem areas that I needed to go back and address which added more cost. However, if you are careful with your planning and have at least some experience with DIY projects, you will come out just fine.

How Long Is A Conversion Van? 6 Examples

One of the main benefits of traveling and camping in a van is the small size that gives you more freedom. A conversion van is small in size but mighty in what it can offer in terms of living space and convenience. Though there are differences in various models of vans, most conversion vans are shorter and easier to drive than standard RVs.

A conversion van ranges from about 18 ft to 24 ft in total bumper to bumper length. Because of this short length, a conversion van offers a very livable space inside a compact footprint. They are easy to drive, park, and maneuver through tight places where larger RVs may struggle.

If you are considering purchasing a van for conversion, the difficult part of the process is which one to choose? The sizes of today’s vans are similar but differ slightly in areas that matter. Some are longer and some are wider so you will really need to determine your needs and then you will be able to make a wiser choice.

Below, let’s look at some of the most popular vans for conversion that are currently on the market. These are the vans that you will typically find being turned into campers.

Most Popular Vans For Conversion

The following chart shows the length of the most popular vans for conversion in the US. They are listed in order with the longest van being first and the shortest being last.

NOTE: Specs taken from the manufacturers’ websites on the latest 2021 models except for Ford Econoline which was discontinued in 2014.

Van MakeModelTotal Length InchesTotal Length Feet
RAMPromaster 136WB213.1 in17.75 feet
Ford2014 E-250216.7 in18.05 feet
FordTransit Regular Medium Roof217.8 in18.15 feet
FordTransit Regular Low Roof219.9 in18.32 feet
ChevroletExpress 2500/3500 Regular224.05 in18.67 feet
MercedesSprinter 144 Standard/High Roof233.5 in19.45 feet
FordTransit Long Medium/High Roof235.5 in19.62 feet
RAMPromaster 2500/3500 159WB236.1 in19.67 feet
FordTransit Long Low Roof237.6 in19.8 feet
NissanNV 1500/2500/3500240.6 in20.05 feet
ChevroletExpress 2500/3500 Extended244.05 in20.33 feet
RAMPromaster 3500 159WB EXT250.5 in20.87 feet
FordTransit Long-EL High Roof263.9 in21.99 feet
MercedesSprinter 170 High Roof274.3 in22.85 feet
MercedesSprinter 170 Extended High Roof290 in24.16 feet

We can determine from the list of vans above that the shortest length is 213.1 inches (17.75). The longest van on the list is 290 inches (24.16 feet). This is quite a big range with more than six feet separating the longest from the shortest. While this may not seem like a substantial amount of difference, it is!

The extra amount of space can give you more room to work with inside allowing for a more spacious living area. However, a longer van comes at a cost since it will be a little more challenging to drive and park.

Let’s look further at each van and discuss some good reasons for choosing that particular van.

Ford Transit

Maximum Length: 263.9 inches (21.99 feet)
Minimum Length: 217.8 inches (18.15 feet)

The Ford Transit is quickly becoming a favorite for conversion vans as it has a lot to offer. With the longest van coming in at nearly 22 feet, it offers plenty of space to set up an amazing living space. Beyond the length of the van, the Transit also has lots of headroom (in the high roof option) and a good amount of width (on the 2021 models).

I have looked at this van in person and considered it for my build but at the time, the narrow width kept me from purchasing it instead of the Promaster (discussed below). I love the comfort of this van and driving it is a pleasure. The new Transits have a luxurious feel to them and it feels as if you are driving a comfortable car. You won’t even feel like you are driving a large cargo van.

With the Transit now available in a 4×4 option, it has become a great option for those looking to convert a van to a camper.

Mercedes Sprinter

Maximum Length: 290 inches (24.16 feet)
Minimum Length: 233.5 inches (19.45 feet)

The choice of luxury can be found in the Mercedes Sprinter. Living up to the Mercedes name, the Sprinter gives you a high-tech, comfortable ride along with lots of space for a killer living area. The total length of the longest Sprinter van comes in at over 24 feet long. This is quite a long van that can accommodate a super roomy living space.

You can also opt for the shorter version if you don’t want the added length or don’t need all that space. The shortest van coming in at around 19.45 feet is plenty for a roomy conversion, depending on the design. The benefit is that it will be easier to drive and park making it a truly mobile adventure mobile.

The Sprinter is for those who need the longest van possible. If multiple people will be staying in it or you are a family with children, the Sprinter is your best choice. The longest version is quite a bit bigger than what you will find with the other makes and models on the market.

RAM Promaster

Maximum Length: 250.5 inches (20.87 feet)
Minimum Length: 213.1 inches (17.75 feet)

I chose the Promaster for my conversion and am mostly happy with it. It’s a great van for the most part that has a nice wide interior for a spacious layout. Many choose this van for a few different reasons.

  • It’s wide enough to accommodate a sideways bed.
  • It’s more affordable than other options.
  • It has a powerful V6 that gets great fuel mileage.
  • It’s easy and cheap to work on.
Empty Promaster van ready for conversion

The van has a good amount of length and comes in an extended version that gives a decent amount of extra space over the standard lengths. My van is a 159WB and has a total length of 236.1 inches. I can easily maneuver it nearly anywhere I want it and with the great turning radius of this van, it’s super easy to drive.

I do have some complaints about it such as it being uncomfortable to drive. It’s has a very minimal cabin without a lot of the comforts found in more expensive vans.

Read more about my experience with the RAM Promaster here.

Nissan NV

Maximum Length: 240.6 inches (20.05 feet)

It has a weird look but offers a nice amount of space to design a beautiful camper van. Although I don’t see a lot of these vans converted to campers, the high roof option makes a great choice. The length of the NV is more than that of my Promaster 2500 so it is a very useable van in regards to the size.

I am partial to Nissan because I have always owned Nissan trucks. I’m familiar with the typical layout and overall feel of driving these vehicles. These are typical of Nissan and will be familiar to anyone coming from any type of Nissan vehicle. It has a nice comfortable interior and is a pleasure to drive.

Chevrolet Express

Maximum Length: 244.05 inches (20.33 feet)
Minimum Length: 224.05 inches (18.67 feet)

If a low-roof workhorse is what you are looking for, the Chevrolet Express is a tried and true model that will get the job done. Although you won’t have the headroom of the other high roof vans, you’ll have a length similar to those mentioned above. Many awesome conversion vans have been built using this chassis and it certainly has its benefits.

It’s great for those who are going for the stealthy look and don’t want to be seen as a camper van. Converting one of these can be super affordable since you can get them used for a great price. Many people choose this type of van and then add a pop-top to it. In the end, you end up with a spacious van with plenty of headroom thanks to the additional height the pop-up adds.

Ford Econoline

Maximum Length: 216.7 inches (18.05 feet)

As a blast from the past, the Ford E-Series vans can still be seen all over the place as company work vans. These are also workhorses similar to the Chevy Express mentioned above. Although the Econoline is no longer manufactured, it can still serve as a great van if you find a good used one.

Similar to the Chevy Express, it can serve as an excellent choice for a stealthy camper van. It has a roomy interior and with a pop-up roof added to it, it can make for a great conversion van.

Summary

As you can see, a conversion van isn’t much different in length from a large full-sized truck. For example, the Ford F250 Crew Cab LWB comes in at 266.2 inches (22.18 feet) in total length. Even the smallest F250 Regular cab is 231.8 inches (19.31 feet) long. This is about the same length as my RAM Promaster camper van that I converted. If you are used to driving a full-size truck, a conversion van won’t feel much different unless you find yourself in one of the longest ones on the market.

Conversion vans come in all shapes and sizes but any of them can be designed in a way to accommodate a comfortable living space. Whether you go long or short, a conversion van makes a great, agile home out on the road.

Camping In A Van – 10 Tips For Making It Awesome!

I’m am amazed each time that I take a trip in my camper van that I am actually pulling it off. There is something amazing about driving your small home around and parking it somewhere for the night that just seems surreal. Even after camping many different places over the past few years, I still get a little giddy each time I pull into a camping spot.

As the evening sits in and I find myself going about my normal routine as if I were at home, I stop and think about how amazing it is.

Camping in a van is a unique experience but one that will make you feel right at home if done right. Most converted vans or manufactured Class B RVs have all the comforts of home so it’s just the experience of being in a new place that makes it different.

Though a van is small, you can still have the time of your life if you have it set up right. A van that is set up to maximize the space is going to be one that will give you the best experience when camping.

After all the traveling and living in my van that I have done, I have gathered a few tips for making it an awesome experience. Though I am still figuring out hacks and ways to maximize my enjoyment, the list below will help give you ideas of ways you can make camping in a van fun.

1) Have The Right Expectations

Camping in a van is going to be a different experience than what you might experience if you are used to something larger. The square footage of a camper van is generally much less than 100 square feet. However, this amount of space shouldn’t deter you even if you have multiple people. A well organized and thought out van design will offer a comfortable and roomy trip.

However, even the roomiest van is small and cramped in comparison to larger RVs. It will be best if you set your exceptions so that you will not be disappointed. Most everyone that camps or lives in a van will probably tell you that along with the good, comes the bad. On one hand, it is nice to have a small vehicle that can go nearly anywhere. On the other hand, the limited space can make for some challenging living arrangements.

If you have multiple people camping with you, expect it to be tight inside the van.

There have been times when I was staying in an RV park and could see much larger rigs all around me. Oftentimes, windows are open and you can see inside as they are cooking or lounging in their nice, large living space. I have often thought of how nice that would be as I look around at my tiny 70 square feet.

However, I have also watched these large motorhomes and trailers battle to get into a parking spot. It’s nice to know that my van doesn’t have these problems and I can park easily and pack up and be gone easily when the time comes.

A van will provide you with a nice shelter to stay in and allow you to sleep, cook, and live comfortably. However, don’t compare it or expect it to be a luxurious trip or you will be very disappointed.

2) Clear The Clutter With Great Storage

Perhaps the most useful tip for making van camping more of a pleasure is to make use of good storage and keep the clutter at bay. A van is a small living area and I can say from experience that clutter can make the experience less than pleasant. When you keep the place cleaned up, it makes for a nice and organized living space that ultimately makes for a better trip.

There are a few ways to accomplish this other than just being a neat freak. It all starts with the way your van is designed. If you have purchased it, then you’ll have to work with what you have. If you are converting a van, you have the advantage of being able to create storage areas and cubbyholes galore!

Here are a few ideas to help you tidy up your space:

  • Overhead storage. This type of storage is great for keeping often-used items up and out of the way. Clothes, food, cooking supplies, and other essentials can be stored here.
  • Bench storage. If you have seating in your van, make sure to utilize every square inch of it for storage space.
  • Hanging storage. There are plenty of hanging storage options available that can attach to the seats, and walls.
  • Netting. This can be a great way to store odds and ends. Attach it to the wall and it will keep small items from scattering about the van.
  • Multi-use items. Items that have multiple functions are great for small camping spaces. My collapsible ottoman is a great example that serves as a step to my bed, a seat as needed, and a storage box.
  • Hooks & Tie Downs. You can never have enough hooks and bungee cords in your van. These are essential for keeping items secure.

If you put a lot of thought into your storage solutions, you’ll be much happier in your living space. Everything should have its place and be stored there at all times. When camping in a small area, things can get misplaced and lost in the shuffle so it’s important to put things back where they belong once you are finished with them.

3) Pack Lightly

Organizing is easy to do when you pack only the essentials without going overboard. A van is not the place to carry lots of unnecessary items just because you think you MIGHT need them. Instead, it’s a place to carefully consider the most important things you need and only plan for those items to come along.

You’ll be thankful that you packed less stuff in the end and be glad that you won’t have too much extra stuff to pack and keep track of. I’ve always been bad about packing way too much stuff when I travel. I usually pack my bags with things I think I might need but usually end up never touching.

I’ve had to learn a different strategy when traveling in my van. Taking less stuff with me has given me fewer options and allowed me to have a clutter-free space without all the extras that I don’t need. If you are camping in a van, I would suggest packing as lightly as possible.

4) Camp In Remote Locations

Van parked in a remote location

Take advantage of having a smaller RV and head for remote areas rather than sticking to the crowded RV parks. Since you have a van, you can get off the beaten path and go to places that larger RVs won’t be able to go. This is great news for those who want more than the typical campground experience.

Being in remote areas is a great way to enjoy your van as it was meant to be. If you have solar or a generator to enjoy electricity, your in for a great trip! Remote areas beat crowded areas any day and if you have a chance to boondock in a great location, take it!

The times when I have truly enjoyed camping in my van have been those times when I have been alone in remote areas. These areas aren’t always easy to find but when you find that perfect spot, it can be a magical experience. It’s surreal being in a prime location and having your little home complete with electricity, running water, entertainment, and all the other creature comforts.

5) Spend More Time Outdoors

Camping in a van is a little different than camping in a larger RV. Those who have larger RVs might spend more time inside and enjoy the large living space available to them. However, in a van, you are limited on space so you are forced to either make do with it or spend more time outdoors.

A van should be seen as a home base for you and the great outdoors is your living space. A van is plenty big to organize into a livable space but you aren’t going to want to sit in that tiny space ALL the time. It’s a good idea to spend as much time outdoors as possible. When the weather permits, it’s a great idea to sit up an outdoor living space with chairs, a table, and other living features.

Beyond that, planning outings during the day is a great way to be able to use the van for camping but also get away from it when you feel cramped.

6) Cook Your Own Amazing Meals

When traveling in my van, I rarely eat out. Instead, I make use of my fridge and freezer to store lots of food so that I can cook my own delicious meals. It’s so awesome to be able to open up the fridge and pull out all the ingredients you’d expect from a nice cooked home meal.

It’s one of my favorite parts of the experience and I look forward to mealtimes. I love to crank up the camp stove with the sounds and smells that let me know I’m about to have a great meal! No matter the meal, it’s a fun experience to be able to cook it yourself and be self-sufficient.

To do this, you’ll want to have a spacious refrigerator that is able to store the essential ingredients. If you are converting a van, I would suggest a fridge that has a freezer. It can be tempting to go small and install a fridge only or even a cooler, but if you really want a home on wheels, a fridge/freezer combo is the way to go. I have a top load fridge in my van and it makes a perfect solution for a small van.

Having a setup like this will allow you to buy groceries as you would at home and have ingredients on hand for some amazing meals.

7) Make It Self-Contained

A self-contained camper is one that has all the essentials included inside the living space. Everything that you can do can be done inside the van. There are many benefits to having a van or any type of camper that is completely self-contained.

Many places will not allow you to stay unless you have a self-contained RV so it’s extra important in these locations. It’s so convenient having everything available to you in your van. One feature that van-lifers often disagree about is whether or not to have a shower and toilet in a van.

If you don’t have a toilet, it won’t be a self-contained van. You’ll need to go outside the van and find facilities in other places. A shower isn’t a necessity but sure is nice to have. I have both in my van and it’s so nice to be able to shower and use the toilet without leaving my van. A simple cassette toilet will do the trick.

A self-contained van will allow you to enjoy it to the fullest. You’ll be thankful in the middle of the night when you have to get up and use the bathroom. It’s a huge benefit to simply use the bathroom right inside your van and then go back to bed.

8) Add A Bug Screen

I consider this a MUST HAVE now that I have added this feature to my van. It makes the experience so much better when you have a way to keep bugs out of your living space. Back before I had a bug screen, I would open my door quickly and shut it quickly so that I wouldn’t let any bugs in.

Now, I open my door and leave it open so I can enjoy the fresh air and views. I often leave my side door open the entire time I am parked somewhere if the weather is nice. It’s a great way to add a view to your living space and not have to worry about getting eaten alive.

Van side door bug screen

There are many solutions on the market but I created my own DIY solution for my van. Whether you make your own as I did or you buy a more expensive pre-made version, you don’t want to be without this feature. You can add one to the side door and one to the back door if you wish. This will depend on your van layout and the areas you use the most.

The image above was taken in an amazing location where I was able to leave my side door open the entire time. The weather was pleasant and I was in a very private area. This made the whole experience better and without it, my living space would have been filled with mosquitos and other annoying creatures.

9) Add Some Good All-Terrain Tires

Although I’ll admit that I have not done this yet, it is next on my list of upgrades. I have traveled to many areas and some were a little beyond my comfort level with the stock tires I have on my van. While I don’t feel like a 4×4 is necessary for my travels, I do feel like better all-terrain tires will be a difference-maker.

Having a van with all-terrain tires will give you more peace of mind in knowing that you are less likely to get stuck. Even wet grass can be a problem if you have slick road tires and find yourself parked in an odd position in wet conditions. It’s better to have more grippy tires that will work better in areas like this.

If you plan on camping in remote areas, having better tires is a great idea and can make for a better trip.

10) Go Far & Travel Often

Winding road through the mountains

Perhaps the best part of using a van as your camping vehicle is that you can go anywhere you want. There is no need to stay in one area and deal with heat waves or cold spells. If you really want an awesome experience, take that van and travel further. Go to locations that may be off-limits to larger motorcoaches and trailers.

I have been to locations in my van that would not have been accessible if I had been pulling a travel trailer. The small size of my van allowed me to drive right into a tight location without any issues. Besides the fact that your camping vehicle will be smaller, it will also likely get better gas mileage than a larger RV.

Newer camper vans are generally built to get great fuel mileage so going further distances is not as costly. My RAM Promaster van gets around 20 MPG on average which isn’t much different than other vehicles I’ve owned. The fuel economy will vary depending on where you travel but you can usually expect to be pleased with it.

Bottom Line

A camper van can be a lot of fun to own and an awesome experience to camp in. I have had a great time over the past few years with mine and look forward to many more great camping trips in the future. If you are planning on using a van as your camping vehicle, be sure to take the time to set it up properly to get the best use out of it.

A well-organized van has been the key to making it work in my experience. When there are multiple people in the van, it is especially important that you do all you can do to make it as roomy as possible. Otherwise, the messy small space of the van will become a nightmare rather than a fun camping trip.

Whether you plan on going on short camping trips or extended travels, a van is a great way to get it done!

Why Do People Like Hiking?

Have you ever wondered why people like to hike so much? What is it that is so intriguing about walking through the woods or on a trail out in nature? If you are not a hiker, you may think that this activity could be boring and a complete waste of time. With all of our modern-day inventions, you’d think that people having fun hiking would be a thing of the past. However, once you experience an unforgettable hike in an amazing location, you may be hooked for life!

People like hiking because it gets them away from the noise of the world. It’s a fun, easy, and cheap activity that can be very rewarding both physically and mentally. Being in nature makes us happy and allows us to clear our minds, reflect on our lives, and re-charge our batteries.

We are not designed to sit at computers all day or in cubicles, offices, or other places where we lead sedentary lives. Hiking allows us to get away from it all and experience the simplicity of life.

Have you ever added up the time you spend on your phone during the day? What about watching TV? Gaming? Surfing the web? We spend hours each day involved in these activities and I’m no exception. I have my own addictions that keep me occupied more than they should.

It’s not that these activities are bad, it’s just that many people do not balance these activities with other activities that could be more beneficial to their well being.

These beneficial activities include things like exercise, reading, learning, meditating, preparing healthy meals, and of course hiking.

Some people are more concerned with who got kicked off the island or who got kicked off that dancing show than they are about their own well being and growth.

One way to get away from it all is to GO HIKING. Put yourself out there on a trail in the middle of nowhere, put your phone away in your backpack, and get moving.

You’ll find that out on the trail, you are forced to clear your mind. You aren’t distracted by the many things that normally consume your life like TV, music, the internet, and all the other modern conveniences.

It’s like taking a step back in time and the only distractions are the birds chirping or the squirrels shuffling in the brush as you pass by.

When I go hiking, it’s like I have left the world behind for a while. I try to let go of my problems and anxieties. I focus on being in the moment.

I take notice of everything. I force myself to notice things that I would normally just pass up. Maybe it’s green moss on a log or maybe a leaf on the ground that doesn’t look like the others.

Why?

Because if you just go tromping through the woods checking your watch, looking forward to getting back to the car, you really aren’t accomplishing anything.

The point is to slow down and allow your mind to focus on the simple things in life that we take for granted; be amazed at the natural world.

It may sound silly but just give it a try. Take a hike and see how much you can notice. Don’t think about a TV show or texting your bestie. Instead, focus on something that you wouldn’t normally take notice of.

Doing this on a regular basis will give you a new appreciation for the world we are living in.

Why Hiking is Awesome

Hiking is something I have always done. As a teenager, growing up in rural Kentucky, I would set out on my own, hiking through the woods or across the farm. I did this for no particular reason other than getting away from the stresses of being a teenager.

After school, I would set out hiking and it would feel awesome to be the only one in the forest hearing the sounds of the tree leaves blowing in the wind or the stream cascading across the rocks.

This was my happy place and it sparked a love for nature inside me that is still just as strong now as it was then.

Now, in my early 40s, I go hiking for much of the same reason. When I step foot on the trail, I feel as though It’s just me and nature and I can let my thoughts come and go. I can be me without feelings of judgment or the need to fit some predefined mold.

I seek solitude when I am on the trail and when you seek it, you will likely find it. Of course, you can’t go to a highly trafficked trail and expect to have solitude.

Hiking is awesome because it is a great way to recharge your battery. Many people like to do other things to charge their battery like watch sports, play games, or exercise.

However, for me, there is no better way to recharge and to re-focus your priorities than being humbled by the sights and sounds of nature.

Benefits of Hiking

Besides clearing one’s head and allowing one to recharge, hiking can offer many other benefits as well.

  • Provides great exercise that isn’t boring that allows you to burn fat and improve cardiovascular health
  • Allows time outdoors which can help increase sun exposure and Vitamin D levels
  • Provides a great way to clear your mind and focus on the moment
  • Gives you time in solitude which is important for understanding yourself better
  • Lets you discover and explore the amazing natural world we live in
  • Decreases levels of stress that can be exacerbated by the fast-paced world we live in
  • Improves your mood and increases your overall state of well-being

And there are so many other reasons that could be on this list and it may be different for each person.

It also depends on where you hike and what you expect to get out of it. I know that when I go hiking, I am looking to get lost in nature and to focus totally on the moment and the appreciation that I feel for living on this earth at this moment in time.

That’s deep, but it’s true. My hiking time is ME time and it’s like meditation to me.

When I go hiking, I usually am off to myself so that I can enjoy my time in solitude and benefit from some of what the natural world has to offer.

Why Would Someone Think Hiking Is Not Fun?

We live in a time where many people would rather play video games or watch virtual reality than spend time in actual reality. It’s easier to view a hiking trail from a computer than it is to actually get out on the trail and experience it firsthand.

It’s understandable that everyone is different and will like different things but what makes hiking such a bad thing for many people?

  • It’s too strenuous
  • The weather is too hot or cold
  • Bugs are biting – mosquitos is a real problem in many areas
  • It’s boring
  • They’d rather be shopping or viewing man-made structures instead of nature

It comes down to personal preference. Many people will not like hiking simply because they have never been to an epic hiking place before.

If you have never hiked at some of the most amazing places such as the Grand Canyon or Half Dome in Yosimite or The Narrows in Zion National Park, you may think that hiking is just walking in the forest through a bunch of trees.

This may be the case if you live in certain areas in the world but once you hike one of these epic adventures, it may change your opinion on hiking forever.

Hiking amongst the most scenic places in the world might just convert you into a regular hiker.

How To Get Started With Hiking

Bridge over a creek on a hiking trail

Hiking is really simple and mainly requires that you put one foot in front of the other. However, there are some basic things that you should know if you are a beginner or just haven’t done a lot of it.

The list below are things that you should be aware of before you start hiking and will help you to get the most out of your journey.

  • Wear proper clothing – this includes hiking boots or shoes and comfortable, lightweight clothing
  • Go hiking where paths are clearly marked – you don’t want to get lost by guessing your way through difficult trails
  • Hike with a partner or in a popular area where other people are nearby – in case of emergency
  • Pack plenty of water and snacks – depending on the amount of time you expect to be gone
  • Carry bug spray to keep the pesky critters at bay
  • Carry the lightest weight gear that you can get by with, such as a small backpack for holding water and snacks
  • Put your phone away in your pocket or backpack and enjoy the moments as you surround yourself with nature

If you are just starting out, make sure your hikes are short ones. You don’t want to go hiking far off into the woods only to realize you’ve gone too far and will have a difficult time getting back.

How To Make Hiking Enjoyable

If you find yourself out hiking and are not having the time of your life, you may be doing some things wrong. For the most part, putting one foot in front of the other as you meander down the trail enjoying the sights is enough for many people. However, there are a few ways that you can make sure that you are enjoying it even more.

Put Down Your Phone

I have seen so many people on the hiking trail that are hiking while staring at their phones. It always makes me wonder what is so important that people need to stare at their phones constantly? While there are a few times you might want to look at your phone such as to view your GPS or look at a picture you just took, your phone should be packed away otherwise.

To enjoy the hiking experience, you have to immerse yourself in the nature that is around you. Staring at your phone will cause you to miss out on living in the moment and may make you miss some great sites.

Pack Lightly

One of the worst things you can do when you go hiking is to pack too much stuff. I have made this mistake numerous times as a photographer because I often go off hiking with a pack full of gear.

This will make for a long and tiring hike and make you wish you could start chucking things. Many people set out on a hike with a backpack full of gear including water, food, cameras, chairs, bug spray, extra clothes, and other equipment they deem essential.

Some of these items may be essential, especially water and some snacks but think it through before you just go stuffing your pack full of crap. If you are an inexperienced hiker, having a heavy load on a hike may rub you the wrong way and make you never attempt it again.

Bring Plenty of Water

The one thing you don’t want to be without while on the trail is a good supply of water. This is a necessity and the amount you bring will be determined by the weather, the distance you are hiking, and your fitness level. If you are going on a short stroll in cool weather, you probably won’t need as much water as you would on a long hike in the hot summer.

I have also made the mistake of not having enough water on a hiking trail. I recall a time of hiking to Charlies Bunion in the Smoky Mountains and didn’t take nearly enough water. This is an 8-mile roundtrip hike that starts at the Newfound Gap parking lot.

I had a small canteen of water but had drunk nearly all of it by the time I reached Charlies Bunion. I struggled on the hike back and began cramping and feeling lightheaded. It was in June and the weather was hot and humid. I made it back but boy was I glad to get to my van and drink some water!

Be sure and always take plenty of water when you go on a hike. It will be hard to enjoy it if you are dehydrated and struggling like I was.

Bring Plenty of Snacks

Likewise, snacks can be great to have on a long hike. Healthy snacks like fruits, nuts, and trail mix make great options and will help replenish you with the nutrients you need to keep going. I nearly always have a banana or two in my pack along with apples and nuts. These foods hit the spot perfectly when you need replenishing out on the trail.

Be sure and bring plenty of snacks but don’t go overboard. Bring snacks relative to the distance and difficulty of the trail you will be hiking.

Pack a Lightweight Chair

Helinox chair

If you really want to enjoy your hike and you have a super lightweight chair, you may be well served by bringing it. I’m talking about a simple stool or a lightweight camp chair such as the Helinox Chair Zero. This chair only weighs a pound and can be carried in a pack or just carried in your hand.

Earlier, I wrote about the hike I took to Charlies Bunion. I would have given nearly anything to have a chair like this on that hike! I would have loved to sit in something comfortable and just take a load off while looking at the mountain views. Instead, I had to plop myself down on a rock here and there to overcome the tiredness I was feeling.

These chairs are great because they are so light but offer lots of support. You can fall into the chair and rest your legs and back at the same time.

If you want something simpler, a stool chair will do the trick too. These are a lot cheaper but may not be as lightweight as the Helinox chair mentioned above.

Go Hiking With a Friend

Hiking is a great time for solitude but it’s also a great time to connect with friends. It can be fun to hike beside a friend as you talk and laugh together. Nothing beats the time spent with a close friend and doing it out in nature makes it even more amazing.

Next time you get the itch to hike, ask a friend to come along. It will be a great experience for you both and allow you to enjoy all the benefits together. It may even make you closer friends and something you’ll look forward to doing again and again.

Conclusion

Hiking can be fun and many people love to make this a part of their lives. The popularity is increasing since people are seeking an escape from the modern world in which we live.

If you have never been hiking, I urge you to get out and hit the trail. You just might find a new hobby that can not only be beneficial in physical ways but also for your mind.

Those of us who have been hiking for years know that out on the trail, there is a peace that is hard to find in the cities, workplaces, or even at home sometimes. The tail offers fresh air on your face, the smells, sights, and sounds of nature and does wonders to restore your energy.

Boredom While Camping – 15 Ways To Stay Entertained

Camping is a great way to get away from all the noise of the world and enjoy nature with a bit of relaxation. However, some people may find camping boring and seek out ways to entertain themselves during their trip. If you are a full-timer, you might get tired of the same ole routine every day and need a way to spice it up a bit while out on the road.

While I normally don’t get bored while camping, not everyone is the same and some people need to be entertained regularly or they won’t enjoy themselves. Camping offers the perfect opportunity to take it easy and appreciate the simple moments in life. For me, it’s a time to get away from all of the entertainment bombardment that we are so accustomed to in our normal lives. I like to shed the consumption lifestyle and I find comfort in the simplicity that comes with the whole camping experience. These “boring” moments are what I look forward to the most.

If you are one of those who struggle to stay entertained or have children who find themselves bored, the following list is things that you might consider to help you find more enjoyment in your trips. It’s easy to tell you to just turn on the TV or set up your mobile device to play a movie. However, camping is something that is different than the normal world in which we live. While there is nothing wrong with watching a good movie or TV show, this list will seek to introduce other ways to help you entertain yourself.

1) Play Music or Sing

Playing guitar beside campfire

Playing music around the campfire can be a fun way to let go of the stresses of the day, have some laughter and entertainment at the same time. There are lots of small instruments that can travel well and take up minimal space. Some of my favorites include the following.

  • Acoustic guitar
  • Ukulele
  • Banjolele
  • Harmonica
  • Keyboard
  • Recorder

As a guitar player, I can stay entertained for hours playing my guitar so doing something like this on a camping trip would provide me with plenty of entertainment. If you are going to carry an instrument on a camping trip, make sure it is not a super expensive version. You don’t want an expensive solid wood guitar getting banged around along the way. It’s better to find a cheaper instrument that can take a beating and won’t really matter.

Just make sure you are in an area where you are not going to disturb other people. If you are in an area with other people, ask them to join along. The more the merrier and you’ll make new friends at the same time.

2) Play Games

There are tons of games you can play while camping and I’m not talking about video games. Instead, I’m referring to games where you have fun, laugh, and interact with others at the same time. These types of games can be a great way to break up the boredom and enjoy the company of others. Some of the games you might play include:

  • Cornhole
  • Jacks
  • Horseshoes
  • Ringtoss
  • Lawn bowling
  • Mumblety-peg
  • Cards
  • Boardgames

If you are traveling by yourself, it may not be as easy but there are still games that you can play such as puzzles, and word find games. Even video games on your phone or iPad can come in handy in helping to break the boredom.

3) Hiking

Hiking boots and backpack in the grass

My favorite way to add fun and interest to my camping trips is to go hiking. Nearly any place worth traveling to will have hiking trails nearby. Hiking can be a great way to get your mind off of things and explore nature and your surroundings in a way that broadens your senses and allows you to appreciate all that is around you. It’s something that can be done alone or with a family and it never gets old. When hiking, you are always seeing something new and if you are with others, it can be a great time to interact, talk, laugh, and just have a good ole time.

Casual hiking doesn’t require anything special other than a good pair of shoes, comfortable clothes, and enough water to stay hydrated. Learn more about some great reasons that you should be hiking.

4) Biking

Biking is another physical activity that can be done to break the boredom. Not only is it great for adding some fun, but it’s also a great exercise as well as a great way to get around to explore the area that you may be at. Bikes are easy to carry with you in an RV or in almost any other vehicle that you might be traveling in. Biking is fun by yourself or it can be an activity for the entire family. Children will especially love riding bikes. If you have children with you, make sure to include bikes in your packing list so that they will have a fun activity to look forward to.

5) Sightseeing

There is no need to just sit in your camper or tent the entire time you are camping. When you go sightseeing, it doesn’t require much. You can just walk around and appreciate the sights or sit where you are and take in all that is around you. You can seek out animals, rocks, seashells, landmarks, and other interesting things.

6) Reading

If you are looking for something less physical and a lot more relaxing then reading may be the activity for you. Reading while camping can be a relaxing way to enjoy your time and to either gain knowledge or get entrenched into an interesting novel or another type of book. If you are a reader, camping affords you the perfect opportunity to slow down, find peace and quiet so that you can focus on your book. For those who love to read, sitting down with a good book is definitely not boring and is a great way to pass the time if you find yourself with some downtime.

The great thing about the digital age in which we live is how books are delivered. Digital books take up no room and you can have hundreds or even thousands on your device in the palm of your hand. It’s the perfect way to pass the time no matter where you go.

7) Build and Watch the Campfire

Is there any better movie out there than watching a campfire? Most people will agree that a campfire is something to look forward to when camping. It can be a welcoming experience in cooler weather. Sitting by the campfire offers the perfect time to let your mind wander as you stare into the burning embers and converse with those around you while the crackling and popping of the fire can be heard around the campsite. I’d rather watch a campfire burn than a movie or TV show any day!

Stoking the fire and keeping it going is a chore that can be fun and allow you to break the boredom of just sitting around.

8) Cook

Now that you have the fire going, why not break out the roasting sticks and roast some marshmallows, make some S’mores, or whatever other food is your favorite to consume around the campfire? There are many amazing campfire recipes out there and you could get lost for days trying to cook the perfect campfire meal. There is just something extra special about food cooked over the campfire.

Of course, it doesn’t have to be cooked over a campfire. You can cook food utilizing whatever cooking method you wish. Cooking is a great way to add a little excitement and anticipation to your day. Looking forward to camp cooked dinners is one of my favorites parts of the camping experience.

9) Photography

Photographing sunrise in the mountains

As a photographer, this is one of my favorite activities and nearly all of my camping trips revolve around photography. I am always going to locations where I know I can explore and capture some awesome landscape photography. You’ll see all kinds of sights when you go camping. Some may be worth photographing and some may not but it’s fun to seek out the scenes that inspire you. If you have any interest in photography, it’s a great time to take part in the hobby and improve or just have fun doing it.

I enjoy getting up in the mornings before sunrise and getting myself into position for the perfect sunrise opportunity. It’s the anticipation of this that often keeps me up at night.

10) Paint, Draw, Sketch

If you aren’t into snapping pictures with a camera, perhaps you can paint, draw or do other artistic activities. Looking onto a beautiful vista and sketching it with a pencil can be fun for those who have the artistic ability to do so. I can barely draw a stickman but even I could have fun trying to draw an image before me and putting my spin on the scene.

Painting or drawing only requires a few tools and they are all easy to bring with you on your trip.

11) Talk & Tell Stories or Jokes

When all else fails, talking and just sitting around telling campfire stories, jokes, or just talking about the day is something that can be a great way to spend your evening. If you are by yourself, you may not want to be telling stories to yourself and laughing at your own jokes but hey, who’s gonna know? If you are with your family or other campers nearby have joined you, talking is all you need to be able to enjoy your time.

Camping in a campground is a great way to make new friends or just converse with others that may have things in common.

12) Whittle

Perhaps one of those things I do when I am at my highest state of boredom is pick up a stick and whittle it into something. I have done this most of my life as many people have and it can be a fun pastime to pick up a stick, whittle a point onto it, or try to carve something out of it. Oftentimes, I find that I don’t care to make anything, I just enjoy cutting the bark off of the stick. There is something satisfying about running a pocketknife across a stick and cutting chunks off of it. It’s reminiscent of my childhood when I would sit on the porch with my grandparents doing the same thing.

13) Birdwatching

Depending on where you are at, you may have the opportunity to see species of birds that are often elusive. Whether it’s a Bald Eagle, Woodpecker, Spotted Owl, or other bird that is hard to spot, finding different birds can be fun and challenging at the same time. Be sure and bring a book or download information on different species of birds for the area you are going to. It can be a fun game to play with others to see who can spot the most birds from the book. Not only will it keep you on your toes the entire time, but it will also be educational for you and any children that may be camping with you.

14) Astronomy

Milky way sky while camping in tent

As night falls, the stars come out bright and plentiful. If you happen to be boondocking out in the middle of nowhere, the sky may light up with more stars than what you are used to seeing. If you live in a light-polluted area near a town or city, camping in remote locations can be a sight to behold and allow you to see things in the sky that you might not normally see.

It’s the perfect opportunity to look for constellations, planets, and other oddities in the night sky. A good pair of high-powered binoculars are all that you need to be able to see a little closer to objects in the sky. However, if you really want to get closer, you can bring a small telescope on your trip. Better yet, a camera with a long telephoto lens on it can allow you to take your memories home with you. The Nikon Coolpix P1000 is a great option for zooming in close and capturing stunning pictures of the moon and planets. You’ll need a tripod to get the most from it but these items are well worth the cost for the memories you’ll gain.

15) Just Relax

Camping is one of those activities that doesn’t require you to do anything. Once you have arrived and set up camp, it’s time to relax. Anything you do after that is your choice and boredom is subjective. I could just chill and read a book the majority of the time and be fine with it. I do love physical activities such as hiking and photography but my ultimate goal on any trip is to just relax. I just love to sit and listen to nature around me as I enjoy the peacefulness that it brings. It’s a welcoming sound after you have had a particularly stressful week and need to escape from it all.

Conclusion

Camping can be as fun as you make it. If you are the type of person who needs a lot of entertainment, hopefully, the list above will help you find something to do rather than sitting around twiddling your thumbs. Perhaps you find yourself camping with your partner and you aren’t particularly fond of the lifestyle. Sooner or later, you’ll be seeking out ways to add a little fun to the experience.

Camping is something to be appreciated for what it is; a time to unwind and enjoy a more simplistic way of being. However, even the most hardened camper may find times when the boredom is just too much. The list above may help but finding intuitive ways to pass the time is all part of the experience. Each person has different interests so seek out whatever speaks to you and immerse yourself in it rather than thinking about the boredom.