Converting a van to a camper can be a costly undertaking. Many people don’t realize just how expensive it can be. Until you have gone through the process, you might not understand how costs can add up. It’s important to have a budget and know beforehand about some of the additional costs that you may run into along the way.
A van conversion will cost in the range of $5,000 to $25,000 and beyond. The final cost of a conversion will depend on the complexity and quality of the build. A DIY conversion will be the most affordable but may end up less than stellar if you are not experienced.
The problem with determining the exact cost of a van conversion is that there are an unlimited amount of floorplans and features that you might choose. Along the way, you may decide on doing something different than you had originally planned for. This can cause additional costs and they keep adding up if you keep veering from your original plan.
With the popularity on the rise for van conversions, unique ideas are being seen all over the internet that might make you reconsider yours. It might cause you to spend more money changing it into the new cool idea you saw.
In this article, I would like to share with you the approximate amount that I spent on my van conversion. This was a challenging process and the initial budget I had set was surpassed throughout the build process.
VAN COST
$23,300
CONVERSION COST
$10,000
TOTAL COST
$33,300
| Section | Price |
|---|---|
| Insulation | $904.17 |
| Flooring | $358.92 |
| Ventilation | $493.00 |
| Ceiling | $375.89 |
| Walls | $270.58 |
| Kitchen | $1571.60 |
| Cabinetry | $215.00 |
| Bed | $344.00 |
| Dinette | $534.00 |
| Shower/Toilet | $345.97 |
| Electric | $2163.26 |
| Plumbing | $293.49 |
| Upgraded van features | $994.29 |
| Miscellaneous items | $800.00 |
| Tools | $400 |
| $10,064.17 |
Let’s look closer at each different area of my van layout and how much was spent in each area. This won’t be an exact accounting for every piece that was included in the build. Instead, it will include most of the larger items with some estimated numbers for smaller, miscellaneous items.
Hopefully, this will give you an idea about how much yours is likely to cost. If you are planning to build something similar to what I have, your cost may be similar. However, you can certainly do it for cheaper and of course, you can always spend MUCH more on it.
Planning A Van Conversion
I have learned from experience that planning a van conversion should be well thought out and based on YOUR needs. Make a plan and stick to it if you expect to come in on budget and time. It’s also a good idea to sketch a design beforehand. Many people do this in different ways. I chose to use my iPad, Apple Pencil and an app called GoodNotes. I was not exact in my dimensions and only wanted a general idea of what my finished layout would look like.
I created an entire notebook dedicated to each part of my van build and created sketches along the way. This helped me to stay on track rather than leaving me scratching my head about what I was going to do next.
You can take this design process as far as you want and even make it exact using online software like Sketchup. However you choose to sketch your design, be sure and plan as much as possible. Staring a difficult task like converting a van needs a solid plan or else it will become overwhelming. Flying by the seat of your pants is no way to create a fully functional conversion van.
Once you have your plan, it will be time to determine your budget and then stay as close to it as you can. To give you an idea of what it might cost, I have laid out my entire van build below and have included the cost of each section. As you can see from above, my total van build was around $10,000.
The following breakdown will help you to see exactly where those costs came from.
Cost Breakdown
Below you’ll find the products and prices that I paid for each section of my van build. While your results may vary, this should help to give you an idea of what it might cost if you do a similar build as I did.
Initial Van Purchase
$23,300
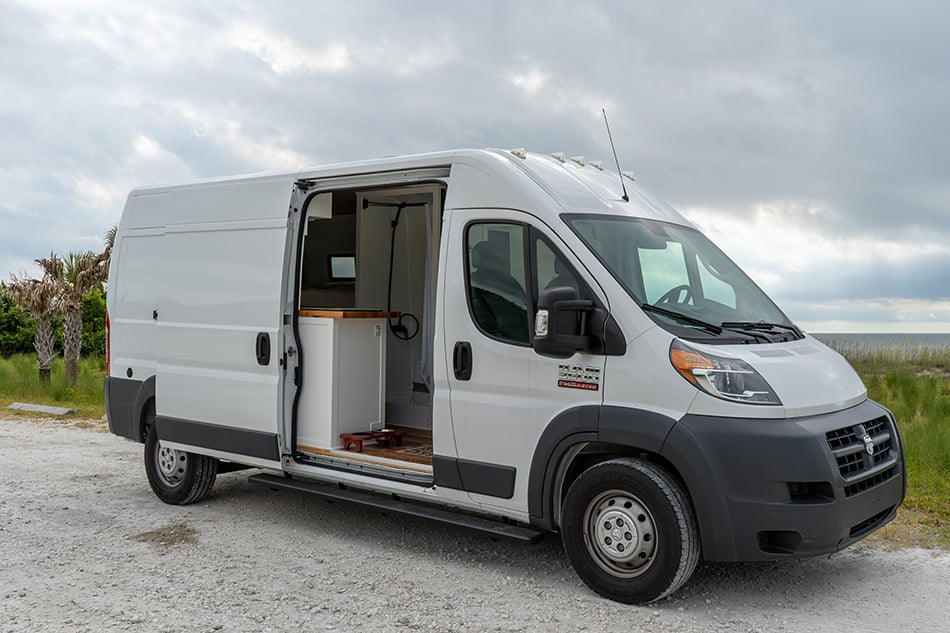
I purchased my 2017 RAM Promaster 2500 159″ wheelbase van in 2018. It was only a year old and had 27,000 miles on it. It took me a while to find the perfect van for my needs but as soon as I did, I jumped on it. Learn more about the process of finding my van here.
Insulation
| Product | Price |
|---|---|
| 20 feet Thinsulate | $250.00 |
| 30 feet Thinsulate | $365.00 |
| 3m Adhesive spray (3) | $30.00 |
| GAF (3) 1 inch poly iso boards | $60.00 |
| Sound deadener & roller | $138.00 |
| Refelctix | $61.17 |
| $904.17 |
I also used insulation on the floor which is counted in the flooring calculation below.
I went all out on insulation because I wanted to make sure that it would stay as cool as possible in the summer. I live in a hot and humid part of the country and summers get very hot. In reality, no amount of insulation will keep you comfortable in the summer heat inside a metal van. However, having a good amount of insulation is better than not having enough.
The other reason I may have gone overboard on insulation was that I wanted it to help deaden noises. I was able to achieve a good amount of sound deadening utilizing sound deadener and Thinsulate. These two products combined helped to create a quieter ride along with a quieter interior at the campsite.
Flooring
| Product | Price |
|---|---|
| Furring strips | $30.00 |
| Plywood sub floor | $78.00 |
| 2 1/2 inch boards polyiso | $20.00 |
| Great Stuff | $3.50 |
| Paint | $8.00 |
| JB Weld | $15.00 |
| Liquid Nails | $10.00 |
| Permatex Liquid metal filler | $4.42 |
| Vinyl Plank FLooring | $190.00 |
| $358.92 |
This was the real start of the van build as I did quite some work to build up a subfloor in order to put in floor insulation and vinyl planks. I patched holes, painted the floor, and had it looking brand new before I ever began the floor building process. I probably did more than I needed to on this part and could have saved a little time and money. However, I wanted the foundation to be near perfect before I started the rest of the build.
Ventilation
| Product | Price |
|---|---|
| Maxxair Fan | $203.00 |
| Lap Sealant | $10.00 |
| Butyl Tape | $15.00 |
| Metal Jigsaw blades | $10.00 |
| CR Laurence window | $245.00 |
| Rustoleum paint | $10.00 |
| $493.00 |
Ventilation is such an important part of a van conversion. You might not realize it if you have never lived in a van but once you begin traveling in one, you’ll want plenty of ventilation. My main ventilation comes from my Maxxair fan on the roof and one vented window in the rear of the van above my bed. Air circulates nicely throughout the van using this combination.
Ceiling
| Product | Price |
|---|---|
| 1/4 in. x 3-1/2 in. x 96 in. Cedar V-Plank | $115.50 |
| Poplar board for back 1×6 | $15.39 |
| Acegoo recessed lights (8 lights) | $70.00 |
| Rivet nuts | $25.00 |
| Bolts | $30.00 |
| Furring | $25 |
| Wiring for lights | $25 |
| Switches for lights | $70 |
| $375.89 |
The main cost of my ceiling was the cedar planks along with the recessed lighting. I made sure to install enough lighting so that the small living space would be nice and bright. The cedar planks are cheap enough and look great in a van build but be aware that you’ll need to purchase more than you need if you go this route. Unfortunately, a lot of the pieces in the box are unusable. I saved these pieces and cut them into smaller pieces to be installed inside my overhead cabinets.
Walls
| Product | Price |
|---|---|
| Shiplap (12 planks) | $57.08 |
| 1 Gallon of paint | $30 |
| 1x2x8 trim (3) | $11.00 |
| 1x3x8 trim (1) | $6.00 |
| 1x6x8 trim board | $11.50 |
| Misc. (screws, spackle, trim) | $75 |
| Furring | $80 |
| $270.58 |
My walls mainly consist of furring strips and shiplap. I did it in sections and it was difficult to keep track of since there was a lot of time that went by between sections. The walls weren’t very costly and you could even make it more affordable if you just cover it in a sheet of thin plywood or other solid material.
Kitchen
| Product | Price |
|---|---|
| Sink | $78.96 |
| Faucet | $100.37 |
| Sink base build | $100.00 |
| Butcher block countertop | $100.00 |
| Drawer slides/handles | $75.00 |
| Refridgerator – Dometic CFX 75DZW | $782.27 |
| 36″ Refridgerator slides | $80.00 |
| Eureka Stove | $40.00 |
| Pots & pans | $60.00 |
| Plates, cups, silverware | $60.00 |
| Kitchen utensils / Tools | $35 |
| Misc. (Screws, bolts) | $60.00 |
| $1571.60 |
The kitchen is usually one of the costliest projects during a van conversion. The cost of it will depend on how fancy you want it. Including a built-in oven with a connected propane tank will cost more than my simple cooking setup did. Mine is basic but useful for me. The main cost was the refrigerator which I got for a deal.
Besides that, I did the work myself and built all of my cabinets, the sink base, and drawers.
Overhead Cabinetry
| Product | Price |
|---|---|
| Wood for cabinets | $120.00 |
| Screws & bolts | $25.00 |
| Door hinges | $50.00 |
| Door handles / knobs | $20.00 |
| $215.00 |
I built a lot of cabinets in my van and they provide a great amount of storage. The main cost of cabinets is the wood to build them with. This isn’t always easy to estimate but you can assume that you will need more than you actually do. Wood isn’t very expensive and you are likely to use it all somewhere during your build. Besides the wood, hinges, knobs, and other items will make up the bulk of the cost for building cabinets throughout your van.
Bed
| Product | Price |
|---|---|
| Wood | $40.00 |
| Ikea Slats | $30.00 |
| Full size mattress | $125.00 |
| Mattress cover | $39.00 |
| Mattress encasement | $30.00 |
| Misc. parts (bolts, screws, etc.) | $20.00 |
| Bedding, Sheets, Etc. | $60.00 |
| $344.00 |
The bed was quite simple to build and was one of the first things I did. It gave me a great sense of satisfaction to have gotten the first major framing project done. While the cost wasn’t much, you can see how the cost of parts begins to add up. The bed itself was super cheap to frame up and turn into a sturdy bed.
I went pretty minimal so there wasn’t much room for me to save money on this part of the build. I did go overboard on the mattress covers because I didn’t want any kind of dampness getting to the bed. I encased it in a waterproof cover and then an extra cover on top of that. Essentially there are two waterproof covers on the bed but you don’t feel them when you lay on the mattress. It just feels like a comfortable mattress.
If you are building a bed that converts to something else, you will probably spend more than I did. However, you may also save money in other parts where I didn’t.

Dinette
| Product | Price |
|---|---|
| Lagun table mount | $189.00 |
| Banquette bench (custom built) | $100.00 |
| Seat cushions | $150.00 |
| Wood for pantry | $40.00 |
| Tabletop & finishing | $35.00 |
| Misc parts (screws, shims, wood) | $20.00 |
| $534.00 |
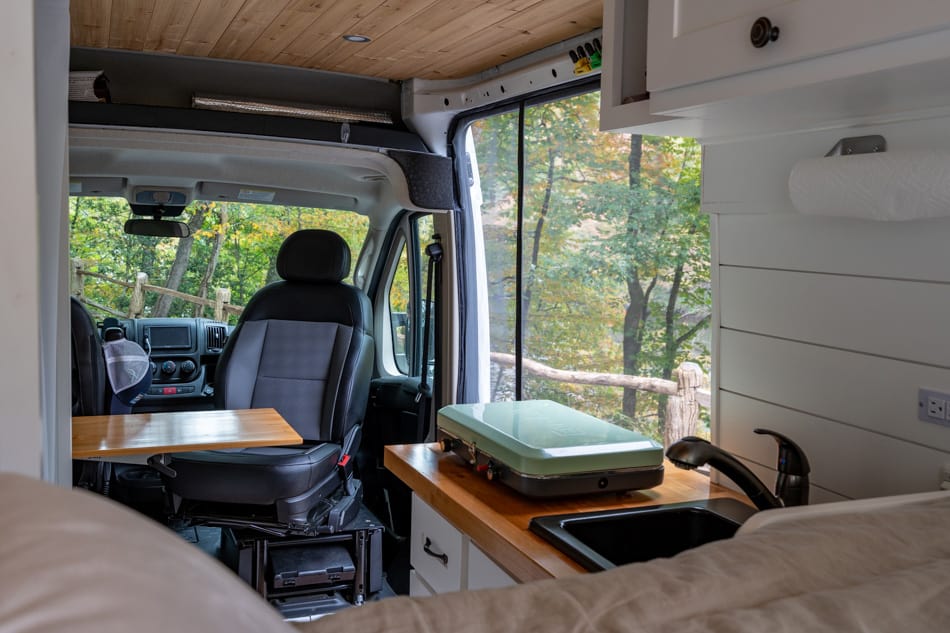
My dinette is one of the most used areas in my van and I love the way I set it up. I’m not sure I’d do it any different than I did it. I built the entire bench area and it is a great place to sit and have meals, or just relax.
Shower / Toilet
| Product | Price |
|---|---|
| 24 x 32 Shower Pan | $156.97 |
| HEPVO Trap | $33.00 |
| Shower strainer | $8.00 |
| 3/4 x 2 x 4 plywood for floor | $28.00 |
| Thetford cassette toilet | $100 |
| Light switch/wiring | $20 |
| $345.97 |
I went all out on my shower because I am often in remote locations and I do a lot of hiking, biking, and other outdoor adventures. My shower allows me to wash off easily, hang wet clothes and gear, and also gives me a private area to use the toilet. I did all of this for an affordable price but it sure wasn’t easy!
Electric
| Product | Price |
|---|---|
| 15 ft MC4 Cables | $30 |
| MC4 Branch Connectors | $8.47 |
| MC4 to Anderson Connector | $34.99 |
| (2) 100 Watt Panel | $305.26 |
| Coroplast | $22.98 |
| Goal Zero Yeti 1400 | $1526.35 |
| MC4 Branch connectors (no cables attached) | $6.79 |
| 1.5 foot exension cable | $9.26 |
| Renogy MC4 assembly tool | $6.35 |
| Cable glands | $10.39 |
| Goal Zero Regulated cable | $30.00 |
| 100ft 14-2 wire | $46.94 |
| Fuse Block | $41.00 |
| Split loom | $4.89 |
| Terminal to Anderson cable | $20.00 |
| Fork Wire terminals | $7.00 |
| Terminal block | $5.87 |
| Romex wire 12-2 (25 ft) | $19.26 |
| 10 gauge wire 5 ft & terminal ends | $19.46 |
| Heat Shrinks | $8.00 |
| $2163.26 |
This was my favorite part of the whole build because I got to geek out on the whole solar setup. While I didn’t build a super expensive system as many people do, I built what was right for me and my needs. This was the most expensive part of the build and it was mainly due to the solar generator that I used.
You can usually expect to pay in the thousands for a good solar setup in a van so know that before you get started. If you choose a custom solar setup capable of delivering enough power to run your life full-time, the price tag can get very expensive.
Buying Tip
If you can time this to where you are purchasing these parts around the holidays, you might be able to get great deals. I got my Goal Zero Yeti 1400 for a lot cheaper around Black Friday than I would have any other time of year. Between the Yeti 1400 and the flexible solar panels, I saved over $500 from what I would have normally paid so be aware that these types of items often go on sale at various times of the year.
Plumbing
| Product | Price |
|---|---|
| Water pump | $83.32 |
| Accumulator tank | $37.48 |
| Water pump filter | $15.00 |
| Silencing kit | $20.19 |
| Plumbing PEX | $10.00 |
| PEX fittings, crimps | $10.00 |
| 16 gallon freshwater tank | $72.50 |
| 5 gallon graywater tanks (3) | $45.00 |
| $293.49 |
Plumbing was quite a challenge for me! Installing a water system in a van was not a standard job so finding parts that worked was often difficult. I spent a lot of time at The Home Depot in the plumbing aisle trying to figure out how to piece my system together. I purchased things I didn’t need, returned them, and repeated the process until I was successful.
Looking back now, I realize that the plumbing system was quite simple and next time I’ll know better. I used PEX and highly suggest it if you are converting your own van. It’s so easy to work with and the seals are rock solid as long as you have the right tool and fittings. I have one freshwater tank that supplies my entire van including the shower and the kitchen sink.
Upgraded Van Features
| Product | Price |
|---|---|
| Swivel Seat mount passenger | $265 |
| Rearview camera with housing | $139.95 |
| Sony stereo system kit | $324.34 |
| Running boards | $265 |
| $994.29 |
I didn’t spend a lot of money upgrading my van as I wanted to put more money into the actual living area. Many people deck out their vans with fancy upgrades like new rims, tires, roof racks, etc. While I may add some of these in the future, I chose to keep it simple for my initial build.
However, there were a few things I needed to upgrade. Mainly, I needed a backup camera because my van didn’t come with one. I also installed a new stereo unit that would display the camera view and allow me to use CarPlay. Besides that, some of these other items I installed and consider van upgrades were much needed for a better experience.
Upgrades are going to relative to your build and desires. You may not require anything which will be good for your bottom line.
Miscellaneous & Uncategorized
Total: $600.00
There were lots of miscellaneous items in my build that just didn’t really have a category. I ended up putting them into a miscellaneous category in a spreadsheet. These included screws, bolts, spacers, various cuts of wood, and other oddities. These types of things add up over the course of a van build and you will find that it can become difficult to keep up with all the odd parts you are buying.
After a while, the difficulty of the van build was on my mind more than keeping track of every little part. These “nickel & dime” items add up quickly but are difficult to keep track of unless you are super meticulous with your tracking game. I will admit that I failed in this department but it’s all part of the experience.
That’s why it’s so important to realize in the beginning that you will probably spend more than you think you will. You’ll be buying small parts here and there to solve a problem and the small costs will become a large part of the overall cost in the end.
I tracked a lot of these items but I estimated a lot of them as well. The point is to realize that there will be uncategorized items throughout your build that will add up.
Tools
Total: Approximately $400
Unless you have a shop stocked with every tool known to mankind, you will probably need to purchase or borrow some along the way. I had to purchase a few items that were necessary to get the job done. These weren’t super expensive and they made the job so much easier.
Most of the tools that I purchased were not one-off tools that I will only use once and never again. Instead, they are useful items that I have already used around the house and will use many more times in the future.
The tools I purchased included items like:
- Miter saw
- Kregg Jigs
- Saw blades
- Nail gun
- Staple gun
- Rivet nut tool
- Drill bits
- Tape measure
- etc.
Bottom Line
After all was said and done with my camper van, I had tallied up a total of around $10,000 and it’s gone well above that now. I have continued to add and fix things along the way so, in reality, a van conversion is never really completed. Just like a home, you’ll find that something different will work better and you’ll renovate areas from time to time.
Beyond that, you’ll discover that some of the things you did during your build were just plain stupid. I have had a few problem areas that I needed to go back and address which added more cost. However, if you are careful with your planning and have at least some experience with DIY projects, you will come out just fine.