
Disclosure: Some of the links in the article below may be affiliate links. This means that I may earn a small commission if you click on them and make a purchase.
If you are like me and want to make sure you have a place to shower while you are on the road, you will want to keep reading. After much back and forth, I decided to build a full-featured shower for my camper van conversion.
In the beginning, I had planned on purchasing a portable shower system to use but decided that I wanted something that felt more like home. I wanted something that would give me the convenience that I was used to while out on the road.
Planning
When planning your shower build, you’ll want to figure out exactly where you want to put it. When building my van, I decided that the bed and shower were the two most important areas and everything else would be built around these. These two areas provided the base of my layout.
I was very flexible in the other areas so after building the full-sized bed, the full-featured shower was next.
Many people locate their showers behind the driver’s seat but I wasn’t keen on doing this since I wanted to make use of the seats in the front on swivels to be used as living space.
I decided in the end that the shower should go right next to the bed. This would create a wall side by the bed that would add a bit of privacy and separation from the sleeping area as well as free up space in the front of the van for a dining area and swiveling seats.
Measurements
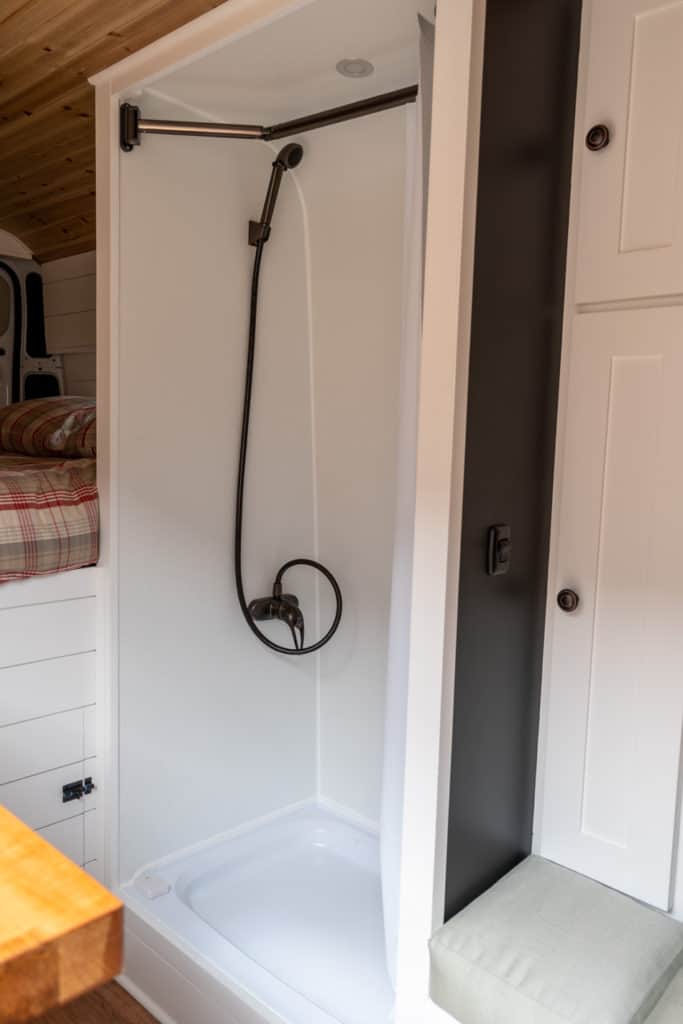
The shower pan that I chose measured 24 x 32. This is a small shower pan but it is plenty for my van conversion. At first, I considered a 36-inch wide pan but that would take up too much space in the van.
Underneath the shower pan would are a 3 1/2 inch gap that would make room for the drain system and provide me with a way to make repairs if needed.
Framing
Perhaps the most difficult part of the whole shower installation was the initial framing for the shower.

The reason this was so difficult is that you have to initially get the framing squared with the floor for the rest of the shower to end up straight and squared.
This took a little work and a lot of ingenuity to make sure I had everything perfectly straight before I continued.
This was a common thing as I progressed throughout my van build and I found myself scratching my head, wondering how to get something squared and straight.
The first step was to build the first wall. The first wall would be attached to the bed that I had already built. Once this wall was up I would then have a squared wall in which to build the rest of the shower upon.
This was easier said than done.
One thing that made this difficult is the floor was not perfectly straight. Even though I had built my floor up and made it straight with a plywood subfloor, The sides were up a few millimeters higher than the middle so I had to account for this in order to get my first wall street.
I used a standard square to get the wall as straight as possible and then I simply eyeballed it against the rear window to make sure that it was straight.
After the first wall was up, I was able to then frame the rear wall and this was a bit tricky since the van walls curve. I used 1×2 furring strips and bolted them to the metal frame as they slightly bent on their way up.
This created a contour on the backside of the shower that followed the shape of the van.
For the rear wall, I used 1/4 inch plywood since this plywood was easy to bend. I fastened a sheet of this to the furring strips that I had bolted to the wall.
Once the rear wall framing and plywood wall were up, I was then able to build the third wall frame.
The third wall was just a matter of measuring 32 inches from the first wall that I built and I was able to square the wall up with the first wall by using a good ole fashioned tape measure.

I also used a squaring tool to make sure it was as close to square as possible.
After this, I had three walls framed and now I just needed to add plywood to the two side walls.
However, first I needed to add wiring for the light that would be in the shower.
Installing A Shower Light
I wanted to have a dedicated light for my shower so that I wouldn’t have to have all the lights in the van on when I was just taking a shower or when I got up to use the toilet at night.
I wanted the light to have a dedicated switch and just be a simple on and off switch.

I ran a wire from my solar system to a place on the wall of my shower where a switch would go. From here, a wire ran up to the ceiling where I had a 1 1/4 inch hole drilled that the light would be placed into.
The light I chose was the Acegoo light which is the same as all the other lights used in the ceiling throughout my van.
These lights are not waterproof or at least they do not claim to be. However, it seems to be sealed enough to handle what little amount of water might splash on it or steam that may get onto it.
If it doesn’t work out over time or if it malfunctions from water splashing onto it, I can simply change it out so it’s not a big deal.
The light switch is in a convenient place so that you can easily switch the light on as you step into the shower and then turn it back off again as you step back out.
Just using one light in the shower gives off plenty of light. This LED light hardly uses any electrical power but produces a lot of light and makes it easy to see in the shower stall.
Shower Walls
After the framing and wiring were all done, it was time to move on to finishing the walls.
I added 1 inch foam board insulation on each wall mainly because I had some left over and I thought it would help to deaden noise a little, making the bathroom experience quieter.

I’m not sure how well that will work but at least the walls have insulation and I was able to use the leftovers that I had.
Next, was the FRP shower paneling that would line each wall and turn it into a waterproof shower stall.
I chose to use FRP because it is an obvious choice for this purpose. It can be cut to size and it’s easy to work with to customize for your exact area.
I created a template using construction paper and then traced the template onto the FRP. After cutting it and adjusting areas here and there, it was easy to attach to the walls by using paneling glue.
I stuck a wall at a time and then let it sit a couple of days with some boards pressed against it so that it would be nice and stuck.
For the ceiling, the same piece for the back was used. This was one full piece and I just simply curved it from the ceiling down to the back floor.
After all the walls were stuck to the frame, I sealed the seams using white silicone.
I tried to make it look as clean and neat as possible all the way down so it wouldn’t look hideous. I made sure that it was properly sealed so that no water could get through.
I think I did a pretty good job and I don’t foresee any water getting through any of the sealed areas.
Shower Pan
The shower pan that I chose for my van was a 24″ x 32″ size.
I built the walls first so that they would fit perfectly around the shower pan and the shower pan could just sit in there perfectly.
Like most any shower pan, this one has a slight downhill to it so that it can drain properly. I wanted this downhill going towards the front of the van since the van has a slight downhill of the same way.
Once the walls were all in, the shower pan sat in there tightly exactly how I had planned it.
As mentioned earlier, the floor was built up about 3 1/2 inches to allow for the plumbing underneath the shower. I used three-quarter inch plywood for the flooring so that the shower pan would have a sturdy, supportive base in which to sit.
Underneath the plywood, I placed support blocks in various places so that there would be no give on the floor.
Once the shower pan was sitting on it, I had to do the plumbing which was pretty easy.
It ended up being much easier than I expected.
I didn’t know much about plumbing and had done a little bit of plumbing around my house fixing things here and there but I’m certainly no plumber. It took me a while to figure out exactly what I would need.
Plumbing
At first, I was going to have the plumbing to go straight out the bottom of the van and then have the P-trap underneath the van.
However, I decided not to do that and opted for a solution that would stay inside the van and stay underneath the shower pan in the 3 1/2 inch space that I had built.
The product I chose for this was the Hepvo 1 1/2 inch trap.
This product is made for RVs and tight spaces so this was the obvious choice for my shower install.
It’s a cool design and worked perfectly and allowed me to accomplish having a P-trap and still keeping it inside the van. It’s just like any P-trap in that it keeps the smells out but allows the wastewater to drain properly.
From the drain of the shower pan, I used a 90° fitting and some 1 1/2 inch piping to connect the Hepvo trap and then once again a 90° flexible fitting that goes through the van floor.

Currently, this is where I left off and the 90° fitting is just sticking through the bottom of the floor.
I sealed the gaps around the pipe by using great stuff and then placing Everbond tape over that. Eventually, I will continue to pipe this underneath the van into a gray water tank that will be installed permanently.
I also sealed the pipe off with some metal screen netting so that no critters could climb up the pipe and end up inside my van.
When I am boondocking or in an area that doesn’t matter and want to take a shower, the water runs straight out the bottom of the van.
Since I use biodegradable soap, this is usually not an issue.
If I am staying at a campground or somewhere where I cannot allow the water to run out the bottom of the van, I have a solution.
I keep an empty 5-gallon jug for this purpose. I simply place the jug underneath the pipe that’s coming out the floor of the van and then the dirty shower water runs into the jug. I can then empty this jug at a dump station.
Finishing Touches
After the shower was installed, I placed trim all along the outside as well as at the top so that the shower would have a nice finished look.
I painted it whisper white to match the rest of the trim throughout the van.
I also installed an access panel on the bottom of the shower. This panel allows me access to the 3 1/2 inch space that I built underneath the shower pan.
This could come in handy if I were to ever have an issue with a leak or if I need to change the batteries out of the water detector that is located in this area.
This 3 1/2 inch space allows me plenty of room to reach in and work on the drain piping and even unscrew and change pieces of the pipe as needed.
So no matter what happens to the plumbing system, I have easy access to it and I can fix and repair any issues that come up.
Water Supply System
For my water supply, I used a 16-gallon freshwater tank that also feeds my kitchen sink. This water is shared between my kitchen and my shower.
Originally, I had planned to have these two areas using separate water systems but that would mean that I would have to fool with two separate water systems to fill and dump.
In the end, it made more sense to combine both systems and use one large freshwater container. Although, in hindsight, I should have chosen a slightly bigger water tank such as a 23 gallon.
I purchased it online at this link.
I installed the fresh water tank up against the wall of the shower on the backside underneath the bed.
The shower plumbing for the faucet comes in right above where the water tank is so it makes it easy access.
I built a handy little waterproof connection area just in case there are any leaks.
If the faucet area were to spring a leak, it would leak into this waterproof area and also down into the waterproof area where my freshwater tank sits.
I will also have a water detector in this area so if any water gets into this area I’ll know it and I can take action to remedy the problem before it gets out of hand.
For my plumbing, I used PEX pipe.
Originally, I was going to use clear vinyl tubing which I had initially installed but I noticed an issue with it that I did not like.
In the hot summer when it was in my van, it began to put off a hideous smell. Even the water that was running through it started to take on the smell.
I do not trust this and did not want any chemicals or plastic getting into my water so I tore it out and did it the right way by using PEX.
I suggest using this kind of piping because this is the piping that is the standard to use for plumbing supply lines and it’s super easy to work with as long as you have a good crimp tool and a good clean way to cut the pipe.
For now, I capped off the hot water side of my faucets so that they are not used. However, they will be used in the near future when I decide upon and install a water heater.
This faucet and wand that I chose are not as well-made is one you might expect in your house because it is built for RV use. It is made of plastic so it is lightweight, it looks good and I hope it lasts.
I have used it numerous times and it has worked great so far. It goes well with the bronze color that I’m going with throughout my van.
Toilet
My shower is also the place where my toilet will live in. It will not be installed permanently but it will stay in the shower unless I am taking a shower.
I added hooks on each side of where the toilet will sit so that I can strap the toilet down while I am on the move so that it doesn’t move or shift around or fall over and dump wastewater all over the place.
Shower Curtain & Door
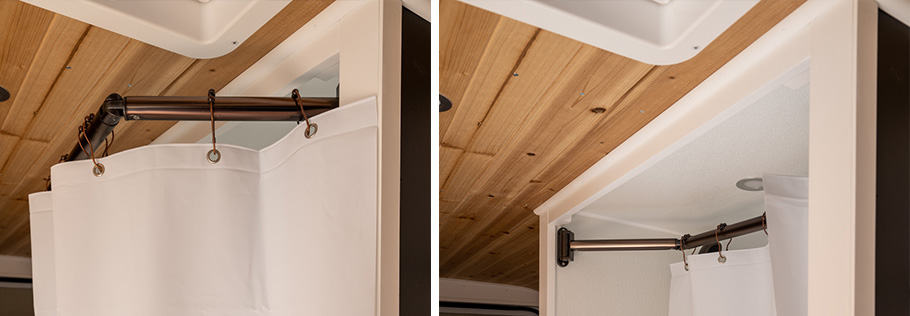
I chose to install the Extend-A-Shower so that it would give more room when you are utilizing the shower. This rod works great because you can keep the shower rod pushed inside the shower stall when not in use which creates a great place to hang wet items.
When you are ready to take a shower, you just rotate the shower rod to the outside and now you have more room in which to take a shower.
This opens up the shower quite nicely and gives the feel of a much larger shower area. I feel like something like this is essential in the shower stall as small as this one is.
I screwed it into the sides of the shower using the studs that were in the wall of my shower frame. It holds tight and is very sturdy and allows you to hang towels and clothes on it to dry.
Conclusion
The shower I built is pretty simple and it is a full-featured shower that anyone can build. It wasn’t that difficult and in fact, the most difficult parts were the initial framing and then finding the parts that I needed to accomplish the entire project.
Once I found those tools and parts and fittings, it was simple to put together. The project went together easy and I’m proud of how it ended up. I have used it quite a bit to take showers in the summertime and it works great.
I have not used it in the wintertime since I do not have a water heater installed. It would be quite miserable taking a shower in the wintertime without a water heater so I will hold off until I get one.
You can get away with it in the summertime since the van warms up inside and makes the water fairly warm.
Materials Used
In closing, the supplies and products that I used to install my shower are as follows. Most of the building items, I purchased at my local hardware store. Some of the items required ordering online and I have linked to those items below.
- 1×2 furring
- 2x4x8
- 1/4 inch plywood
- 1 inch Spax Screws
- FRP panel
- FRP panel glue
- 1 Acegoo light
- Pex piping
- Pex fittings
- Shower faucet
- Shower wand
- Shower pan
- Strainer
- Extend-a-shower
- 42×72 Shower curtain
- Thetford 365 Toilet
- Hooks
- Bungee cords
- Flexible 90 degree fitting
- 1 1/2 pipe
- Hepvo trap
It was a challenge, in the beginning, figuring this all out and getting all the walls straight but once I got going and I could see the light at the end of the tunnel, the project became more clear making it a simple but worthwhile addition to my camper van.


