
Disclosure: Some of the links in the article below may be affiliate links. This means that I may earn a small commission if you click on them and make a purchase.
A conversion van will usually have all of the necessary components needed for a living space. This includes lighting and a way to control the lighting. Light switches are commonly installed in the walls similar to what you will find in a home. Unless you have simple lighting that has built-in switches, you’ll need some kind of switch to control each light circuit that you install.
I went back and forth on this particular part of my van build because I was torn between simple switches and more advanced options. On one hand, I wanted something a little more modern than the standard options on the market. However, on the other hand, I wanted to keep my build simple so there would be less to go wrong in the future.
There are a few different options to choose from that are popular with van builders. These options vary from simple on and off switches to ones that are touch-sensitive.
In the end, I chose the most simplistic option on the market. The ones I chose include a simple toggle switch that only has two options: on and off. These are just like the ones that turn the lights on and off in a home, only much smaller and designed for a 12-volt circuit. The only exception to my simplicity rule was that I opted for a couple of switches that included dimmers. Since the LED lights I installed are dimmable, I wanted to be able to control this feature using switches.
Van Conversion Light Switch Options
Light switch options will vary depending on the system that you have installed. However, with most systems being built around a standard 12-volt system, there are a few popular options that most would consider. The following options were on my list when I began the process of installing the lighting system in my van.
Lights With Built-In Switches
These are the simplest types of lights and switches to work with since everything is already built-in. All you need to do is connect the light to a power source and then everything else should work as intended. There is no fussing around with installing switches separate from the lights. If you are going with a minimal setup and only need a few lights in key areas, these may be your best option.
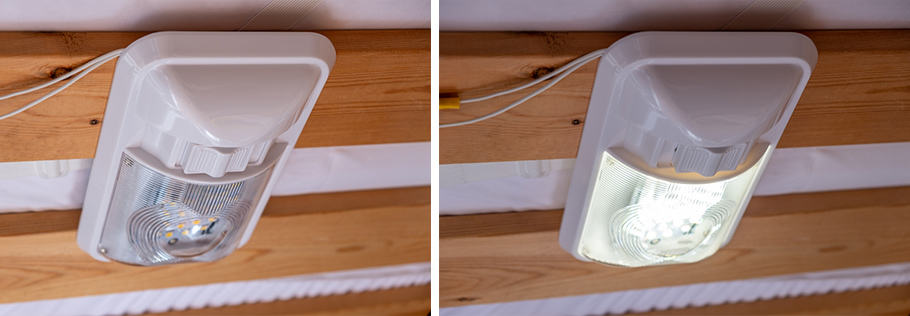
The lights pictured above (affiliate link) are installed in my garage area and were simply wired to my 12-volt power source. As you can see, the built-in switch allows me to turn each one on independently and they were super easy to install. These work great in areas where you need extra light but want a simple install. They were the obvious choice for my garage area since they could be flush mounted and it doesn’t really matter how they look.
Simple On/Off Switch
When you think of turning on your lights, you may think of just using a simple on and off switch. These are standard in most homes and allow you to either turn the light fully on or fully off with the flick of a switch. These are basic toggle switches (affiliate link) that complete a circuit when turned on and then break the circuit when turned off.
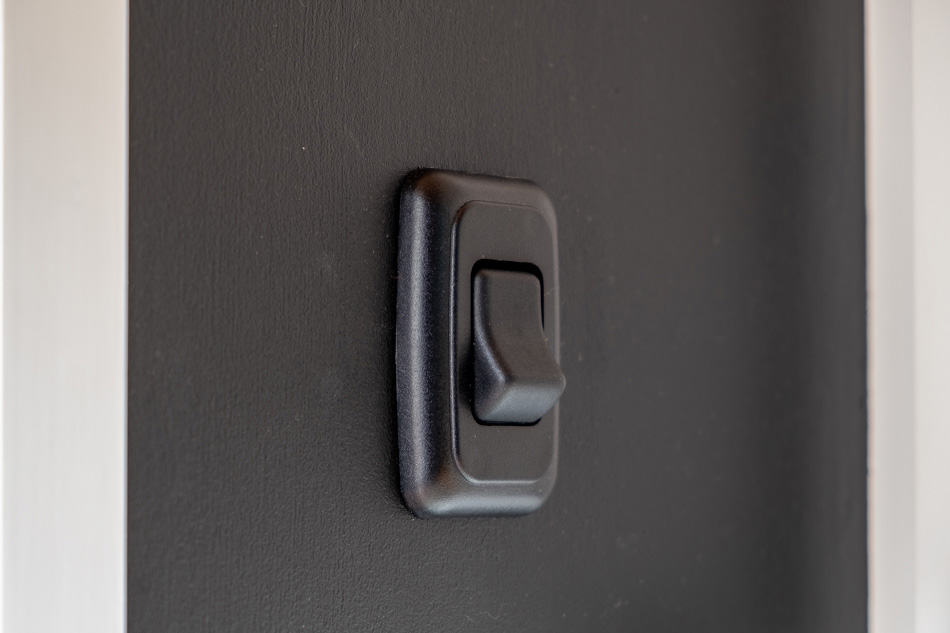
These are the best choice if you have a lighting system that needs no dimming control. I have a simple switch like this installed in my shower because I only wanted the light to be on or off when using it in that location. These types of switches are cheap, small, and easy to install.
Simple On/Off Switch with Dimming Control
Similar to a simple on and off switch except it has a dimming slider that allows you to control the brightness of the lights. These types of switches come in different shapes, sizes, and looks. One of the most popular options for RVs and van conversions is the option as seen in the following picture.
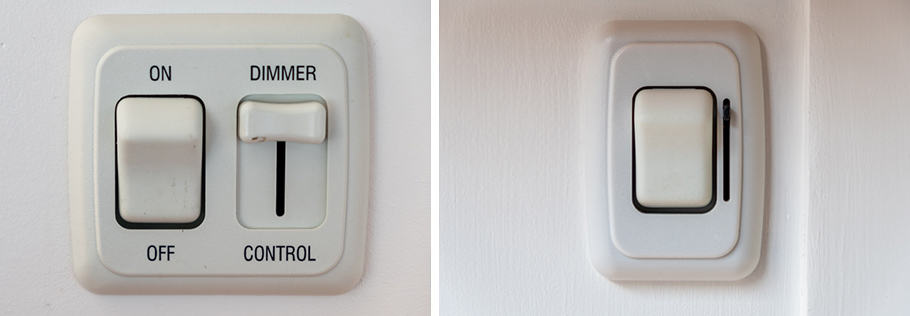
While these have somewhat of a dated look to them, they work great, they are reliable, and are small enough to fit into the thin walls of a camper. They are also easy to connect to a light circuit. I used both types in my van build and they control my main light circuits in my van.
Large dimmer switch (affiliate link)
Small dimmer switch (affiliate link)
Touch Activated Light Switches
Similar to the dimming switches above, these offer the same functionality with a different interface. These are a bit more elegant and have a modern feel to them. If this is important to you, you may want to see if these will fit into your van build. These switches will give an updated look to your van conversion.

You can also use a switch that is similar to the previously mentioned switches that I installed in my van. These switches look similar but they have touch functionality rather than a switch and slider control.

Installing Light Switches In Van Conversion
To install light switches, you’ll need a circuit of lights that the switch will control. LED is the best choice for those seeking low energy usage along with a long-lasting solution that will give plenty of bright light. Many LED lights are dimmable so having a dimmable switch will allow you to enjoy all the benefits that they offer.
Once you have a light circuit that is installed in a parallel circuit, you can commence installing the switch to control it.
For a simple switch, you’ll need a ground wire along with a hot wire that will attach to the back of the switch.
For a dimmable switch, it will be just a little more complicated. You’ll need a ground wire along with a hot wire and a neutral wire to control the dimming feature.
Let’s look at how my switches are installed.
On/Off Switch
For my shower, I installed one light on the ceiling. The wires for this light run down the wall to where the switch is located. From the switch, I have two wires that run to my power source. This leaves me with two wires from the light and two wires that run to the power source (4 wires total).
Installation
The black (ground) wires get connected together so that it creates one wire that goes straight from the light to the power source. In theory, you can run this ground wire directly from the light to the ground of your power source.
The red (hot) wires will be connected to the light switch and will allow you to open and close the circuit.
I only had one light for this on/off switch circuit but it will be the same whether you have one light on the circuit or multiple lights on the circuit. If connected in parallel, you will end up with two wires coming from the circuit.
Once connected, the switch simply allows you to close or open the circuit. When the circuit is closed, electricity can flow to the lights from the power source. When the circuit is opened, electricity will not flow and the lights will not operate.
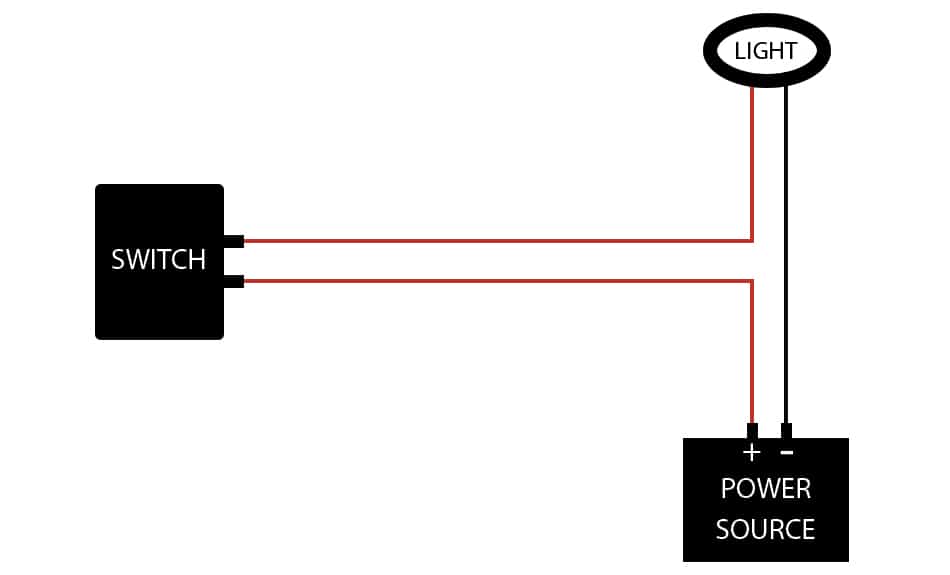
Dimmable Switch
A dimmable switch will work just like the standard switch with an additional wire for operating the dimming feature. As an example, I used a dimmable switch for my main living area. This area contains four LED lights that are all connected together in a parallel circuit. This means that all the reds are connected together and all the blacks are connected together leaving me with one red and black wire.
Installation
The black wire of the switch will combine with the ground wires in the circuit and connect to the ground or negative terminal on your power source.
The red wire connects to the positive side of your power source, which in my case is my fuse block that is connected to my Goal Zero Yeti 1400.
The dimmable switch that I used also has a white wire. The white wire will connect to the hot side of the light circuit (red wire in my case). See the image below for a diagram of my connections.

Once connected, the dimmer will control how much electricity is flowing to the light circuit. If you have the dimmer at full power, all the voltage will get through to the lights causing them to fully light up. If the dimmer is at 50%, only 50% of the voltage will get through to the lights and they will only shine at 50% brightness.
Most light switches will contain instructions so be sure you are installing your switches according to their instructions. While the concept will be the same for most switches, the execution may differ. Some switches may have wire leads that hang out while others may have screw terminals that you’ll need to place the wire in and tighten down. Some may have different colored wire colors than mine did. Either way, light switches are easy to install and will provide you with a convenient way to control the lighting within your van.
Conclusion
There are lots of different options to choose from for switches to control the lights. Every van build is different and each builder has different needs. I preferred to use the most simple solution because they were cheap, easy to install, and there isn’t much that can go wrong with them. They give you a satisfying click when you turn them on and off so there is no question as to whether the switch worked. Other than normal wear and tear from switching the lights on and off, I don’t foresee any issue with these simple switches.


