Disclosure: Some of the links in the article below may be affiliate links. This means that I may earn a small commission if you click on them and make a purchase.

Overhead cabinets can be a great way to add extra storage to your van. These cabinets make use of what would often be wasted space and can provide you with ample storage for clothing items and other small items that you use on a regular basis. The items that you need to get to more often can be stored in overhead storage cabinets, making it easier to put them back up and out of the way once you are finished with them.
Overhead storage cabinets can be a great way to keep the small space of a van tidied up.
However, overhead cabinets aren’t always a good option depending on your van layout. Some people go through the process of putting overhead cabinets throughout their entire van. This can often lead to areas that may feel closed in and you may have been better off excluding overhead cabinets from certain areas of your van.
If you are considering installing overhead cabinets in your van conversion, here are a few things to consider.
Do you have enough headroom?

Decide where you want to put your overhead cabinets and make sure it is not going to affect the headroom that you will have in that area once they are installed. As an example, installing overhead cabinets over your bed may give a feeling of having less space which may either be claustrophobic or a dangerous place where you can easily bump your head.
Do you want or need them throughout your entire van?
Having overhead cabinets throughout your entire van isn’t always a good idea. This could make the space feel more closed in rather than having wide open walls in certain areas. If overhead cabinets are installed in every square inch, you will end up with a van that feels more narrow inside.
Is this a good trade-off for you? If you need the extra storage space, it could be. Just make sure you keep this in mind as you build your van. Having lots of cabinets is great but feeling closed in in a space that is already small can be a downside of having lots of overhead cabinets.
Do you need the storage?
If you need lots of storage, whether you have a large family or you just have lots of stuff that you will be traveling with, you may need all the storage space that you can get. Overhead storage cabinets make a great way for you to achieve this. However, if you are like me, some of my overhead cabinets don’t even get used. I went light on my overhead cabinets and it has been plenty for me. Just make sure that you think it through beforehand and find a balance between allowing for more space in your van versus having the most storage that you can get.
How To Build Overhead Cabinets In A Van
Like anything in a van conversion, building overhead cabinets has its own challenges. However, it’s something that can be accomplished fairly easily if you have the tools and know-how to get it done. Let’s first look at knowing where to put the cabinets.
Deciding Where To Install Overhead Cabinets

The first thing you want to do is plan exactly where you want the cabinets to go. Once you know where you want them to go, you are going to want to create furring strips on the walls where that the cabinets can be mounted to. Click here to learn more about adding furring strips to your van. You can also use the structure of the van to mount them as long as you have a sturdy way to accomplish this. The best way that I have found is to use furring strips so that you have a sturdy and consistent structure to screw the cabinets into.
After you are sure of where you want your cabinets and how they will be mounted, the next thing that you want to do is find your measurements and build the framing for the cabinets.
Framing The Cabinets

For the size of the cabinets, this will be a personal preference. In my conversion van, I chose to build my cabinets approximately 11 1/2 inches x 11 1/2 inches. My cabinets hang down from the ceiling 11 1/2 inches inches and then come out from the wall 11 1/2 inches inches.
Once I had my dimensions, I built my frame using 1/2 inch plywood. This size of plywood is a good balance between sturdiness and weight. It’s plenty strong to hold the weight of anything I would be storing inside but it doesn’t weigh much.
The bulk of the cabinets will be the bottom piece.
For mine, I cut the bottom piece that was the exact size of the cabinet I wanted. From there, I cut the side pieces and dividers as needed. For the back and the top, I used 1/2 inch plywood strips rather than full pieces. I did this to keep the weight down and because it was not necessary to use full strips of plywood like it was on the visual part of the cabinet.
This allowed me to complete the cabinet and have a place to mount The cabinet but it decreased the overall weight. I did not weigh my cabinets but the largest one in my van was very light and I could hold it easily with one arm. It was also quite sturdy as I put the cabinets together using wood glue and screws.
Once the framing was mounted to the side walls of the van, I installed the cabinet facing.
Adding Facing Onto The Cabinet

For this, I used 1×2 inch wood strips that were already pre-primed. I purchased these strips of wood from my local Home Depot and I simply created a face frame around the front of the cabinets. You can opt to go frameless if you wish but you will probably want to neaten up the front of the plywood if you go this route.
The facing is great because it allows you to have an area that helps things from sliding out of the cabinets. It creates a little lip on the cabinet which can be handy in a moving vehicle.
To install these, I used a nail gun along with wood glue to attach these to the front of the cabinet framing. After these were mounted and all the glue had dried, I added some wood filler where I had put the nails and in other imperfections. Once all of this had dried, I sanded it all down lightly and then painted the entire cabinets with white paint.
Overhead Cabinet Doors

I chose to go with a Shaker style look and build the doors myself using 1×3 inch wood and 1/4 inch plywood for the inside panels. To mount the inside panel, I used a router bit, this one, that allowed me to route a channel inside the 1x3s. I created a box and then lightly glued a panel of quarter-inch plywood. It may not be necessary to glue it in but since this was a moving vehicle, I wanted everything to be as tight as possible.
This was a time-consuming process as I had to create four different doors for my upper cabinets. I also had to create multiple other doors throughout my van in the same way.
Overhead Cabinet Door Hinges
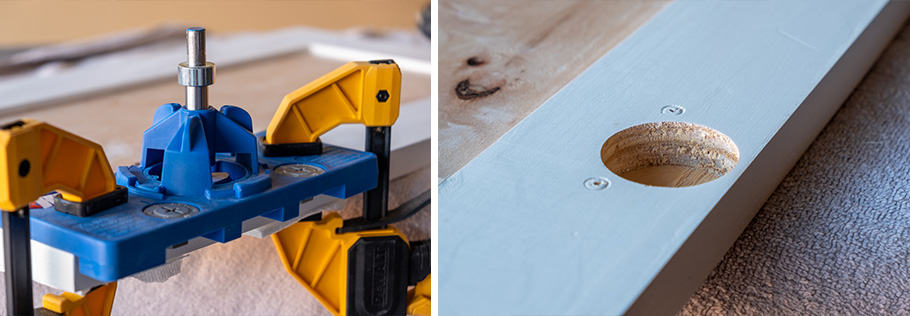
I used concealed hinges on all of my doors which were mounted with help from the concealed hinge Kreg jig. I wouldn’t want to attempt this without using this jig or something similar. It made the project so much easier. I have used a lot of different Kreg jigs throughout my build and they have always been super helpful.
For the hinges, I simply decided where I wanted the hinge and clamped the jig onto the door using squeeze clamps. The jig takes care of the rest and all you need to do is drill the large hole using the included Forster bit as well as the small holes for the screws. Be careful when drilling the small holes. The jig does not have a metal guide for these so the holes tend to waller out after a few times drilling. It’s a little difficult to get the small holes completely straight but it is still better than it would be without the jig.

Overhead Cabinet Door Latches
While most people use some type of latch that holds the doors closed on the overhead cabinets, I felt it unnecessary for my specific build. I found that the hinges that I used are very tight and have a springiness that keeps the door closed tightly. I’ve never had an issue with the doors coming open while driving or even moving at all. Depending on what you store in these cabinets, it may be a good idea to add a latch just as a safety precaution to keep items from falling out.
I also did not use any door stays because the hinges are tight enough that when you open the cabinets, they stay open. For now, this has been fine for me but I may put some type of a piston door stays on in the future.
Overhead Cabinet Door Handles
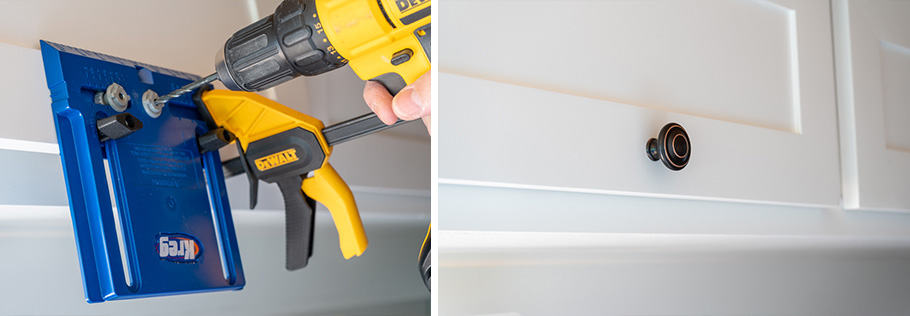
The last thing I did was to add knobs to each door. I chose to use knobs on the upper cabinets while using handles on the lower cabinets.
For the handles, I also used a Kreg jig which allowed me to line up each knob perfectly with the other. Single screw knobs are quite easy and you can probably do them without the jig. However, it’s nice having the jig so that you can get a perfectly straight drilled hole through the wood. Without it, you may end up with a crooked hole making your knob a little bit off from where you wanted it. Again, this jig made the job so much easier and I wouldn’t want to fool with putting door handles on without it.
Tips
Plan your cabinets with the end in mind
When designing your cabinets, it’s easy to get caught up in building something like this and end up with more than you need. Be sure that you think it through so that you are not putting cabinets in areas where you are going to hit your head. I can’t count the times that I have hit the corner of one of my cabinets in my kitchen area.
In my bed, I chose not to build cabinets on one side because I did not want cabinets on the side where my head would be laying. I wanted to have a decent amount of space between my head and the ceiling. I didn’t want to get up in the middle of the night and bang my head. I specifically left a space open on the head side so that it would feel roomier.
Don’t overdo it
As already discussed, the more overhead cabinets that you have, the smaller your space is going to feel. Having some areas where there aren’t overhead cabinets could make a big difference in helping the van seem like it has a larger living area. If you can make do with less overhead cabinets, I would suggest considering going with the least amount that you can.
Make sure your cabinets are mounted solidly
Make sure that you have mounted your cabinets solidly before you call it done. You don’t want them coming loose or falling off while driving down the road. If anything were to happen, you would not want cabinets coming loose and creating a dangerous situation. Vibrations in a moving vehicle like this can cause them to come loose over time. Make sure that you’re using sturdy and thick screws that are solidly installed into furring strips that are also solidly bolted onto your van wall.
Overhead Cabinet Storage Tips
Use Separators
You can purchase these separator boxes that make it so much easier to organize the contents of your overhead cabinets. If you will be storing clothes in these cabinets, these can easily be used to separate socks, underwear, shirts, shorts, etc. Rather than just folding them up and placing them in the cabinet, using boxes like this helps to keep it maintained better.
Use Boxes or Travel Cubes
You can also use lidded boxes that contain different items. Travel cubes also work well to help you two separate clothes and it can help to make a neater and more organized space. Without something like this, it can become messy within the overhead cabinets. Using boxes is especially helpful if more than one person is traveling. You can easily separate each other’s belongings making it easier to determine what belongs to who.
Use Shelf Liners

Shelf liners are great but make sure you stick it down with double-sided tape or some type of glue. I made the mistake of adding shelf liners to my overhead cabinets without gluing it down. While the shelf liner works great and keeps things from moving around, it also sticks to items that are sitting on it. When you remove items from a cabinet, you will have to hold the shelf liner down if it is not glued down in some way. I used the gorilla shelf liner in my van and it is great but it is very sticky. It holds items in place very well but make sure you stick it to the bottom of the cabinets.
Bottom line
Having overhead storage in your van is a great way to maximize the space by adding plenty of additional storage without taking up too much space. It’s up to you the size that you use and the dimensions that you go with. You can choose to have them come further out into your van or you can choose a more narrow storage solution.
Whatever you choose, make sure they are installed properly so that they do not become a dangerous projectile if you were to be involved in a crash.