Disclosure: Some of the links in the article below may be affiliate links. This means that I may earn a small commission if you click on them and make a purchase.

Having a privacy curtain in your van is ideal for maintaining privacy but more than that, it can help ward off heat and make the place feel more like home. When combined with reflective window coverings, they make a great way to add an additional layer of privacy to your living space.
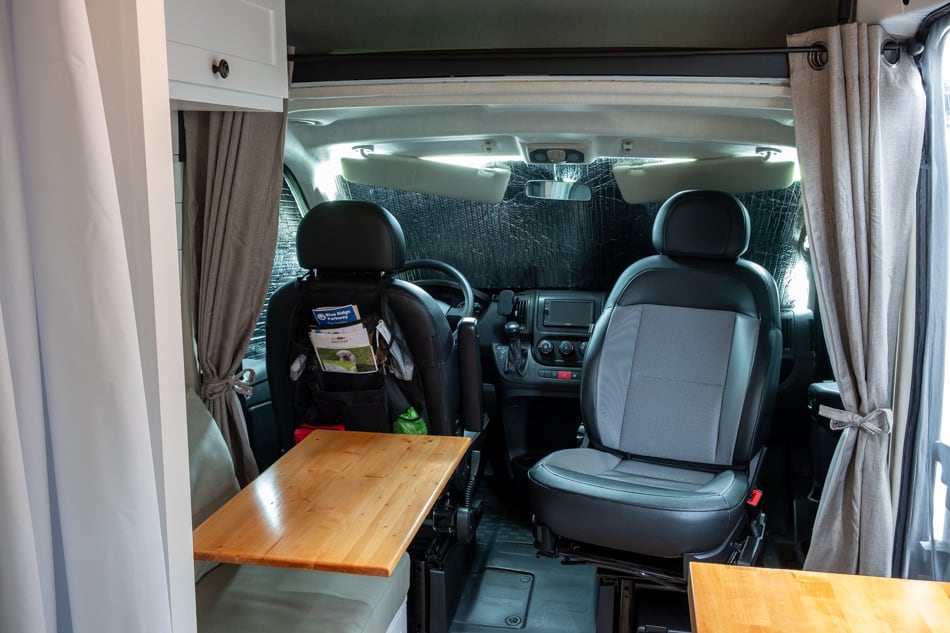
For my van conversion, I chose to install a privacy curtain between the cab of the van and the living area. I didn’t install it initially but after a few months of traveling without one, I decided one was needed. Once installed, I wished I had done it from the beginning as it makes a big difference in helping to make it feel like I’m in a little home rather than a vehicle.
Besides that, privacy is important and a privacy curtain does a darn good job of keeping your space private.
Now when I sleep in my van at night, I see darkness rather than the light pollution that gets in around the window coverings. The blackout curtain I used keeps it nice and dark so I can sleep with no strange lights.
In my van, there is a blinking security light in the dashboard that used to bug me. I would have to hang something over it so I wouldn’t see it during the night. Since installing the curtain, this is no longer an issue since all of the front area is now hidden when the curtain is closed.
Another benefit has been for using it during short periods of rest. As an example, when I pull into a parking lot to eat lunch, sleep, or just take a quick break, I can simply draw the curtain rather than installing the window coverings in all the front windows. It makes for a quick way to gain privacy when I don’t want to go through the trouble of putting my window coverings in.
Installing a Privacy Curtain in a Van
The following are the steps I took to install a privacy curtain between the cab of my van and the living space.
Choosing a Privacy Curtain
An ideal privacy curtain will be something that is made of blackout material that doesn’t allow any light through. With blackout material, the sun or other outside light will not be able to penetrate your van as much. Likewise, the light inside your van won’t be seen from outside if installed correctly and covering up all gaps.
It isn’t necessary to use a blackout curtain and any ole curtain will get the job done. However, for a better experience, I would highly suggest using a blackout curtain. This is what I chose to use and I was able to find one on sale at my local Kohl’s store.
The curtain was a bit larger than needed since it was designed to be installed in a home but my wife trimmed it up, re-sewed it to fit perfectly into the space that I installed it in. If you are not good at sewing or don’t know anyone who is, you can use some type of liquid stitching to make quick and easy work of customizing an oversized curtain. You can also pay someone to do this for you for a little bit of money.
Mounting The Curtain Rod

The most difficult part of the installation process, in my opinion, was installing the curtain rod. You probably won’t have a flat mounting area to install it like you would in a home. Because of this, you will probably have to be creative and this will look different in each van depending on how your ceiling and walls are installed.
Finding a curtain rod seemed difficult at first because I was overthinking it. In the end, I purchased a simple curtain rod from Home Depot that came with mounting brackets. The idea was to mount it to the ceiling and allow the rod to extend all the way across the van.
However, I also did not want to cover up the storage area over the cab. I wanted to be able to access this storage area while the curtain was drawn. In this case, the brackets that came with the curtain rod were not long enough to extend the rod down far enough.
This is where a little DIY ingenuity comes in handy to complete the project. I created some very simple brackets that allowed me to extend the curtain rod brackets down from the ceiling a little further to exactly the place I needed the rod to be.
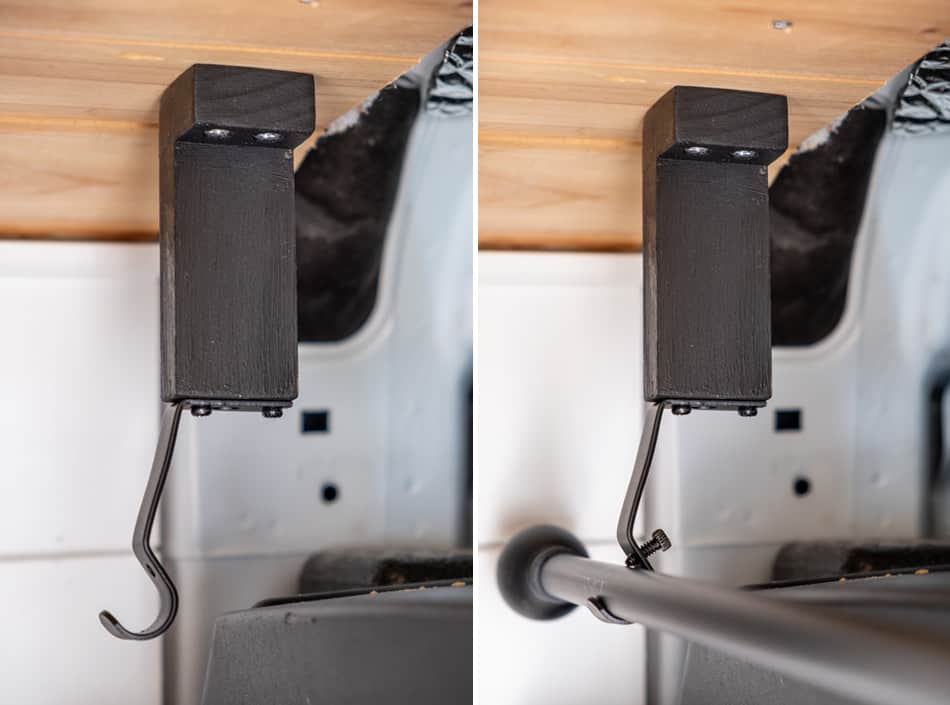
As you can see, this only required a couple of small pieces of 1″ x 2″ wood strips. I created two wooden brackets with flanges that would allow me to screw them into the ceiling. I painted them black to match the brackets that came with the rod.
Once the mounting brackets were screwed onto these wooden brackets, it looked as though it was all one piece when seeing it from a distance. It looks like it came this way.
Once installed on each side of the van, the rod simply sits in the brackets and the curtain easily slides back and forth, extending all the way across the living space. Each bracket also includes a small screw so you can tighten the rod into place once it is exactly where you want it to be. This solution works great and is sturdy without making noises as you travel down the road.
When the curtain is drawn, it provides good separation from the front to back and doesn’t allow any light in from the outside world.
Installing Curtain Ties
Once the curtain is installed, you’ll need a way to hold it open when you don’t want it closed. There are lots of different hardware solutions for this and it will depend on your van setup when choosing the best option. You may be able to screw some type of curtain ring into your walls on each side to do the trick.
For my van, each side of the wall where the curtains open up to is the plastic area that houses the airbags. There is no way I’m screwing anything into these areas. I chose a very simple solution instead: Velcro.
For this to work, you’ll only need some Velcro and some type of flat string. In my case, I used the extra curtain material that was cut off of the bottom of the curtain. My wife cut a couple of strips of the material and sewed them into strings that could be used to tie around the curtain.

She also sewed Velcro onto the center of each string. With the other side of the Velcro stuck to the van panels, this string attaches tightly and stays in place at all times.

When I’m ready to open the curtains, I can tie back each side so that they remain open and out of the way. It makes for a secure way to hold the curtains open and since it’s all cloth material, there is no rattling or noises as I drive down the road.

Conclusion
Like most DIY projects I have done on my van, this privacy curtain gave me a real sense of satisfaction once installed. I put it off for far too long and have certainly appreciated the benefits it has brought to the experience.
- It creates a more private experience. It gives me a greater sense of privacy because the window covering in the front windshield has areas where people can see in, especially if the interior lights are on. The curtains helps fill in the gaps.
- It helps to manage heat. It provides an additional layer of radiant heat blockage from the front window area. While not life-changing, it is noticeable.
- It makes for a better sleeping experience. My van is now super dark at night with no stray lights coming in through the front of the van.
- It gives your van a more homey feel. It keeps the steering wheel and front seats out of sight so you don’t feel like you are sleeping in a vehicle.
This was a project that I initially avoided because I couldn’t figure out how to mount the brackets for hanging the curtain. I have a tendency to overthink projects like this. There are other ways, and probably better ones, to hang it beyond what I have done but hopefully my method has given you an idea to help you install one in your van.