Disclosure: Some of the links in the article below may be affiliate links. This means that I may earn a small commission if you click on them and make a purchase.

Window coverings are essential if you have a van with a converted living space or any other type of RV. Not only are they needed for privacy but also for maintaining a more comfortable temperature. These can easily be purchased already made for you but you can also save money by creating some basic window coverings yourself.
I created window covers for my Ram Promaster during my conversion and have been using them ever since. They are simple and cheap to create and can be easily customized to fit any window opening. Below, I’ll show you how I built them and the materials that I used to do so.
Parts I Used
- Reflectix – 25ft roll (you could probably purchase less but I used the entire roll throughout my van)
- Small Rare Earth Magnets (3mm x 6mm)
- Tape (Silver, Scotch)
- Card stock paper or thin cardboard of some type
You will likely be using some type of reflective insulation during your van conversion. If so, you may have enough leftovers to at least create some of the window coverings. I had plenty of leftovers to create the smaller windows and only needed to buy a 10ft roll extra to create the windshield. Either way, it doesn’t take a lot of it and the material is pretty cheap so you won’t be out-of-pocket for a lot of money.
Measuring & Creating Templates
The first thing you will need to do is measure exactly how much you will need for each window. There are a few different ways that you could go about doing this. In the example of a Ram Promaster, there are typically two square windows on the back, front windows on the driver and passenger side, windshield, and in some cases, a sliding door window. There may be more in your van but these are the typical ones found in most vans.
Rear Windows
Let’s start with the square windows in the back doors of the van. These are the easiest windows to create coverings for since they are usually square.
In the Promaster, these windows will measure 24 3/4 inches x 24 3/4 inches. This is easy to measure so just double check before you get started. You can simply measure and cut the Reflectix to this size and then trim the corners to fit. Once you have one of them done, you can use it as a template for the other one.
You may want to use a piece of cardboard as a guinea pig to begin with so that you do not waste the reflective material.
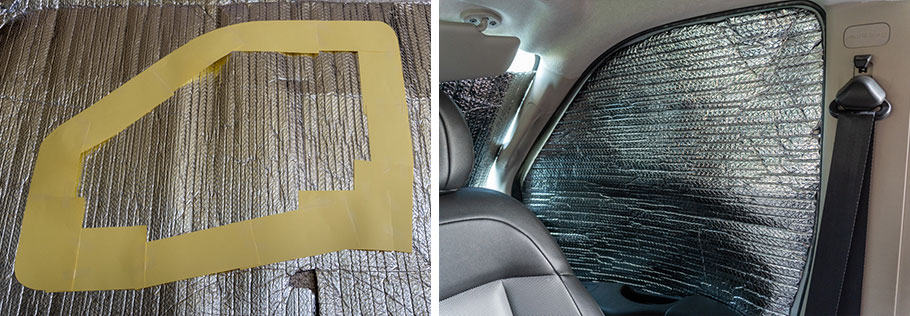
Another option is to use card stock paper, cut it, and tape it around the window to create a perfect template. You’ll waste a little paper but the paper is cheap and you can get your dimensions perfect the first time by doing it this way. You won’t have to guess at it. The picture below will show you exactly how you can accomplish this.
Once the paper template is done, you can just trace it onto the Reflectix material and cut.
Driver & Passenger Side Windows
For the side windows, you can also use card stock paper. This is easy to do and just requires that you tape together a template around the window in the exact location that you want it. The following picture shows how I did mine and I was able to get an exact fit for my window.

Once the template was created, I simple traced it onto some Reflectix with a Sharpie and then cut it out.
Another option is to use something a little bigger if you have it. You can use floor protection paper but you may also use packing paper or something else that may be large enough to cover the window areas. If you cut a section of paper that is close to the size for the window, you’ll be able to mark and fine-tune it from there.
By using a little tape to hold it into place, you can trace along the window frame exactly where you will want the window covering to go. It’s easy to feel through this thin paper as you trace so you’ll know exactly where you are. It’s best to cut it a little big the first go-around and then continue to custom fit it from there.
Once you get it perfectly fitted to your window, you can just trace it onto the Reflectix and then cut it out. You can do this for both front side windows since they will both be the same dimensions.
Windshield
The windshield is the most difficult window to measure and get exact. You can do this the same way by using card stock paper to cut out a template as you tape it in sections. Of course, you’ll use a lot more paper to do it this way. The windshield is big so you will end up with a big taped up cardboard mess that you’ll have to be careful with as you move it out of your van and onto the Reflectix.
You’ll have to make sure it’s not warped or in a situation that is not perfectly fitting like it was in the windshield. By doing it like this, you can get an accurate template of the front windshield. This even includes the cutout for the rearview mirror so there will be no guesswork involved.
This is how I did my front windshield and it turned out perfect. It’s a tedious way of creating a template but hey, a little patience and you’ll save yourself some money and have some window covers that fit great.
Over time, the cover on the windshield has begun to sag a little bit. It has become less stiff from the heat. Nevertheless, it has served me well for the entire time I have had my van. This doesn’t happen to the window covers for the smaller windows. They have held up well and still cling to the windows just like they did from day one.
All of the treatments that I created keeps most of the light out and work great for keeping the interior of the van much cooler in the summer than it would without them.
I also installed one on my side sliding window but this one was simple since it is just a rectangle cutout. A few measurements will allow you to create a perfectly fitted window cover for a window like this.
Attaching The Window Covers To The Windows
So how do you get these window treatments to stick to the windows?
There are multiple ways you can go about achieving this with the most popular being velcro or magnets. I chose to use magnets because I didn’t want to add anything sticky to my windows. Since the framing is metal around the windows, why not utilize magnets that can hold the window covers tightly against the window frames? The only one that I couldn’t do this with was the windshield. This one seats tightly and is held in place firmly with the sun visors pulled down.
Installing Magnets
The magnets that I chose to use are very small rare earth magnets. They are about the same size as the little air bubbles inside the reflective material. This allowed me to place the magnets directly into an air bubble area so that you never even see the magnets. They are hidden inside the Reflectix once you are finished.
To begin with, I used a pair of long needle-nose pliers to pull apart an air bubble area just enough so that I could fit a magnet inside.
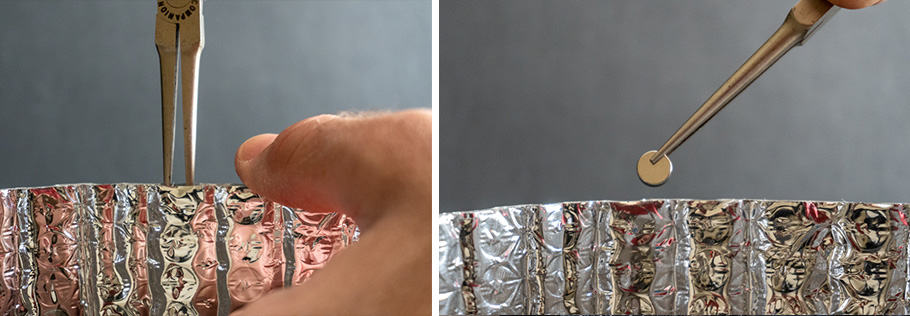
Once the magnet was inside, I used a small strip of silver tape to tape the bubble area back up so that the magnet would not fall back out.

I used silver tape that was the same color as the Reflectix so you don’t even know it’s there unless you look close. It’s not obvious when you look at it that something has been put inside the Reflectix. In this way, it’s like the magnets are just built-in.
I put about 12 magnets on each window covering and this has been plenty to hold each window covering tightly to the metal. You’ll want to put enough magnets in it to be able to hold the windows treatments tightly and close all the gaps so there is as little light as possible coming in.

In the beginning, I tried to use the magnetic tape that sticks on one side and has a magnet on the other. However, this was not strong enough to hold and the sticky side would not stay stuck to the Reflectix. I tried using superglue and other methods but the summer heat kept the stickiness from sticking.
I finally moved on to these small rare earth magnets and they have been excellent. The window coverings just cling to the window and hold strongly. You have to give them a good pull in order to get them off.
The magnets were only used for the two back windows and the two front windows. The custom window that I installed in the back of my van does not need anything to hold it in. I cut the covering out so that it would fit perfectly inside the hole and it is held in firmly. If you have a window like this, be sure and cut the Reflectix large enough that you have to stuff it in there a little bit.

For the windshield, you can use different types of attachment methods like Velcro or suction cups that could go through the material and stick to the windshield, holding the entire window covering tightly. A lot of the professionally made ones are done this way so it’s nothing new. You’ll just have to purchase your own suction cups that will work for this solution.
I have not done this yet but these suction cups should do the trick.
When I put the reflector in my windshield, it holds tightly because it was custom cut and when I pull my sun visors down over it, it stays in place nicely. There are a few gaps and as I mentioned above, since the material is not as stiff as it used to be, there is more light getting in now than there used to be when it was new.
Unfortunately, using magnets for the windshield covering is not a feasible option since there is no metal around the windshield for the magnets to cling too.
Bottom Line
The good thing about creating your own DIY coverings is mainly that it is going to cost less. If you are like most van builders, you will probably be using this type of material along the way so you will have extra lying around that can be used. Window coverings like this are easy to make and since you already have the material, you might as well save money and make them yourself.
The downside of using this type of DIY solution is that they are not going to be as good as some of the professional options available on the market. Some of the ones you can purchase are more insulated and do a better job of reflecting the sun and insulating the inside so that less radiant heat gets into the living area. Also, in the wintertime, they will help the heat to stay in the van better.
Of course, the option is always there to purchase custom-built window covers for your specific van. However, if you are just looking for something simple and cheap to make, these basic window coverings are what I have been using the entire time that I have owned my camper van and they have served me well.