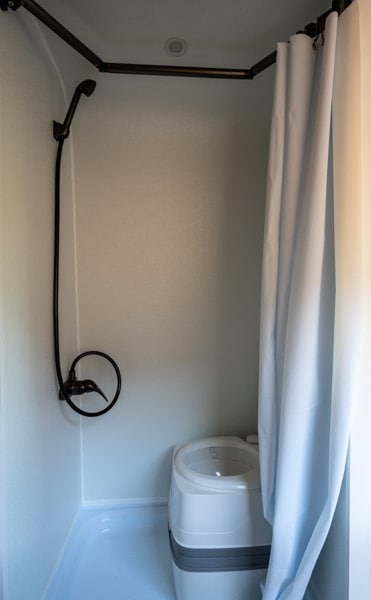
Installing A Full-Featured Shower In A Camper Van

If you are like me and want to make sure you have a place to shower while you are on the road, you will want to keep reading. After much back and forth, I decided to build a full-featured shower for my camper van conversion.

In the beginning, I had planned on purchasing a portable shower system to use but decided that I wanted something that felt more like home. I wanted something that would give me the convenience that I was used to while out on the road.

Planning

When planning your shower build, you’ll want to figure out exactly where you want to put it. When building my van, I decided that the bed and shower were the two most important areas and everything else would be built around these. These two areas provided the base of my layout.

I was very flexible in the other areas so after building the full-sized bed, the full-featured shower was next.

Many people locate their showers behind the driver’s seat but I wasn’t keen on doing this since I wanted to make use of the seats in the front on swivels to be used as living space.

I decided in the end that the shower should go right next to the bed. This would create a wall side by the bed that would add a bit of privacy and separation from the sleeping area as well as free up space in the front of the van for a dining area and swiveling seats.

Measurements

The shower pan that I chose measured 24 x 32. This is a small shower pan but it is plenty for my van conversion. At first, I considered a 36-inch wide pan but that would take up too much space in the van.

Underneath the shower pan would are a 3 1/2 inch gap that would make room for the drain system and provide me with a way to make repairs if needed.

Framing

Perhaps the most difficult part of the whole shower installation was the initial framing for the shower.

The reason this was so difficult is that you have to initially get the framing squared with the floor for the rest of the shower to end up straight and squared.

This took a little work and a lot of ingenuity to make sure I had everything perfectly straight before I continued.

This was a common thing as I progressed throughout my van build and I found myself scratching my head, wondering how to get something squared and straight.

The first step was to build the first wall. The first wall would be attached to the bed that I had already built. Once this wall was up I would then have a squared wall in which to build the rest of the shower upon.

This was easier said than done.

One thing that made this difficult is the floor was not perfectly straight. Even though I had built my floor up and made it straight with a plywood subfloor, The sides were up a few millimeters higher than the middle so I had to account for this in order to get my first wall street.

I used a standard square to get the wall as straight as possible and then I simply eyeballed it against the rear window to make sure that it was straight.

After the first wall was up, I was able to then frame the rear wall and this was a bit tricky since the van walls curve. I used 1×2 furring strips and bolted them to the metal frame as they slightly bent on their way up.

This created a contour on the backside of the shower that followed the shape of the van.

For the rear wall, I used 1/4 inch plywood since this plywood was easy to bend. I fastened a sheet of this to the furring strips that I had bolted to the wall.

Once the rear wall framing and plywood wall were up, I was then able to build the third wall frame.

The third wall was just a matter of measuring 32 inches from the first wall that I built and I was able to square the wall up with the first wall by using a good ole fashioned tape measure.

I also used a squaring tool to make sure it was as close to square as possible.

After this, I had three walls framed and now I just needed to add plywood to the two side walls.

However, first I needed to add wiring for the light that would be in the shower.

Installing A Shower Light

I wanted to have a dedicated light for my shower so that I wouldn’t have to have all the lights in the van on when I was just taking a shower or when I got up to use the toilet at night.

I wanted the light to have a dedicated switch and just be a simple on and off switch.

I ran a wire from my solar system to a place on the wall of my shower where a switch would go. From here, a wire ran up to the ceiling where I had a 1 1/4 inch hole drilled that the light would be placed into.

The light I chose was the Acegoo light which is the same as all the other lights used in the ceiling throughout my van.

These lights are not waterproof or at least they do not claim to be. However, it seems to be sealed enough to handle what little amount of water might splash on it or steam that may get onto it.

If it doesn’t work out over time or if it malfunctions from water splashing onto it, I can simply change it out so it’s not a big deal.

The light switch is in a convenient place so that you can easily switch the light on as you step into the shower and then turn it back off again as you step back out.

Just using one light in the shower gives off plenty of light. This LED light hardly uses any electrical power but produces a lot of light and makes it easy to see in the shower stall.

Shower Walls

After the framing and wiring were all done, it was time to move on to finishing the walls.

I added 1 inch foam board insulation on each wall mainly because I had some left over and I thought it would help to deaden noise a little, making the bathroom experience quieter.

I’m not sure how well that will work but at least the walls have insulation and I was able to use the leftovers that I had.

Next, was the FRP shower paneling that would line each wall and turn it into a waterproof shower stall.

I chose to use FRP because it is an obvious choice for this purpose. It can be cut to size and it’s easy to work with to customize for your exact area.

I created a template using construction paper and then traced the template onto the FRP. After cutting it and adjusting areas here and there, it was easy to attach to the walls by using paneling glue.

I stuck a wall at a time and then let it sit a couple of days with some boards pressed against it so that it would be nice and stuck.

For the ceiling, the same piece for the back was used. This was one full piece and I just simply curved it from the ceiling down to the back floor.

After all the walls were stuck to the frame, I sealed the seams using white silicone.

I tried to make it look as clean and neat as possible all the way down so it wouldn’t look hideous. I made sure that it was properly sealed so that no water could get through.

I think I did a pretty good job and I don’t foresee any water getting through any of the sealed areas.

Shower Pan

The shower pan that I chose for my van was a 24″ x 32″ size.

I built the walls first so that they would fit perfectly around the shower pan and the shower pan could just sit in there perfectly.

Like most any shower pan, this one has a slight downhill to it so that it can drain properly. I wanted this downhill going towards the front of the van since the van has a slight downhill of the same way.

Once the walls were all in, the shower pan sat in there tightly exactly how I had planned it.

As mentioned earlier, the floor was built up about 3 1/2 inches to allow for the plumbing underneath the shower. I used three-quarter inch plywood for the flooring so that the shower pan would have a sturdy, supportive base in which to sit.

Underneath the plywood, I placed support blocks in various places so that there would be no give on the floor.

Once the shower pan was sitting on it, I had to do the plumbing which was pretty easy.

It ended up being much easier than I expected.

I didn’t know much about plumbing and had done a little bit of plumbing around my house fixing things here and there but I’m certainly no plumber. It took me a while to figure out exactly what I would need.

Plumbing

At first, I was going to have the plumbing to go straight out the bottom of the van and then have the P-trap underneath the van.

However, I decided not to do that and opted for a solution that would stay inside the van and stay underneath the shower pan in the 3 1/2 inch space that I had built.

The product I chose for this was the Hepvo 1 1/2 inch trap.

This product is made for RVs and tight spaces so this was the obvious choice for my shower install.

It’s a cool design and worked perfectly and allowed me to accomplish having a P-trap and still keeping it inside the van. It’s just like any P-trap in that it keeps the smells out but allows the wastewater to drain properly.

From the drain of the shower pan, I used a 90° fitting and some 1 1/2 inch piping to connect the Hepvo trap and then once again a 90° flexible fitting that goes through the van floor.

Currently, this is where I left off and the 90° fitting is just sticking through the bottom of the floor.

I sealed the gaps around the pipe by using great stuff and then placing Everbond tape over that. Eventually, I will continue to pipe this underneath the van into a gray water tank that will be installed permanently.

I also sealed the pipe off with some metal screen netting so that no critters could climb up the pipe and end up inside my van.

When I am boondocking or in an area that doesn’t matter and want to take a shower, the water runs straight out the bottom of the van.

Since I use biodegradable soap, this is usually not an issue.

If I am staying at a campground or somewhere where I cannot allow the water to run out the bottom of the van, I have a solution.

I keep an empty 5-gallon jug for this purpose. I simply place the jug underneath the pipe that’s coming out the floor of the van and then the dirty shower water runs into the jug. I can then empty this jug at a dump station.

Finishing Touches

After the shower was installed, I placed trim all along the outside as well as at the top so that the shower would have a nice finished look.

I painted it whisper white to match the rest of the trim throughout the van.

I also installed an access panel on the bottom of the shower. This panel allows me access to the 3 1/2 inch space that I built underneath the shower pan.

This could come in handy if I were to ever have an issue with a leak or if I need to change the batteries out of the water detector that is located in this area.

This 3 1/2 inch space allows me plenty of room to reach in and work on the drain piping and even unscrew and change pieces of the pipe as needed.

So no matter what happens to the plumbing system, I have easy access to it and I can fix and repair any issues that come up.

Water Supply System

For my water supply, I used a 16-gallon freshwater tank that also feeds my kitchen sink. This water is shared between my kitchen and my shower.

Originally, I had planned to have these two areas using separate water systems but that would mean that I would have to fool with two separate water systems to fill and dump.

In the end, it made more sense to combine both systems and use one large freshwater container. Although, in hindsight, I should have chosen a slightly bigger water tank such as a 23 gallon.

I purchased it online at this link.

I installed the fresh water tank up against the wall of the shower on the backside underneath the bed.

The shower plumbing for the faucet comes in right above where the water tank is so it makes it easy access.

I built a handy little waterproof connection area just in case there are any leaks.

If the faucet area were to spring a leak, it would leak into this waterproof area and also down into the waterproof area where my freshwater tank sits.

I will also have a water detector in this area so if any water gets into this area I’ll know it and I can take action to remedy the problem before it gets out of hand.

For my plumbing, I used PEX pipe.

Originally, I was going to use clear vinyl tubing which I had initially installed but I noticed an issue with it that I did not like.

In the hot summer when it was in my van, it began to put off a hideous smell. Even the water that was running through it started to take on the smell.

I do not trust this and did not want any chemicals or plastic getting into my water so I tore it out and did it the right way by using PEX.

I suggest using this kind of piping because this is the piping that is the standard to use for plumbing supply lines and it’s super easy to work with as long as you have a good crimp tool and a good clean way to cut the pipe.

For now, I capped off the hot water side of my faucets so that they are not used. However, they will be used in the near future when I decide upon and install a water heater.

This faucet and wand that I chose are not as well-made is one you might expect in your house because it is built for RV use. It is made of plastic so it is lightweight, it looks good and I hope it lasts.

I have used it numerous times and it has worked great so far. It goes well with the bronze color that I’m going with throughout my van.

Toilet

My shower is also the place where my toilet will live in. It will not be installed permanently but it will stay in the shower unless I am taking a shower.

I added hooks on each side of where the toilet will sit so that I can strap the toilet down while I am on the move so that it doesn’t move or shift around or fall over and dump wastewater all over the place.

Shower Curtain & Door
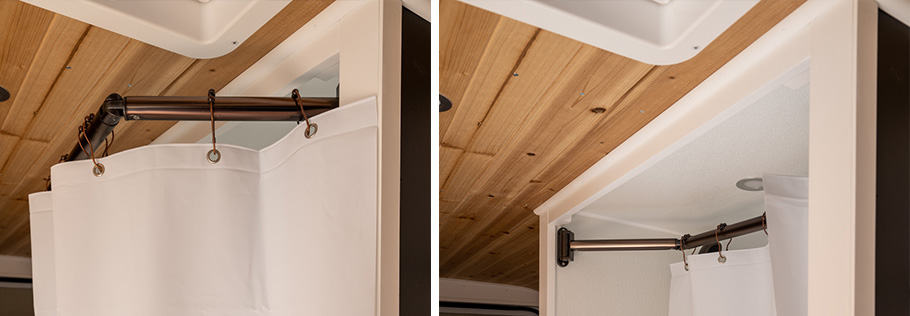
Extend-a-shower opened and closed

I chose to install the Extend-A-Shower so that it would give more room when you are utilizing the shower. This rod works great because you can keep the shower rod pushed inside the shower stall when not in use which creates a great place to hang wet items.

When you are ready to take a shower, you just rotate the shower rod to the outside and now you have more room in which to take a shower.

This opens up the shower quite nicely and gives the feel of a much larger shower area. I feel like something like this is essential in the shower stall as small as this one is.

I screwed it into the sides of the shower using the studs that were in the wall of my shower frame. It holds tight and is very sturdy and allows you to hang towels and clothes on it to dry.

Conclusion

The shower I built is pretty simple and it is a full-featured shower that anyone can build. It wasn’t that difficult and in fact, the most difficult parts were the initial framing and then finding the parts that I needed to accomplish the entire project.

Once I found those tools and parts and fittings, it was simple to put together. The project went together easy and I’m proud of how it ended up. I have used it quite a bit to take showers in the summertime and it works great.

I have not used it in the wintertime since I do not have a water heater installed. It would be quite miserable taking a shower in the wintertime without a water heater so I will hold off until I get one.

You can get away with it in the summertime since the van warms up inside and makes the water fairly warm.
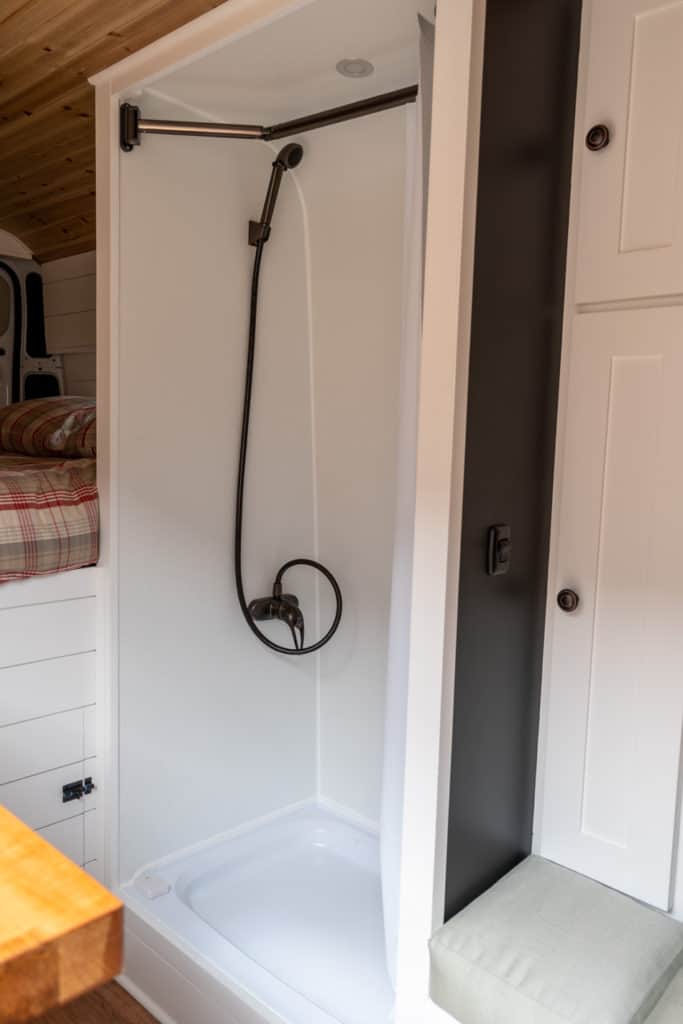
Shower in a camper van
My finished shower

Materials Used

In closing, the supplies and products that I used to install my shower are as follows. Most of the building items, I purchased at my local hardware store. Some of the items required ordering online and I have linked to those items below.

It was a challenge, in the beginning, figuring this all out and getting all the walls straight but once I got going and I could see the light at the end of the tunnel, the project became more clear making it a simple but worthwhile addition to my camper van.

How To Build A Bed In A Cargo Van

For the bed in my custom build camper van, I decided on a fixed bed. I didn’t want a bed that had to be set up and then broken down to use as a table.

While these types of beds do have their advantages and are certainly nice, it wasn’t what I wanted.

I wanted to be able to have the bed set up at all times.

The first thing I needed to do was figure out what size bed I wanted to go with. Initially, I had planned on putting in a queen size bed but after further examination decided that would be a bit too large and would take up too much space.

In my size of a van, a queen size would not allow me as much space for the shower and the dining area that I had planned.

I ended up changing my plan to include a full-size bed and the bed dimensions that I went with are a standard full-size bed which measures 54″ x 75″.

This allowed me to build a bed frame that would hold any full-size mattress instead of some odd-shaped size made for RVs.

I also would not have to cut the mattress like many people do making it easier to purchase bedding since you can buy full-size bedding anywhere.

The height of my bed needed to be at least 31 inches high so that I could fit bikes underneath the bed frame.

We intend to haul our bikes with us when we travel so that we can do some off-road mountain biking from time to time. My bed needed to set up enough to clear the bikes stored underneath it.

Building The Bed Frame

For the frame, the first order of business was to install the two supports that were going to hold the bed up for the most part.

This is easy in a Ram Promaster because the two side supports have holes in them that are used to bolt the 2x6s I used.

I put four 7/16” bolts on each side to hold the 2×6 supports to the sides of the van.

I ended up using regular stainless steel bolts, washers and nuts since I could easily reach my hand around the back to tighten them. I didn’t have to use anything special like Plus nuts or Rivet nuts.

I preferred this way of doing it since it was cheaper and bolts are readily available at my local Home Depot.

Once the supports were done, the next thing was to put in the actual bed frame supports. I used 2x4s for this, strung across, connecting to the 2x6s on either side of the van.

There would be three of these with two on the outside and one in the middle.

I had to build supports that the 2x4s would sit in on the 2×6 supports. I could have opted to purchase the metal supports but I chose to use wood since I had plenty of it laying around.

Why waste more money on metal supports when there is already wood sitting around? This worked fine for my needs.

Bed Base

For the base of my bed, I didn’t want to use a solid piece of plywood. This was mainly because of the weight.

A 3/4 inch piece of plywood of this size would have added quite some weight to my bed. I chose to use slats that I purchased from IKEA instead.

I have used IKEA beds before and the slats have always worked great in my house so I chose to use them in my van as well.

They fit perfectly within the frame that I had built and were much lighter than 3/4 inch plywood would have been.

Mattress

I ended up using a cheap memory foam mattress that I purchased online. It’s an OK mattress but not quite as good as the one I have in my house.

However, I didn’t want to spend a lot of money on a mattress since I will not be using this van full time. If it were something that I lived in full-time, I would want to spend more money on this part.

The mattress I chose was a Zinus Memory Foam 6 Inch Green Tea Mattress. You can learn more about it here.

One problem that I saw right away when receiving this mattress was that it has fiberglass in it.

This is a bit strange to have fiberglass in a mattress but after research, I learned that this is quite common with cheaper mattresses. This shouldn’t be an issue as long as you don’t pull the cover off of the mattress.

I have read horror stories of people that have done this and have ended up with fiberglass shards all over their house.

To protect myself from these fiberglass particles, I purchased a mattress cover that covers the entire mattress including the bottom so nothing could get through it or fall out from underneath the mattress on the bottom.

I also purchased a second mattress cover but the second one was more to keep moisture off the mattress. It was a waterproof, cooling cover so it should keep out any moisture as well as help to regulate heat.

Although, both of the covers I purchased are waterproof covers so you could say my mattress is well protected.

You can’t tell that the covers are on the mattress when you lay on it and the mattress is just as comfortable as it is without any covers.

Avoiding Mold In Your Mattress

There have been some people that have reported getting mold in their mattress in their van or their camper. However, this is due to a lack of preparation and a total disregard for how mold forms and grows.

Mold needs moisture to thrive so if you can keep your mattress clean and dry, you shouldn’t have an issue.

My plan for avoiding mold mainly was to use a waterproof cover, which as mentioned above, I have done that and have two waterproof covers around the mattress. Yes, I know that is probably overkill but it is what I have done nonetheless.

I think it’s safe to say that there will be no moisture that can get to my mattress unless one of the mattress covers punctures in which case I would likely know about it and fix it.

Another thing that I did was to use the slats instead of a solid piece of plywood. Although, this is not required.

If your mattress doesn’t get moisture in it, you can just use a solid piece of plywood.

I used slats mainly to save weight and so the added benefit is that slats allow more airflow. I see it as just a little additional insurance in avoiding any mold issues.

Conclusion

The bed was the first thing I built in my van and it was really simple. There isn’t much to it other than a couple of supports on either side and the bed frame which consists of 3 2x4s.

Beyond that, slats and a mattress are all you need to complete the bed.

One issue with the bed being higher up is that you need a footstool to get up on it or you will need to have a bench or something built in front of your bed that provides a step.

I couldn’t do this since my fridge is going under my bed so I have been using a portable step stool for now.

In the future, I will build an ottoman that I can step on to get into bed and when it’s not in use for that purpose, it will become a footrest for my swivel seats upfront.

It will also serve as an extra storage area for miscellaneous items. I look forward to building that and showing you the process as well.

So far, the bed has worked great. It’s very sturdy and the height of it is perfectly fine. It does sit up higher than a normal be would, but not too high.

The mattress starts at 35 inches above the floor and the top of the mattress sits 41 inches from the floor.

I have plenty of headroom and I can sit up straight in bed with no problems and my bikes fit perfectly underneath.

The full-size bed is nice to have in the van because I can fully stretch out just as I would in my bed at home.

I am about 5’ 10” and I still have a little space above my head and below my feet when I’m fully stretched out.

I also love how you can easily buy bedding for the mattress since it’s a standard size. I purchased a full-size sheet set and a synthetic down-filled comforter and my bed is nice and cozy even on those cool nights.

It’s comfortable and I sleep like a baby. I look forward to traveling and the many nights that I will sleep in this bed.

Do Camper Vans Have AC?

If you have ever stayed in a camper during the hot summer heat, you know that having an air conditioner can be a very welcoming amenity. It can be brutal during the summer months without a way to cool your camper and it can be downright miserable, making enjoying it nearly impossible.

An air conditioner can certainly come in handy and most RVs are equipped with them. Does this also include camper vans?

Camper vans may or may not have air conditioning units installed. Oftentimes, camper vans come equipped with ceiling air conditioners that will only run when plugged up using shore power. An air conditioner consumes a lot of electrical energy and minimalistic camper vans may be missing this feature.

Even if the camper van is not equipped with an AC unit, it is not a dealbreaker. One can easily survive the summer months and enjoy it if you are well prepared and take advantage of other means of cooling.

I do not currently have an AC in my camper van but I manage to get along just fine by making use of other cooling methods that keep me nice and comfortable.

Keep reading for ways that you can cool down a camper van, whether it’s with an air conditioner or another type of cooling system.

How Do You Keep a Camper Van Cool?

Keeping a camper van cool begins with making sure it is insulated properly. This includes also insulating or covering any windows as well.

If your camper van is equipped with windows you will have to do extra work so as not to let any heat from the sun penetrate the van. This is simple by using window covers generally made from Reflectix or other reflective or insulating material.

There are other obvious things that you can do that many people don’t think of such as parking in shaded areas.

Of course, many times you do not have the option to park in the shade and you just have to do the best you can. In the heat of the summer when the sun is beaming down at it’s hottest, a nice shade tree can certainly make a huge difference.

One of the absolute must-have’s that I consider on a camper van are windows that open up for airflow. These, along with a fan of some type will help to circulate air throughout the van making it much more pleasant during hot summer months.

Learn how I installed a rooftop fan to my camper van. This fan has been excellent for keeping me cool in the heat.

Keep in mind that you are in a camper van and can travel wherever you want to. Many camper van travelers prefer to follow the weather and travel to a more pleasant area to escape the scorching heat.

If you need more than just a fan and airflow, an AC unit is an option and there are a few different ways that you can include one in your van. Let’s talk about a few of them below.

Cargo Van Roof Air Conditioner

The primary option for an air conditioner on a camper van is a rooftop unit similar to what you would find in any other type of RV or camper.

These rooftop units sit on top of the roof and function as any air conditioner unit would by blowing cold air out of the vent coming from the ceiling.

They are typically installed in manufactured class B motorhomes. These almost always require you to be plugged into electrical service to use them. Solar energy is usually not enough to power an AC unit like this.

Another problem with these types of air conditioners is that they are big and unsightly. If you are into stealth camping, you will not want to add one of these to the top of your roof because they stick out like a sore thumb.

These also take up a lot of valuable real estate in your van roof.

They are great for people who absolutely cannot live without their air conditioner. If you live in a warm climate where it is humid and hot most of the summer, this AC will do wonders to cool your van down to a livable temperature and humidity level.

As long as you know you will be staying in RV parks most of the time or in a place that offers electrical hookups.

If you Boondock or will be off-grid most of the time, this type of AC unit will probably never get used and you might want to consider other options.

Installing an AC Unit In a Van

Installing one of these types of roof AC units in your van is similar to installing a Maxxair roof fan, which I installed in my custom-built van.

Both require you to cut a large hole in your roof and then mount the unit into the hole. This can be a scary task but in the case of the Maxxair fan that I installed, it wasn’t too bad.

One of the differences is that the AC unit is much heavier and will likely require two people to lift the unit and install it.

You will need more substantial framing to hold the AC unit tight and secure and to give it a little more support than just the metal roof.

If you purchase a manufactured class B motorhome, this will already be installed for you as done by the manufacturer so you will not need to worry about this.

If you have a custom-built van that you are converting, this may be a bit too much and you may consider going with another solution.

There are other ways to keep cool and other types of air-conditioning units that you can use in your van besides the rooftop type.

DIY Van Air Conditioner

For you to have air-conditioning in your van, it doesn’t necessarily have to be one made for that purpose. Many people have built their own cooling units and have found them to work quite well.

One of the best-known ways to create a cooling box is to use an ice cooler and some simple ductwork along with some ice and a fan that blows cold air out.

Although not an air conditioner, a unit like this can definitely make you cooler and help you enjoy your camping experience more.

Ice Cooler Air Conditioner

You can find numerous videos on YouTube about making your own cool air blowing system out of a cooler. The only problem with these is that you have to be sure you are not blowing out wet air that will make your van more humid.

The air needs to be dry to be effective.

These types of systems will probably not cool the entire van in the middle of summer but they do provide a nice cool area if you are sitting close by where the air is coming out.

With one of these, you are essentially cooling the air that is already in the van rather than pulling air from the outside and conditioning it into dry, cool air.

I prefer the air conditioner cooler from Icybreeze. These air conditioning coolers may be a little pricey but they are pre-built to function and produce dry, cool air.

Window Air Conditioner

Some people build their van in such a way that they can install a window unit air conditioner. Whether it’s in a wall or hanging out the back window, a trusty ole window air conditioner will definitely cool your van when you are plugged up.

It won’t look great, but who cares when you’re burning up in the hot summer heat?

Portable Air Conditioners For Campers

Another easy option is to purchase a portable air conditioner unit. These come in different sizes and can easily cool a camper van space or just about any other size camper. You will need to have some way to plug it up as they do use a lot of energy.

One problem with these is that they have to be vented to the outside and there isn’t an easy way to do this in a van. If you can figure out how to vent it to the outside, it could work great for you.

There are many different options for portable air conditioners that you can easily find at your local hardware store or the internet.

The SereneLife 8,000 BTU is a great option for those who want a small unit that could cool down something the size of a camper van very quickly.

Zero Breeze

One option for a portable air conditioner designed for outdoor use is the Zero Breeze. This air conditioner uses minimal energy and produces truly air-conditioned cool air designed to cool a small space such as a camper van or a tent.

Although I haven’t used this specific product, it seems like it would work great for a van. It is very pricey and it may be worth checking out if you are not concerned with price but want something that will produce cold air.

The Mark 1 uses 12 V or the optional battery that will last up to 5 hours of normal use.

The new Mark 2 has a 24 V battery that is capable of delivering cold air for up to 5 hours as well.

This product seems perfect for campers but there aren’t a lot of reviews on the market just yet so it may be risky to spend over $1000 for it.

Bottom Line

Camper vans are available with AC and can provide you with a cool space to enjoy your camping experience. However, if you are like me and do not typically have a place to plug-in, you may find yourself without the needed electrical energy to power an air-conditioning unit.

My suggestion is to make sure that your van is properly insulated, and that you always try to find a shady spot. Use windows and fans to move air throughout your van and you will notice the difference.

Beyond that, I suggest an ice cooler type of unit such as the Icybreeze since something like this does not use very much electrical power and can easily be run on a solar battery bank.

It can also double as a cooler to keep food or drinks in if you do not have a fridge or just need the extra space.

It isn’t all the time that you will need an AC unless you are just spoiled with it and have to have it running every waking hour.

Do Campervans Have Electricity?

If you are looking to purchase or build a camper van, electricity is likely a concern for you. Whether it be grid power or off-grid power, you will likely need some way to power your devices and do normal things that you would do while living in a standard home.

Electricity is often one of the major concerns for people looking for an RV. It’s important to know that you will have enough electrical power for all of your needs and these needs are different for everyone.

Some people will require more power as they are used to using more electrical devices than others.

Most camper vans are equipped with some sort of electrical hookups. These hookups are often referred to as shore power. Camper vans often utilize a solar battery bank for main power or as additional power that can supplement the shore power.

Some people prefer a great deal of solar power for their rig while other people prefer to plug-in at places they go.

Generally, people who tend to stay in RV Parks the majority of time will be fine with the standard 30 amp plugs that most camper vans or class B motorhomes are equipped with.

Let’s look at a typical scenario for supplying electrical power to a camper van.

Class B Motorhome Electrical System

The typical electrical system on a class B motorhome consists of a 30 amp plug on the side of the van. When setting up at an RV park, you can connect 30 amp service to this plug and by doing this, all of the outlets and electrical devices within the van become powered by electricity.

This is known as shore power.

When you pull into a campground parking spot, there will likely be hookups for you to use for electricity as well as water and sewage.

For electrical power, you simply plug into that provided outlet using an extension cord and then plug the other end to the outlet on the outside of your van.

Shore power

Shore power connections come in different sizes but 30 amp remains to be the most popular size. There is also a 15 amp connection available which is what I have in my custom built conversion van.

I chose to install a 15 amp circuit in my van because I only use shore power occasionally. The majority of the power in my van comes from solar energy which I have built into my van.

Custom Built Conversion Van Electrical System

Electrical outlet in my van kitchen

Can a custom-built configuration, it is common for one to install a solar system that powers the entire living space. Solar power has become popular as prices have increased and chargers and batteries had become better and better.

As an example, my van is fully powered by a solar unit from goal zero and solar panels that are mounted on top of my van from Renogy solar.

This amount of solar energy powers everything that I typically use in my van and I only plug into shore power when I need to run an electrical heater or a portable air-conditioning unit.

My van has a 15 amp plug that I can use when I am parked in a campground. 15 amps only allow me to use up to 1800 W of power but that is plenty for me to run the things that I need to run on it. My shore power only supplements my solar power.

Built-in Solar

Building solar into a van has become a very popular choice as batteries and other systems have improved over the years allowing one to get their complete power requirements from the sun.

I generally use solar for everything that I do in my camper van except for a few things.

Many manufactured camper vans offer solar as an option. Some offer large amounts of solar power but it does get quite expensive the more solar capacity you have.

Portable Power

If your power needs are pretty low, you may be able to get by with only portable power. Whether it’s solar or another type, portable power may be able to power all of your devices and serve all of your needs.

As I mentioned above, I use the Goal Zero system and there are also other portable systems like this that you can use.

Goal Zero offers multiple portable options at different prices depending on your electrical needs.

Some of the other brands that you may consider for portable power include Inergy and Jackery.

These units can be charged using the power of the sun or they can be charged by plugging into a standard AC outlet. This would work out great for someone who has minimal power requirements and can charge this portable unit regularly.

Examples of Electrical Usage in a Camper Van

What does a typical scenario look like for someone who uses electrical power while in a camper van?

Below, I have put together some examples of basic items that someone may use as well as the energy requirements needed to safely power these items.

Whether you live in your van or travel in it from time to time there are probably items that you use regularly that you do not want to be without.

Having electrical power in your van assures that you will be able to use all of the things that you are used to when living in a house.

The examples below will help you to understand basic power consumption and help to identify how much you may need in a camper van.

  • Note: the information on the items below are what you can typically expect and were taken from readings using my solar charge controller. It may vary depending on the exact product you are using. All of the items listed below are what they would draw on their highest setting.
ItemAmpsWatts
Coffee maker (120 volt AC)5 – 8 amps600 – 1000 watts
Electric water kettle (120 volt AC)12.5 amps1500 watts
Water pump (12 volt DC)7.5 amps90 watts
Lights – 6 LED (12 volt DC)1.5 amps18 watts
Roof fan (12 volt DC)3 amps (highest speed)36 watts
Portable USB fan0.2 amps2 watts
MacBook charging4.2 amps50 watts
iPhone 11 charging0.4 amps5 watts
iPad Pro charging1.5 amps18 watts
Dometic CFX 75DZW4 amps48 watts

If you were to have all of the items listed above going at the same time your amp draw would be around 40 amps.

Of course, you would never have all of these items running at the same time. Likely, you would only use your coffee maker or electric water kettle for very short periods and probably only once or twice per day.

These are the largest energy draws on the list so when you take these two items off, you are looking at more of a realistic amount at around 22 amps.

Even still, I never use all of these items at one time. The water pump only comes on when I run water and the fridge only runs for a few minutes each hour.

If you are using a solar charge controller, it’s important to note that AC powered devices must use an inverter to convert DC to AC and the inverter itself also consumes a small amount of power.

These are all of the items that I currently have drawing energy from our solar system and I never have any issues with not having enough energy.

You can read more about my goal zero solar set up here.

Deciding on an Electrical Solution For Your Van

If you are unclear on just what type of electrical solution you need for your van, you will need to understand exactly how much energy you want to use.

Are you someone who uses a lot of energy currently and needs this type of energy in your van?

Are you a minimalist and can get by with a limited amount of gadgets and other energy-consuming items?

If you want a real experience of living out of your home and having all of the energy you need to power as many devices as you want, you will want to make sure your van is equipped with a 30 amp or more plug socket.

You will likely plan to stay in campgrounds and other locations that offer electrical service.

However, if you are like me and do not use a lot of electrical equipment when you are out on the road, you can get by with a minimal amount of energy and will probably be happy with a solar solution or even a portable power solution.

Everyone has different needs and you must know exactly what you want and then seek to build a system around that need.

Conclusion

Camper vans certainly have electricity and depending on your needs, can have just enough to get by or they can have all that you could ever need.

Whether you are staying in campgrounds or living off the grid, there are many options available that can make a van powered just as you have come to expect from your home.

The options are endless and if you are interested in purchasing a manufactured class B motorhome, the technology that goes into these vans is amazing.

Even vans that use solar energy can sometimes offer enough energy to power air conditioners and heaters for useable amounts of time.

However, those who tend to live out of camper vans, are often in the minimalist camp and generally get by with the minimal amount of energy consumption which can easily be achieved by using solar or portable power solutions.

Camper Van Conversion – Installing Subfloor & Vinyl Flooring

Installing a floor in a camper van has multiple steps as you will need to first install a subfloor before installing the finished floor.

There is no one-size-fits-all when it comes to flooring on a van build. There are many different ways to approach it and the following list will detail many of the popular ways.

  1. Install the subfloor directly on the metal van floor – a lazy way of doing it and will cause an uneven floor.
  2. Use rigid foam insulation as a base to install the subfloor on
  3. Build a wooden frame so that the subfloor can be mounted evenly throughout the van

We went with the third option because this seemed like the best approach. We wanted our floor to be straight and square so the other options were out of the question.

Installing the Wooden Frame

Our flooring frame was built using 1 x 2-inch pine furring strips. These furring strips would allow us to install them on the flat areas of the van floor. On top of that, we would install the 1/2 inch plywood that would be our subfloor.

The subfloor allows a straight, square, solid base in which we will be able to install our final finished floor on. In the end, we should have a floor that looks straight with no dips or uneven areas, just like the floor in your house.

Step 1

First, we bought a bunch of furring strips and laid them out in our van to get an idea of how far to space them. The typical floor joists in a home are 16 inches apart. We wanted ours closer than that since we would be using 1/2 inch plywood, whereas a house generally uses 3/4 inch plywood.

Of course, not all the spaces were even but we made sure they were at most, 10 inches apart. The areas where we would be walking in the van received the most support. We wanted to be sure and have a sturdy floor that wouldn’t flex when moving around in the van.

Step 2

We cut each of the pieces to size and then glued them down to the floor using Liquid Nails. We also used bolts in two of them; one on the driver’s side and one on the passenger’s side.

These bolts went through the metal floor with a lock washer and nut on the underside of the floor.

We used 4 bolts in each one from front to back, that way we would have two furring strips that were solidly held in place by bolts. All the other furring strips would be connected to these two making for a sturdy base.

With the combination of bolts and glue, we had a strong base that was tightly held to the floor.

Step 3

We cut the small cross pieces to fit between the long pieces giving to floor more support.

These cross pieces allowed us to simply make the floor strong and more sturdy. They were attached using pocket screws and glue to the other long furring strips.

It’s also worth noting that we did these steps in phases. We worked on the front and then the rear and we laid down weights all over the floor to help the Liquid Nails dry more securely to the metal floor.

Installing the floor Insulation

Once the floor base was installed, we began working on insulation for the floor. Many people leave this part out and say it isn’t necessary.

However, we wanted to insulate our floor mainly because we had the space to do it and also because we hoped it would help reduce road noise.

There are varying opinions on this but we decided that using 1/2 inch Polyiso boards in the spaces between the furring strips made sense. It wouldn’t hurt anything since we already had space. Why not fill it with insulation?

Installing the plywood subfloor

Once the furring strip framing was in and the insulation was installed, we were ready to install the subflooring on top. We essentially had floor joists in which to mount the plywood on so at that point it was like working on a floor in a house.

We simply cut the plywood in three separate sections and then screwed it down in various places to the floor joists.

We used construction paper to build templates around any difficult areas such as the front rounded area and the wheel wells.

This worked great and we ended up with a perfectly fitted layer of 1/2 inch plywood for our floor.

Now with the subfloor installed, we had a nice area to stand and walk on during other parts of our build. It wouldn’t be until months later that we were ready to install the final vinyl plank flooring.

I had installed a paper along the floor to protect the floor while I was working on other parts of the van. Probably not necessary but I didn’t want to scar or scratch or get other things on the floor as I was working.

Deciding on a Finished Floor to Use

We wanted our van to look like a little home. This would entail installing a floor that looked as though it was in your home. We considered vinyl plank flooring and other engineered woods for this.

In the end, we chose to go with vinyl plank flooring from Lifeproof that we purchased at our local Home Depot.

We felt like this was the best option to use in a van build since it would be exposed to temperature extremes and possible moisture.

This flooring is supposed to be 100% waterproof and it’s difficult to determine whether its even real wood or not. It’s amazing how much it looks like wood.

Here’s what we like about it

  • It looks rustic and real which is the look we are going for in our van.
  • It is waterproof.
  • It is made of vinyl so it shouldn’t expand and contract as much as real wood does.
  • It already has an underlayment attached to it that also serves to reduce noise.
  • It seems to be very durable which is needed in a van conversion.

It’s pretty much everything we wanted in a floor, now it’s time to see how easy it is to install, what it looks like and how it holds up over time.

Installing Our Vinyl Plank Flooring

The vinyl flooring that we picked out seemed intimidating at first to install. However, we soon found out that the installation was fairly simple except for a few difficult places.

The floor cuts easily and attaches together easily which allows you to lay down the floor very quickly.

Tools we used

  • Measuring tape
  • Straight edge ruler
  • Pencil
  • Sharp box cutter
  • Saw of some sort – we used a scroll saw but a jigsaw would do the trick as well. There were a few areas where we did use a jigsaw.
  • #6 x 1 inch screws
  • Rubber mallet
  • Pull bar

Since the flooring already has an underlayment attached, we were able to simply lay the flooring down onto the plywood subflooring.

If your flooring does not have an underlayment, it will be best if you install an underlayment first. This will help cushion the flooring, deaden sounds, and remove moisture.

We started at the sliding door and worked our way towards the back of the van. We wanted to start here because we wanted to get this part perfectly straight since this will be the part that is seen first as the door opens.

Although we made sure everything was straight, there is still a chance that things could be slightly off as we work our way into the van with the planks.

If we had started on the other side of the van and worked our way towards the door, any part that isn’t straight would be instantly seen as you enter the van.

Step 1

The first thing we did on the first plank was to measure exactly how long it needed to be. This first plank also needs to be cut out to match the angles around the trim of the van.

This was easy to mark by using thick paper that we simply cut and taped together to get the exact angles. We then transferred this template to our final plank and cut the angles with a scroll saw.

Once we had the first plank cut and ready to go, we laid it down, made sure it was straight and then put a few small screws to hold it in place. These screws will later be covered with aluminum stair edging so you won’t see them.

Now that this first plank is in place and screwed down, we have a straight workplace in which to butt the other planks up against.

Step 2

Once you have the first plank in place, it’s easy to use this as the base for all of the rest of the planks. In our case, the next plank went beside the first plank. We continued this process towards the back of the van.

We decided to use this flooring in all of the areas that were still unfinished. Originally we were going to use rubber flooring in the garage area but we went ahead and used this vinyl planking since we had plenty and decided it would be a nice finished look.

It’s also waterproof and it will be easy to clean as we move things in and out of the garage area.

During this process, we simply laid the planks down and hammered them tightly using the tap that we purchased. There was also a lot of cutting around things such as the kitchen cabinets the front bench and lots of crazy angles towards the rear of the van.

We found that using a razor blade wasn’t the greatest way to cut these boards.

Although it did work in some cases and gave us a clean-cut, we mainly relied on our scroll saw to make most of the cuts, especially cuts that weren’t straight.

The scroll saw gave us a clean-cut and was straight for the most part.

However, if you aren’t comfortable with a scroll saw or don’t have one, a jigsaw works fine as well.

Step 3

After we finished the entire floor, we went around and put small screws on the outside areas that are going to be covered with trim. That way the floor never moves since it is screwed down on all sides of the van.

We will have quarter round moulding along the baseboards of the walls so any screws or nails that are put down will be covered up by this.

Just make sure you measure first so that your screw isn’t out past where the quarter round moulding will cover-up.

Tips on Installing The Lifeproof Vinyl Planks

  • With each piece you lay down, be sure and sweep any debris out of the way. We didn’t do this a few times and had some pieces that wouldn’t go down all the way.
  • Measure multiple times, think it through and take your time. It’s really easy to get all turned around when you are cutting around corners or weird angles if you are not an expert at this.
  • Be sure to have a very sharp blade. A box cutter works fine but you may need to change the blade a few times to keep it sharp.
  • You will need a good tapping block and also a good pull bar to pull the flooring tight once you get to the hard to reach areas.

Final Thoughts on the Lifeproof Vinyl Planks

Overall, we had a great experience with this flooring option. The installation process was extremely easy, even for people who have never done anything like this before.

If you want a homey look to your van, RV or any type of camper, you can’t go wrong with Lifeproof flooring.

We felt like it was the perfect flooring for our camper van build because it’s a great in-between option. We didn’t want to go with cheap-looking vinyl floor and we didn’t want to use high-end wood or manufactured flooring.

Those would not be a good option in a camper environment where the humidity levels can get high.

We won’t have to worry about that with the vinyl planks that we chose. They are supposed to be waterproof and they likely won’t be an issue with humidity.

They are also well made and seem like they would take a beating without showing any signs of wear and tear.

We are glad we chose them for our build.

Update After 6 Months

At the time of this writing, it has been around six months since installing our flooring. We have been able to put it to the test on road trips, in rain, snow and major temperature swings.

I’m happy to report that the flooring has held up very well and it seems like it was the perfect choice for us.

There is only one problem that we have noticed with the flooring. When we initially installed the Lifeproof vinyl planks, it was the middle of summer in the South and the heat had the vinyl planks expanded to the max.

When we installed them, everything was great. There were no gaps and the floor looked as if it were one seamless wood floor.

Fast forward six months and now we are in the wintertime and the temps have already been below freezing. The flooring has a few small gaps in it now where it has contracted with the cold weather.

I’m not sure how to avoid this other than installing this when it is in-between hot and cold temps. I would assume that the fall or spring would have been a better time to install it.

However, I still think there will be small gaps from the floor contracting no matter what you do.

Even still, the floor looks great even with small gaps here and there and I would assume that as it gets warm again, the floor will expand and the gaps will disappear.

Other than this minor thing, the floor is a winner and we are extremely happy with the look, feel, and durability of it.

Is a Camper Van Considered an RV?

An RV, also known as a recreational vehicle, is a mobile living space that can be pulled or driven from place to place. These recreational vehicles may also be known as campers, motorhomes, fifth wheels, pop-up campers, travel trailers and yes, camper vans.

A camper van is considered an RV since it has a livable space and can be driven and moved from place to place. Although, small in size, a camper van is large enough to provide all the essentials needed for traveling and living and can be a great solution for camping and recreation.

Types of RVs

In order to understand what an RV is and what it means to be considered an RV, you should have a basic understanding of the different types of RVs.

Recreational vehicles come in many shapes and sizes and some have benefits over others. The type of RV that one ultimately chooses is based on personal preference as well as what they want to use the RV for.

Keep reading to learn more about different types of RVs available.

Motorhomes

A motorhome has everything you need in one unit. It provides a mobile living area as well as the actual vehicle that you drive. There is no need to pull anything unless you want to pull a small car to use when you are out on the road.

Class A

A class A motorhome is the largest of all of the motorhomes that you drive around. These are basically buses that have been converted to campers on wheels.

These can be quite large and many of them have slide-outs that create more space while parked, making them even more livable and quite spacious like a house would be.

The benefit of a class A motorhome is the livability that it offers. With copious amounts of space, you will never feel cramped in a class A.

However, the downside is that they are so large and may be difficult to drive, park, store and maintain.

Class B

A class B motorhome is a camper van. This type of RV, which is the subject of this article, provides living space on wheels in a much smaller package than that of a class A.

A camper van is considered an RV but requires a different approach since it is much smaller and offers less living space than any other type of motorhome.

However, don’t let the small space fool you because class B motorhomes usually have well-thought-out floor plans that allow you to maximize space.

A class B motorhome has many benefits over other types of motorhomes with the small size of it being one of its best features. A home on wheels in such a small package is a dream come true for many adventure seekers.

Class C

Similar to a class B, a class C motorhome is built on a van chassis but has a custom living space in the back making it much larger than a class B camper van.

A class C motorhome is also easy to drive since it is like driving a van. The only difference is that the backend or the living area of the RV is much bigger and requires more space and thought into maneuvering it.

A class C is a good in-between size for someone who doesn’t want a large class A but considers a class B to be too small.

Trailers

If you have a vehicle that can tow a large trailer, this may be a good option for you. A trailer requires something to pull it so although trailers are often cheaper, you have to consider the cost of the towing vehicle that you will have to purchase and maintain.

Travel Trailer

A travel trailer is an RV that pulls behind your vehicle just like a trailer would. This type of travel trailer includes a living space similar to what you would find in other campers.

These types of trailers require some sort of vehicle that is capable of pulling the size of a travel trailer that you have.

These come in all different sizes and obviously the larger the trailer, the larger and more powerful vehicle you will need to pull it.

Teardrop trailers fall under this category as well. These small trailers provide a small sleeping area with minimal amenities.

Fifth Wheel

Fifth wheels are the kings of the pull-behind types of RVs. These are generally very large and include pull-outs to maximize living space. These can be compared to a class A RV and are usually even larger and provide a greater amount of living space.

These types of RVs require a special type of hitch in the back of a pick-up truck to be pulled. The fifth wheel attaches to the vehicle and typically has a living space such as a bed over where the hitch goes similar to how a class C RV has a sleeping area over the cab.

The downside of these is obvious, they are large and require a large vehicle in order to get you on the road.

Pulling a large fifth wheel can make for a miserable experience if you do not know what you are doing.

Park Trailers

A Park trailer is a travel trailer that looks a little bit more like a home than the typical trailer does. These types of trailers are typically set up to stay in one location throughout an entire season.

Hybrid Trailers

Hybrid trailers are travel trailers that look like standard travel trailers but also include canvas pop-outs that are designed to increase the space of the trailer. These pop-outs generally protrude out the back, front or sides.

These may also be known as expandables.

Toy Haulers

A toy hauler can be a travel trailer or a fifth wheel that also has an area in the back to haul toys, hence the name toy hauler. Many people use these to haul motorcycles, quads, golf carts or other vehicles that can be used when they get to where they are going.

If you want to travel and take your motorcycle, a toy hauler will allow you to do this while keeping it safe and secure and still allowing for ample living space. It’s similar to having a garage attached to a house.

Is a Conversion Van an RV?

What about a conversion van? We know that we can consider a manufactured class B camper van to be an RV. However, what if the van is one that you converted yourself into a living space?

In this case, there is no difference. A conversion van may also be considered an RV. Since the camper van has a living space whether it is custom-built or manufactured, it may qualify as an RV as long as it meets some requirements.

Many people are concerned with this because they would like to title their conversion vans as RVs. While each locale has different laws and rules regarding this, a conversion van can generally be titled as an RV as long as it meets certain criteria.

In many locations, the van must have a sleeping area, running water, a stove or a place to cook and have electricity just to name a few.

If this is a concern of yours, it’s best to check with your local DMV for further information and the criteria required to accomplish this.

Why Choose a Camper Van Over Other Types of RVs?

If you are searching for an RV you probably already have a type of RV in mind that you would like to purchase. In the past, I never really considered a camper van because I assumed they were too small.

I had never really looked at one in person when I first began my search. When I had gone RV shopping, it was typically in search of a travel trailer or a class C motorhome.

It wasn’t until I realized the benefits that a conversion van has over other types of RVs or motorhomes. The main benefit for me is that a camper van is easy to drive and easy to park into most parking spaces.

If you were to choose a travel trailer, fifth wheel or a larger type of motorhome, you would not have such an easy time going to places you would like to go.

It would be more involved each time that you wanted to go to a new destination. With a conversion van, I can pick up and leave at a moment’s notice and not have to worry about whether my motorhome will fit or if I will find a good place to park.

Other benefits might include:

  • Small and compact
  • Easy to drive – if you can drive a car, you can drive a camper van
  • Good fuel mileage
  • Easy to maintain
  • It doesn’t require an extra vehicle. It can be used as your get-around vehicle when you are on a trip.

Conclusion

Camper vans are becoming more and more popular as an RV option and many people are seeing the benefits of such a small solution. If your goal is to travel and see the beautiful sights of this world instead of focusing on big, fancy living areas, a camper van may be the best RV for you.

A camper van is an RV for those who are adventurous but still like the idea of having all of the conveniences that they are used to.

These types of RVs can get you to where you need to go in style and you won’t be stressed along the way.

Do Camper Vans Have Bathrooms?

A common question that one might have when they are searching for a camper van is whether or not it will have a bathroom. Most people are aware that larger motor homes, as well as travel trailers, fifth wheels and other medium to large sized RVs have some sort of shower and toilet available to use within the unit.

However, a camper van is much smaller and may not have the space required for a full-fledged bathroom. Of course, this will all depend upon the brand and model you choose to go with.

Many commercially available camper vans have some sort of bathroom option available. However, many custom-built camper vans do not have bathrooms since they take up so much space and you are already living in a very tight space. Many people make do with portable options that require less space, making for a more roomy floorplan.

This is a matter of preference and some people do not prefer a bathroom within their camper van. Many people would rather utilize that space for more storage or just for a more comfortable amount of room.

A van has a minimal footprint in which to work with and a bathroom can take away from the valuable space available.

Do You Need a Toilet in a Camper Van?

This is very much up for debate and there are many different schools of thought on this question. When I was first looking to build a camper van, I pondered this question and I did my research in-depth on the subject.

Toilet and shower in an RV

In the end, this all comes down to personal preference.

No one can tell you that you need or don’t need a toilet in your camper van. No one knows your needs or your desires for the way you wish to do your business.

Me personally? I would not want a camper van without a toilet and a shower. It’s my personal preference to have both.

Beyond that, I prefer to have my shower and toilet both contained inside my van instead of having to use an outdoor shower as many campervan dwellers use.

Having utilized my shower and my toilet quite often out on the road, I can say for sure that having these two things are a necessity for me and I’m glad I put them into my van.

This may have been a different story if I had built a van in my younger years. When I was in my teenage years or my 20s, I may have had a different opinion and different needs.

However, now that I am in my 40s, I prefer my alone bathroom time and I don’t have any desire to seek out public toilets and showers.

Of course, some campgrounds do have nice facilities to use and I do make use of them occasionally but I like being self-sustainable. Besides that, I don’t stay in campgrounds very often and I prefer to be off-grid as much as possible.

The off-grid lifestyle is one of the reasons I built my van for traveling.

Camper Van Toilet Solutions

Unlike larger motorhomes, there aren’t a lot of options for the smaller spaces in a van. You can have a toilet solution but don’t expect it to be the roomy version that you may be used to in a standard home or larger motorhome or RV.

Many camper vans utilize cassette toilets but there are other options available as well. Let’s look at some of these options below.

Cassette Toilet

Perhaps the most popular option for smaller RVs and Vans. This is what I prefer and it has been a great solution for my needs. If you aren’t aware of how a cassette toilet works, it’s similar to a real toilet.

It has a toilet seat that you sit on and the bowl fills with water while you are doing your business.

It has a clean water reservoir that is used to flush the toilet after you are finished and the dirty water flushes straight into a holding tank which can be dumped at a later time.

I generally only use my cassette toilet for number 1 and I find it to be the perfect solution for this. I have no problems using it for number 2 as well and have done this on occasion and it worked fine.

However, I like to keep this as my main way to pee while I use another solution below to do the other stuff.

It doesn’t take up much space and stores away easy as needed.

Here is the cassette toilet that I use and recommend.

Composting Toilet

Composting toilets have gotten a lot of praise since they offer a mostly odor-free solution.

However, it isn’t without its drawbacks.

Similar to cassette toilets, they have to be dumped regularly. The urine jug has to be dumped every few days depending upon how much it is used.

The composting area will also need to be dumped once a month or so, depending on the amount of usage.

The benefit of the composting toilet is that it separates the solids from the liquids, or in other words, the poop from the pee.

Most of them have a fan that runs continuously and pulls air across the solids and allows them to dry and compost within the composting medium. Most people report that there is no odor, even while using it.

The downside is that it is a bit larger than most cassette toilets and it has to be connected to an electrical source to run the fan. It also needs to be vented so that the stinky air can escape the van or RV.

Another downside is the cost. A composting toilet is the most expensive option that van dwellers consider.

The Nature’s Head is one of the most popular composting toilets on the market.

Dry Flush Toilet

Perhaps you don’t want to deal with the usual problems associated with toilets that you have to dump. If you are looking for a solution where you can do your business and then not have to see it or dump it, a dry flush toilet may be for you.

This type of toilet uses cartridges that contain a certain number of flushes. With each flush, the waste is sealed in plastic. The entire cartridge gets dumped after the allotted number of flushes has been achieved.

One problem with these types of toilets is that they are not the most environmentally friendly. There is a lot of plastic waste involved in these. Besides that, they are expensive and you have to refill with cartridges to keep on using it.

The Laveo Toilet is the best example of this type of toilet.

Portable Bag Toilet

Similar to a dry flush toilet, a portable toilet is made up of a toilet seat that has a hanging bag in which you do your business. They often contain a gelling product that turns liquids to solids and can be used multiple times.

After use, the bag can be thrown into a standard trash can. Similar to picking up your dog’s poop and throwing it in the trashcan using a doggy bag.

One thing that sets these apart from a dry flush toilet is that most of these use a biodegradable bag so you can feel better about tossing them in the trash. Although, I don’t trust this and I usually see this as marketing hype.

I currently use the Cleanwaste Go Anywhere Portable Toilet as my solution for number 2.

I can do my business and then seal the bag up and toss it into the trash. It does feel a bit wasteful because it seems like a lot of plastic bagging but since it’s supposed to be biodegradable, I have settled on this solution for now.

Bucket Toilet

If you do not want to purchase the Cleanwaste Go Anywhere solution, you can always just use a bucket. One of the most popular ones is the Luggable Loo.

Of course, you can just purchase your own, cheap, five-gallon bucket and create your own. You can also purchase your own biodegradable bags to go into it making it a decent solution.

A bucket toilet can be stored out of the way and even used to keep other items in when not in use.

Camper Van Shower Solutions

Who doesn’t like a good warm shower? Especially when you are camping or living in a van. Although a hot shower might be hard to come by, having a shower is possible and there are many different solutions that you could choose from.

Full-Featured Shower

A full-featured shower is one that is set up just like the showers that you may be used to in your home. This is what I chose to go within my van and I am so glad I did for a couple of different reasons.

Custom shower in van

The first reason is that it is great to step into a real shower after a day of hiking and sweating and clean off just like you would in your house.

Although there is not as much space, you can still get the job done. There is no setting up or tearing down. It’s easy to take a shower, wipe the walls down afterward and you are done.

The second reason is that the shower space allows for an area in which I can dry wet clothes, towels, wash rags and other things that may need airing out.

I can hang them up to dry on the shower curtain rod and they will remain out of my way and if there is any drippage, it will end up in the shower pan and make its way down the drain.

This is quite handy for someone like me who hikes and bikes while out in my van. I often come back from the trail sweaty and hot and it feels good to cool off in the shower and then wash my clothes off in the sink or the shower and then hang them to dry out of the way.

Although a shower like this is the most difficult to build, it is definitely worth the effort if you are like me and want a way to take a shower without hassle.

In a commercial class B motorhome, you will often find a built-in shower similar to this. However, many of them don’t have showers installed or have the option to leave it out in favor of more space for other things.

Portable Shower

I had considered using a portable shower in my van build but decided against it in the end. A portable shower is great for someone who wants to save space and not have a dedicated shower permanently in their van.

One of the best portable showers is the Big Kahuna. Although it looks quite cheesy and is just a customized dog food container, it works great as a portable shower and has good water pressure.

It doesn’t use a lot of energy and even has a heating option available so that you can take hot showers.

Roof-Top Shower

If you want a hot shower, a rooftop system may be the choice for you. A rooftop system is a tube that sits on the top of your van that holds water. This water gets heated in the sun and offers you a warm shower.

The only problem with this type of shower is that it has to be used outside. You’ll have to be in a place that allows outside showers and also a place with enough privacy for you to wash without drawing attention.

These types of showers can be great for those who Boondock often and who are in areas where they can obtain more privacy. Many people choose to shower in their bathing suits which works for a quick cleanup.

Water Pan

Probably the simplest solution for washing yourself in a camper van is by filling water into a simple water pan, a bucket or some kind of large container.

I have even seen people use small swimming pools as a place to sit in and scoop water up onto their bodies and wash off.

One good option is a collapsible container. These containers take up very little space when collapsed and then you can uncollapse them to create a basin for you to add water to. The good thing about this is that you can even heat the water before putting it in the basin.

Pros of Having a Bathroom

  • Convenience – go when you want without waiting or searching for a place.
  • Privacy
  • Cleanliness – no worries of going after others in public bathrooms.
  • Less stress of having to find a place to use the bathroom
  • Provides a place to store wet items – hang dry clothes and towels and keep them out of the way
  • Feels more like a home – who would want to live in a home without a bathroom?

Cons of Having a Bathroom

  • Takes up a lot of space in a small van – some people see this as a deal-breaker when considering a bathroom in a van.
  • Requires more water usage – showers use a lot of water and you’ll need water for cassette toilets if you use one.
  • You have to dump toilets – this can be the worst part but it isn’t that bad if you stay on top of it and don’t leave it sitting for days.

Conclusion

Each person will have to decide for himself or herself whether or not a bathroom is a good idea to have in a camper van. Everyone has different needs and will not come to the same opinion on this matter.

Camper vans can have bathrooms that are quite nice and will allow you to conveniently wash off and use the bathroom anytime you want.

As I stated earlier in the article, I wouldn’t even consider having a van without a bathroom. To me, this makes living or camping in a van a much more pleasant experience.

Camper vans aren’t cheap so I would expect them to have all the conveniences that I’m used to at home.

So if you are seeking out a van that has a bathroom, you are in luck because you can certainly find them and you can also build one in your conversion van.

On the other hand, if you don’t want one, you are also in luck because you can certainly find camper vans without a bathroom. Many people make do without one and they are happy to use public bathrooms along their journey.

Are Camper Vans Easy To Drive?

If you are considering purchasing a camper van or even renting one for a trip, you may be wondering if it will be easy to drive. We know that motorhomes come in different sizes and the larger motorhomes may be intimidating for someone who isn’t experienced with driving something of such a large size.

However, a camper van is not nearly as large as a Class A motorhome or even a Class C motorhome. A camper van, also known as a Class B motorhome, is the smallest type of motorhome that you can drive.

Since they are smaller than most other motorhomes, one might assume that a camper van is likely easy to drive. Is this the case?

Camper vans are similar to driving standard passenger cars and trucks. Most of them are built on standard van chassis and include all the comforts and controls that you’ve come to expect in a vehicle. Although they come in different sizes, the average van is around 20 ft in length and is easily maneuverable as well as easy to park in most residential parking areas.

When I first considered purchasing one of these types of vans, this was one of my first concerns. I didn’t want something that was difficult to drive and would cause me stress on my trip.

I didn’t want to be concerned with safety on the road or backing into something or not being able to park in tight spots. However, what I have found after owning a camper van is that it is actually easier to drive than the medium-sized pick-up truck that I own.

Most modern vans are equipped with back-up cameras and other safety features that make them easy to get in and out of places just as you would a smaller car.

Even if a camper van is not equipped with a backup camera, it’s a very simple process to add one. I had to add a camera to my van because it didn’t come with one from the factory.

This was one of the best upgrades that I made to my van because the backup camera has allowed me to feel confident that I will not back over someone or hit another car that is behind me. It has made the experience a safer one as well as a less stressful one.

I’m often surprised at how easily maneuverable my camper van is. I’ve never gotten into a situation that I was scared I was stuck or couldn’t get out of.

If you are concerned that a camper van may not be easy to drive, you will most likely be interested in smaller camper vans so that you will maintain ease of driving that you may be used to.

The following list contains some of the smaller camper vans as well as standard commercial vans that could be converted to campers. These are ideal for someone who wants a small motorhome that is not difficult to drive.

The list below contains some examples of current Class B motorhomes that have a small footprint and make RVing easy. These vans give you everything you could want in a camper that is easy to drive and a pleasure to camp or live in.

  • Winnebago Revel
  • Pleasure Way 2020 Tofino – a small van with a pop-top.
  • Carado Banff
  • Coachmen Nova
  • Roadtrek SS Agile
  • Roadtrek Zion
  • Storyteller Overland Mode 4×4
  • Hymer Aktiv (no longer in production but can be found used.)
  • Volkswagon California (Europe only as of 2019)

Commercial vans with a chassis that has a small footprint and are easy for most people to drive.

  • Ford Transit – The regular and long versions are both small enough that anyone would feel comfortable driving them.
  • RAM Promaster – 136 or 159-inch wheelbase models are easy to drive and can be parked in nearly any standard parking spot.
  • Mercedes Sprinter – the 144-inch wheelbase is a small, manageable size and easy to drive.
  • Chevrolet Express – Although this is a low roof van, it is much like driving a standard vehicle or minivan. A pop-up roof can be added for extra space.
  • Ford Econoline – Similar to the Chevrolet above, the Econoline is small and is another great choice if you want an added pop-up.
  • NISSAN NV – Small and similar to driving a pick-up truck.

View from the cockpit in my Ram Promaster

Tips For Making a Camper Van Easier To Drive

  1. Purchase a van that you feel comfortable in. You should not feel stressed when sitting in the cab of your camper van. You should feel relaxed as you would in a standard passenger car.
  2. Be sure you have mirrors that cover all blind spots. Mirrors are invaluable in providing a safe experience as well as making your van easier to drive.
  3. Choose a van with a backup camera or install one yourself. A backup camera is essential, especially if you are not used to driving something the size of a campervan.
  4. Uncover all windows when driving. I see many people in class B motorhome’s with window coverings on the rear windows while they are driving. This could make for a dangerous situation since your field of view will be less.
  5. Avoid smaller roads. If possible, always travel larger roads and interstates to get to your destination. If you are unsure of a road, it’s best to avoid it.
  6. Always be aware. This should remain unsaid because we should always be aware no matter what we are driving. However, it’s easy to become unaware in a car that we are so used to. A larger van requires that you always maintain awareness of your surroundings to avoid accidents.
  7. Allow enough room to stop. A heavily loaded camper van may need more space to stop than you are used to with a passenger car. The more weight a van is carrying, the more space will be required to stop. Always be cautious of this as you are driving and do not follow cars as closely as you might do in a standard passenger vehicle.

Times When Camper Vans Might Be Difficult To Drive

There are a few scenarios that you might run into when a camper van might be more difficult to deal with. However the same could be said for any passenger vehicle.

There are often times, even in my car, that I am stuck in a situation that I would rather not be in. A camper van isn’t very large and isn’t a problem for most people, but some people may have difficulties in the following situations.

Blind Spots

On my Ram Promaster Class B motorhome, I have a blind spot on my passenger side when I am pulling into oncoming traffic on that side.

Backup camera

There have been times when I could not see anything and did not know if it was safe to pull out onto the road or not. Fortunately, I had a passenger that was able to tell me when it was safe to go.

This was a beginner mistake by me when I was new to driving it. I have since learned that I cannot angle my way into a median in order to pull onto the road. I have to pull straight out so that I can still have a full view of oncoming traffic.

It may take some time for you to discover blind areas and problems like this. Practicing driving your camper van in a low traffic area will help.

Parking Lots

It can be a challenge to park in busy parking lots if you have a larger van. There are some parking lots that I have been to where there was not enough room for me to even pull into a spot.

It’s important that in these situations you always judge the situation first before making a decision. The times that I have been in small parking lots like this, I realized that it would be difficult for me to get in and out so I continued and found a better place to park.

You will need to use common sense during times like this and you will also need to know the size and limitations of the van that you are driving. It is also best that you simply avoid areas like this especially when you are first learning to drive your van.

Gas Stations

You may be used to pulling your car into a gas station to fill up with gas, but a large van may take a bit of an adjustment. With a van, you may not be able to swing in as tightly as you are used to in a smaller car.

You will probably have to swing out further and allow for a further turning radius than you may be used to. This all takes practice and you’ll get used to it soon enough as you spend more time driving it.

A tip for making gas stations easier is to always seek out the end pumps so that you have more room to work with on one side.

Windy Conditions

Wind can often wreak havoc on a van, especially if it is a high roof van. There have been many times when I have been driving on the interstate and the wind shakes my van from side to side much more than it would the standard vehicle that I often drive.

During these times, you should slow down and pay close attention to the road and your surroundings as well as other drivers.

Create A Checklist

A checklist can be a great way for you to make sure that you are safe as you go about driving your van. Similar to how a pilot runs through a checklist before taking off in an airplane, you should use a checklist in order to ensure things are secure and in order and ready for the road before taking off.

A checklist can help you to not forget simple things like strapping down water jugs or turning off the water pump or closing the vent fan.

Tasks like these are easily remembered if you run through a checklist each time you drive your vehicle. Not only will this make it a safer trip for you, but it will also allow you to drive without the stress of wondering if you did everything you were supposed to do.

Conclusion

Camper vans are almost always easy to drive. If you can drive a car, then you will likely have no problems whatsoever driving one.

It may be intimidating at first, but you will quickly get used to it and realize that it is not much different than driving your standard car. Just like anything new, there is always an adjustment and it becomes more familiar the more you do it.

If you are new to driving a van, the best way to improve is to drive it more often.

Practice driving your van on less busy roads and in areas that you know very well. As you improve your driving skills you may then seek out more difficult areas to drive in and pretty soon you will be a master at driving your camper van.

Installing a Swivel Seat in a Camper Van – Illustrated Guide

If you are converting a van into a camper van, you may have considered installing a swivel seat. Of course, this will depend upon your planned layout but most people will benefit from having a swivel seat because they make use of the front seats and add more living space to your van.

They also become the most comfortable place to sit in your van and will leave you fighting with the other occupants over who gets to sit in them. If you only have one seat that swivels, you may be in for a big fight.

The first thing you’ve got to do is find a swivel seat. They are in high demand and are often back-ordered. I had to be put on a waiting list at Eurocampers.com so I would be contacted when they were in stock.

The passenger side was the one I wanted to make sure I installed first because that would be the most useful one in our van configuration.

Now, if you are buying a brand new van, you may be able to have swivel seats installed from the factory. This would be the way to go if you were going to order a brand new van.

However, what most people do is buy a van, whether it’s used or new and then they purchase a swivel base and put that in, which is what I decided to do.

I decided with my van layout, it makes the most sense to have a swivel seat so that you can turn around and now that comfortable seat up front becomes a seat that you can use for the living space of your van.

Once the swivel base was in stock, I placed my order. I ordered the 2014 – 2020 Ram ProMaster Swivel Adapter for the passenger seat. I paid $269.

It only took a few days to receive it and then I got started with the installation.

Installing The Swivel Base In A Ram Promaster

The following are step-by-step instructions on how you can install a swivel base in your van. Note: this particular swivel seat is for the Ram Promaster but is typically the same process no matter what van you have.

Disconnect The Battery

The first thing I did was to locate the battery compartment. In the Ram Promaster, the battery is on the driver’s side floorboard so it’s really easy to get to.

You don’t have to pop the hood as you do on most vehicles. The battery is located inside the cab. The Sprinter and Ford Transit are the same way. They are both located inside the cab, making it easy to service.

If you have the Nissan NV, the battery is located under the hood so it’s not as convenient.

Once you locate the battery you will simply disconnect the negative battery cable from the battery.

This will ensure that no power will be going to the airbags from the seat that you will have to disconnect. You don’t want the airbag going off while you’re working.

After you have disconnected it, you will want to wait 10 minutes.

However, I’m always extra cautious so I waited 15 minutes.

I just set a 15-minute alarm on my phone and once the alarm went off I knew it was OK to disconnect the cables on the seat.

Disconnect Cables From Seat

There are three cables in the Promaster and you will have to disconnect all of them. There is an orange one, a yellow one, and a black one. They are really simple to disconnect.

The orange and yellow one has a purple slide that you will use to disconnect. The black one has a pushpin that you will push while pulling and it will disconnect.

After these cables have been disconnected, you will need to cut some of the zip ties that are holding the cables onto the seat mount.

After all of this is done, you will be free to remove the seat after the bolts have been removed as explained in the next steps.

Removing The Seat Base Bolts

Six bolts hold the seat to the base and all of these will need to be removed in order to remove the seat. You will need a T 40 socket to accomplish this.

You’ll just need to use the T 40 socket to loosen all six bolts and remove them. Once they have been removed the seat will lift off of the base and you can set it aside while you do the next steps.

Installing The Swivel Base To The Seat Base

The swivel base is going to line up using the same six holes as the seat did. Although it will use different bolts, it will be as if you were installing the seat back onto the base.

Once you have the swivel base on to the seat base, rotate it so that you can see the bolt holes. You will want to use the bolts that came with your swivel base to tighten the swivel base down.

After these bolts have been tightened, you will likely notice the first problem in the installation.

The problem will be the front bar underneath the seat. This bar will be hitting on the swivel base. The instructions say that it will do this but that it won’t cause a problem.

However, this is not accurate. It does cause a problem because when you try to swivel, you will be hitting on the bar and the swivel will scrape on it and make it difficult to swivel.

That bar is simply in the way and you will need to do something to get it out of the way.

My solution was to use a rubber mallet to hammer the bar down slightly so that it was out of the way. This way it would not be making contact with my swivel base any longer.

However, be careful not to hammer it down too far or you will bend the seat base sides and the bolt holes will no longer line up. They will be at an angle, making the bolts harder to install. I did this the first time around and had to hammer the bar back up a little.

You will want to bend this bar first and then put the base on without bolting it down in order to test that it has clearance.

Make sure it will swivel without hitting. If it will, you are good to go and can go ahead and bolt the base down.

Once the base is installed, then you have the swivel seat installed. You are back to where you started from when you took the seat off. Now all you have to do is put the seat back on to the swivel base using the same 6 holes.

You’ll use the socket bolts that came with it. You will need a 6mm hex wrench to install those. Just line the holes up and tighten down the bolts. Be sure to get them all started before you tighten them all down.

Once these are tightened down, the swivel seat is now installed.

Reconnecting Cables

Once you have finished you are going to want to reconnect all of the cables that you disconnected in the beginning.

Once you have the cables underneath the seat reconnected, you can reconnect the negative battery cable.

After doing this, the seat will be fully installed and ready for use. Enjoy!

Testing the Swivel

There are a few things I noticed when testing the swivel base for the first time with the seat on it. The first thing is the lever hits on the seat and doesn’t allow you to pull the lever up if the seat isn’t in the proper position.

To swivel, you will need to pull your seat forward but the lever will not raise up all the way if your seat is too far forward. However, if your seat is too far back it will hit the side of the van as your swiveling making it difficult to swivel.

There is a sweet spot that you will need to discover to make swiveling work for your seat. I’m not sure why the lever is designed the way it is. It seems as though it is bent in too far and hits the seat in a way that it shouldn’t.

This could be a problem with my swivel base or it could be a poorly designed product. Not sure which.

Using the Swivel Seat On The Road

If you are wondering how this swivel base performs, I have taken my van out on a few trips and have learned what I like about it and what I don’t. Overall, it has been great but there are a few things that I do not like.

Let’s look at the pros and cons.

Pros

  1. Creates more living room in your van. For my layout, it creates an additional seat for using the table that I have mounted on a Lagun mount. I can use the seat and someone else can use the bench seating and the Lagun table can be positioned where you need it.
  2. Well built – heavy-duty – high quality. It seems like it came from the factory. Besides a few issues with alignment, it fits and works great.

Cons

  1. The seat lever is a possible problem. When I want to swivel the seat around, I have to move the seat back into its furthest back position so that I can raise the lever. Once the lever is raised, I have to move the seat back up so that it can swivel around without hitting the van door. It seems like the lever could have been better designed or positioned.

Having a swivel seat has been great and it really opens up my van to make it feel bigger. I can’t imagine not having it now that I have gotten used to it.

I have considered putting one in the driver’s side but the swivel base raises the seat an inch and a half and I feel that this might be too much for the driver seat.

As it is now, the passenger swivel seat is working great in my van and hopefully, these instructions will help you install one into your van.

Can You Park a Camper Van Anywhere?

Since camper vans are so small and can be similar to driving a car around, one might think that they can be parked anywhere. This is true if you are only concerned with parking your camper van during the day time.

Most camper vans can fit into standard parking spots so you should have no problem parking a van anywhere. However, this doesn’t mean that you can park in a spot and expect to set up camp there for the night.

This was my hope when I initially began building a camper van for myself.

The fantasy that I had was that I would be able to pull off the road onto an overlook or some remote parking lot, and I’d be able to park for the night and sleep no matter where I was.

It’s easy to think something like this when you see it happening all over the Internet. People are creating YouTube videos and writing about their experiences of stealth parking and stealth camping.

Who wouldn’t like the idea of parking for free nearly anywhere and enjoying the night without having to pay for a camping spot?

It certainly makes the lifestyle more attractive and much cheaper. It also makes it more flexible as to where you can stay. But is it really like this?

Can you park a camper van anywhere?

I wasn’t sure about this myself until I finished my camper van and actually got out on the road. After traveling a bit and doing my research, I learned that parking a camper van anywhere you wanted wasn’t going to work.

A camper van can be parked nearly anywhere that a car can during posted hours. However, you are generally not allowed to park overnight in most public places unless specifically stated. Parking in restricted areas without permission may result in fines, towing or even further legal action.

Of course, there is a chance that you will not be caught in some places but this is a risk you’ll be taking. There are many designated areas that one can park overnight without the fear that someone will come knocking in the middle of the night and ask you to leave.

I prefer to park in designated areas where parking overnight is allowed. These places are not always free but it gives me greater peace of mind knowing that I have permission.

Where Can You Park a Van Overnight?

Here are 10 places for you to look when you are looking for a spot to say the night in your van or RV.

Public Lands – BLM

If you live on the East Coast of the United States, public lands are not an option. However, there are many places to park on public lands in the western states of the United States.

BLM land is managed by the Bureau of Land Management and may be used by the public for Boondocking and other types of Camping.

Walmart

Walmart generally allows RVs to park overnight in most of its locations. However, many Walmarts do not allow this and you will be asked to leave if you are caught. This is often a problem for larger motorhomes but camper vans may go unnoticed in a large parking lot such as Walmart.

Anytime you have a 24-hour store that is as large as Walmart is, it is easy to park without being noticed by others especially in a smaller van type of motorhome that may blend in well with other cars.

It’s best to always ask management for permission before you try this. Call ahead or ask for a manager when you arrive to make sure you are allowed to stay the night.

Side Streets

There are many side streets that you may be able to park on and blend in with the rest of your surroundings. This may also be allowed on city streets where signs are not posted that prohibit overnight parking.

Many streets have signs that say no parking during specific times such as 9 AM to 6 PM. This means that after 6 PM, you may be able to park as long as you are gone by 9 AM.

You have to be careful in parking spots like this and make sure that there are no other signs that strictly prohibit overnight parking.

Private Property – using HipCamp.com

One of my favorite ways to park my camper van is by using other people’s property. Although this is not free, it is often a very fair price for a peaceful night’s sleep without worrying whether or not you are allowed to park there.

My favorite place to find parking like this is using hip camp.com. This website is similar to Airbnb except it offers camping spots or RV parking on people’s private property.

My experience with Hip Camp has been wonderful so far. The first time I used it, I found myself parked on a secluded farm beside a creek in the foothills of the smoky mountains.

This parking spot for the night only cost me $15 and I never saw another person other than the owner of the property, who greeted me and then left me alone to enjoy my evening.

Locations like this are the reason that I was interested in building my camper van and these are the locations that I look forward to visiting.

Harvest Hosts

My second favorite way to park my camper van is by using Harvest Hosts. Harvest Hosts is a network of businesses such as wineries, farms, distilleries, golf courses and museums that allow you to stay one night for free at their location.

Although free, it is generally expected that you support the business by purchasing some of their products. I do not mind this at all as I am generally visiting places that have products I would be purchasing anyway.

The picture below is my van parked at an apple orchard where I stayed the night for free. It was a peaceful night in the Blue Ridge mountains near Asheville North Carolina and I was able to purchase some Great tasting apple products as well as breakfast in the morning before I left.

This was a wonderful evening and a great location for parking a camper van.

Visit Harvest Hosts for more information about the memberships that they offer.

Boondockers Welcome

The Boondockers Welcome membership connects you with other property owners who are willing to allow you to stay at their property for free. These are typically fellow RVers who have space and are kind enough to offer it to other people for the night.

I have not used Boondockers Welcome but I have heard great things about it and I intend to try it out soon.

Visit Boondockers Welcome for more information.

RV Parks & Campgrounds

The most obvious place to park your camper van is in an RV park or campground. Although these are not the ideal location if you are seeking a peaceful refuge from the daily grind, some of them can be a great place to stop for the night and they also allow you to dump gray tanks and re-fill your water if needed.

It’s often a good idea to include a stay at an RV park during a trip that you are taking. I prefer to stay at these often because it gives me a way to dump my cassette toilet and to refill water as needed.

They also provide a place for you to take a hot shower and use a toilet if you do not have one in your van or do not want to use your own.

This can be nice if you have been out on the road and need a nice warm shower to refresh yourself.

Cracker Barrel

Cracker Barrel restaurants are another place that you may be able to park for the night. Many of these restaurants allow motorhomes to park similar to the way Walmart does.

Some locations do not allow this so you will need to check with management and call ahead before you assume that the one you are headed to allows this.

One downfall of this is that most Cracker Barrel locations are located right off the interstate. If you are sensitive to noise, you may have a difficult time sleeping throughout the night with all of the loud interstate noise only a small ways away.

Rest Areas

Rest areas can be a lifesaver when you are out on the road and can’t find another place to park. You can always pull into a rest area off of the side of the interstate and catch a nap or even sleep for the night in certain states.

Similar to Cracker Barrel’s that are mentioned above, rest areas aren’t far off the interstate and are noisy 24 hours per day.

A rest area gives you a place to use the restroom and possibly dump your cassette toilet which can be great if you are in a pinch.

Here is more information on different state rules regarding overnight stays in rest areas.

Camping World

Camping World has been known to allow overnight parking at some locations. Many of these do not allow it so you will need to call ahead to determine whether or not a location participates.

Van Life Parking App

  • iOverlander – this is a popular app for finding free Boondocking locations where you can park for free. It is user-submitted data and is not always accurate so use it at your own risk.
  • RVParky – This is an outstanding resource for anyone seeking to stay overnight in an RV. You will find campgrounds, Walmart locations and other locations that allow you to park overnight. Visit RV Parky or download the app to your phone.
  • Campendium – This is similar to RVParky and gives you details about campgrounds and other overnight locations for the area you are in. Visit Campendium for more information.
  • RoadTrippers – This is more than just a campground or overnight stay finder. You will tell the app where you are starting from and where you are going to and it will show you things to do and allow you to discover places you might not have thought about. Visit https://roadtrippers.com/ to learn more.
  • Park4Night – This is a great resource for anyone traveling in Europe and will allow you to find places to camp overnight.

Tips For Overnight Camping in a Van

The following are a few tips that you can use that will help you to make the most of your experiences in your camper van.

  1. If you are unsure, don’t do it. If it feels like you are parking somewhere you probably shouldn’t be, it’s probably a good idea to pack it up and go somewhere else.
  2. Plan ahead. If you just set out without a plan thinking that you’ll just park stealthily wherever you can, you may run into problems when you are unable to find a safe place to do so.
  3. Always seek permission. If you pull into a Walmart or another place that you think allows overnight parking, see if you can find management and ask if it is allowed. This may help keep you from being awakened in the middle of the night by authorities.
  4. Consider joining Harvest Hosts or Boondockers Welcome. If nothing else, these can be the last resort type of solutions when you are out on the road. It’s always good to have as many options as possible.
  5. Always have a backup plan. This may not be always possible but it’s important to understand that you may have to move and go elsewhere if you are stealthily parked in a camper van.

Conclusion

It would be great if you could just hop in a camper van and go anywhere you want, park for free and live with no worries. However, it isn’t quite like that in reality.

Although by looking on the Internet, you would think that this is the reality and many people are disappointed when they try to live this lifestyle. Parking a camper van requires some thought and planning just like traveling in any other type of motorhome or RV.

The location that you are in can be a huge factor in where you are allowed to park and where you are not. Rules are different in different areas and it’s always best that you do your research and learn where you can and can’t park so that you will know before you go.

Most importantly, you should always strive to stay safe. It isn’t always safe in areas where you might succeed in parking for free overnight.

I would rather pay for a spot and know that I am safe than to take a chance on staying in a place that isn’t safe.

Why Are Class B Motorhomes So Expensive?

When I first became interested in purchasing a motorhome, I assumed a class B would be the least expensive way to go. After all, a class B motorhome is the smallest type that you can buy. Why wouldn’t they be the cheapest?

I assumed that the smaller the RV, the lower the price.

However, what I found once I began my search was the exact opposite. The expense of these types of motorhomes was much greater than I expected.

It just didn’t make sense to me that a small camper van can be as expensive and often even more expensive than a larger motorhome.

After much research, I concluded why class B motorhomes are so expensive.

Class B motorhomes are expensive because they are in demand and aren’t as mass-produced as larger motorhomes. They are built on expensive chassis and are more difficult to create since there is less space to work with. They often have higher-end components and materials and are built by skilled workers. They have great fuel economy and are easy to drive, unlike many larger motorhomes.

I can attest to the fact that class B motorhomes are difficult to build. I learned this the hard way as I set out to build my own camper van from scratch.

I used a Ram Promaster van for my build which a lot of manufacturers use. These types of vans have tight spaces in which you have to work with. It takes skilled workers to create one of these masterpieces in such a small vehicle.

I am not a skilled worker but I did manage to create my custom van after some trial and error and lots of four-letter words.

Beyond the Ram Promaster, class B motorhomes are often built on other expensive chassis. The most common ones include the Mercedes Sprinter and the Ford Transit.

When you factor in the cost of the chassis, which is the starting point of the motorhome, the additional parts and man-hours can add up quickly to make these types of motorhomes very expensive.

The Ram Promaster 2500 with a high roof and 159-inch wheelbase starts around $36,000 and the Mercedes sprinter starts around $40,000 for the 170-inch wheelbase, high roof cargo van.

By the time you add high-end materials and man-hours, it is easy to see the cost of these motorhomes reaching the levels that they do.

I learned that it isn’t just about the size of the motorhome that matters. There are many factors involved in the expense of the motorhome.

You are probably well aware of the prices that some of these RVs can reach but just in case you aren’t, here is a list of some of the popular class B motorhomes and the prices that you can expect to pay for them.

10 Examples of Class B Motorhome Costs

The following is a list of popular class B motorhomes and what they cost. These are the approximate MSRP costs for new units. Keep in mind that you will likely be able to purchase these for less than what the MSRP is.

1. Winnebago Revel – $163,292

The Revel starts at $163,292 and is built on the 4×4 Mercedes Sprinter chassis. This motorhome is made for off-road adventure.

2. Winnebago Travato – $114,455

The Travato starts at $114,455 and is built on the Ram Promaster chassis.

3. Carado Banff – $71,625

As one of the more affordable class B motorhomes, the Banff starts at $71,625 and goes up depending upon the options you choose. It is built on the Ram Promaster chassis.

4. Roadtrek E-TREK – $178,211

The Roadtrek is a premium motorhome that comes with a hefty starting price tag of $178,211. It is built on the Mercedes Sprinter chassis and is made for those who want a luxurious camping experience.

5. Roadtrek Zion – $101,681

Cheaper than the E-Trek but still a hefty price tag. The starting price is only $101,681 for the Zion and it is built on the Ram Promaster chassis.

6. Pleasure Way 2020 Plateau FL – $150,735

Built on the Sprinter chassis, the Plateau FL is a luxury motorhome that starts at $150,735. It is among the most luxurious class B motorhomes that you will find.

7. Pleasure Way 2020 Tofino – MSRP $70,850

If you are looking for a cheap class B motorhome, the 2020 Tofino may be your best bet. Although not cheap, it starts at only $70,850 and is built on the low roof, Ram Promaster chassis. It has a pop-up roof for additional headroom.

8. Coach House ARRIVA – $151,000

The Arriva is another expensive class B that is built for those who want a premium experience. At a starting price of approximately $151,000, it is for those who are serious about wanting a top of the line motorhome. It is built on the Sprinter chassis.

9. Fleetwood Irok $100,000+

Built on the Ram Promaster chassis, the Irok is a luxury class B with a starting price of over $100,000. There are different models and options, making it difficult to determine an exact MSRP.

10. Thor Motor Coach – $91,875

Starting at $91,875 for the 20L model and $93,125 for the 20K model. The Thor Motor Coach is built on the Promaster chassis.

As you can see, buying a class B motorhome takes a large financial commitment. The prices of some of these rigs seem like total nonsense for some people and I can understand that feeling. It’s a high price to pay for such a small place to live in.

If you aren’t interested in paying a small fortune for one of these motorhomes, you can always opt for used units. Buying a used motorhome can be a great way to get into a class B for less.

Buying a Used Class B Motorhome For Less

A used vehicle can often be a risky thing to buy. A motorhome can certainly be risky as well and could come with issues that you may not be aware of.

It may be more difficult to obtain information on the history of motorhomes. This means that you may not know anything about the motorhome, who owned it or if proper maintenance was done on it.

However, the cost of a used class B can be significantly less then a new one is. This is mainly because motorhomes, like any vehicle, depreciate.

Similar to cars, motorhomes also lose value as soon as you drive them off of the lot. It’s usually better to let someone else take the initial loss through depreciation rather than you.

You can simply buy a used one for less money and enjoy using it just like the original owner did.

Cost To Build Your Own Class B Camper Van

Building a camper van yourself may be your best bet for obtaining one for the lowest price. However, you should also realize that the cost can add up just the same.

You will have to start with one of the same chassis as one of the manufactured class B’s use. You can choose to purchase a used one to keep your costs down. A used cargo van can often be purchased for a small price compared to what you would pay for them brand new.

Buying a standard cargo van will also have a history attached to it and you will likely know of any issues and maintenance records as reported on Carfax reports.

For example, I purchased my 2017 Ram Promaster for $23,300 and it was less than a year old with only 27,000 miles on it. This gave me a solid base in which to begin building my camper van and allowed me to have a finished motorhome for much less than I would have spent otherwise.

However, if you value your time, you will need to consider how much you will be putting into the van to convert it to a camper van.

Working on a van like this is a huge time commitment. Especially if you are like me and have to learn as you go. I am not an RV builder and each component of my motorhome had to be researched and I learned through trial and error during the whole process.

In the end, I spent around $10,000 converting my van which gave me a ready-to-use camper van for less than $35,000. I ended up with a camper van that cost a fraction of what a manufactured one would have cost me.

I also had the opportunity to design it the exact way that I wanted it. I prefer my build to most all of the manufactured class B motorhome’s that I have looked at. Mine has character and isn’t sterile and cheap-looking like a lot of motorhomes.

Buying a Used Custom Camper Van

If you like the idea of converting your own van but don’t want to do the work yourself, you may consider purchasing a used conversion van.

However, don’t expect these to come at a cheap price either.

Custom camper vans are often expensive because a lot of work and material has gone into creating it, not to mention the time put in.

Building out a camper van is no easy task. I know from experience that it is extremely challenging, especially if you want to do things the right way so that it will have resell value in the future.

Many people don’t have the handyman skills required nor the tools or place to even work on a van so this makes it a no-go for those people.

Buying a used custom camper van may be the way to go if you want to spend less and want a custom van.

Final Thoughts

No matter how you look at it, a class B motorhome is not a cheap way to go. If you want the convenience of a smaller RV that has all the comforts of home and will allow you to travel nearly anywhere you want, you will have a pay a price.

Many people that purchase these types of rigs, plan on living in them full-time so it is their home. Some people sell everything they have, purchase a class B and travel the world in it.

It can be a very rewarding experience and although the cost seems high, the experiences you will have in it are priceless.

As I’ve shown you in this article, there are ways that you can have the same experience for less. Whether you opt for a used unit or build one yourself, a class B has its advantages over other types of larger RVs.

Class B RVs – Are They Too Small?

When I first considered the RV lifestyle, my mind was already leaning towards a class C type motorhome. I felt like this type of RV would give me the most space and provide me with all the comforts of home that I was used to. However, it wasn’t long into my search that I realized that I didn’t want to drive something as large as a class C around.

After sitting in a few of them along with class A’s, I realized that these types of rigs were a bit too big for what I was looking for. I realized that it would be difficult for me to get these types of rigs in and out of places that I wanted to go.

That’s when I began looking more seriously at class B RVs, also known as camper vans. The obvious problem with these is the size. I wasn’t sure if a class B would be big enough for what I wanted to use it for.

It took a little research and a few test drives to realize that a class B would be more than enough for my needs.  After taking my time to decide on the best RV for me, here is what I learned.

A class B RV is not too small in order for you to enjoy living or traveling in it. However, it may require a more minimal type of living and will likely only be suitable for 2 – 4 people depending on the size of the van.

There are many people who live full-time in a class B and they can have benefits that set them apart from their larger counterparts.

What Size is a Class B Motorhome

A class B is typically in the range of 18 – 24 ft in length and may have less than 100 square feet of living space. Although small, many of the layouts are designed to feel more spacious and can offer enough living space without feeling too cramped.

Examples

RV Brand / Make Exterior Length Exterior Width Interior Height
Winnebago Travato 21 ft 83 in 6 ft 3 in
Coachman Crossfit 22.17 ft 84 in 6.25 ft
Coachman Galleria 24 ft 3 in 83 in 6 ft 2 in
Winnebago Revel 19 ft 7 in 76 in 6 ft 3 in

Making The Most Out Of a Small Space

Living out of a class B camper van is much different than living out of a larger RV or a standard sticks and bricks home. A small van requires that you make some changes in order to make the most of it and maintain the comforts that you are used to.

Many people who travel in a camper van, say that they live out of their van rather than in their van. When you travel in a van as small as a class B RV, the world is your home and the van itself is where you sleep, eat, and maintain a sense of privacy and safety.

If you are new to van life or traveling in a class B, don’t expect to have as much room as you would in something larger. Although there are some layouts that maximize space, no layouts are going to provide you with tons of elbow room over another one.

No matter the van or layout, you will be dealing with a small footprint in which you will have to make sacrifices or learn how to live differently in order to be comfortable.

If you are having trouble determining whether a class B is too small, perhaps you should ponder the following questions.

  • Can I take a more minimal approach to living and cut out unnecessary items that I may be accustomed to living with now?
  • Would I rather have more comfort in a larger rig but be more restricted as to where I can go?
  • Would I rather have the ease of getting around in a van and being able to park in a regular parking spot, making it easier for travel?

It’s important to note that although you will probably not have as much room as you would in a larger rig, this doesn’t mean that you will be given up much. A class B RV has plenty a room for most people and as long as you aren’t hauling a large family, you will most likely be happy with the amount of space.

Advantages of a Class B RV

Camper vans may be smaller but they do have some advantages over larger RVs.

1. You will be able to park nearly anywhere that a standard car can park. One of the most difficult parts of driving a large RV is parking and maneuvering around on city streets. The size of some RVs restricts where you can go and makes it a stressful driving situation at times. With a camper van, it will feel as though you are driving a full-size truck and most of them will fit into a standard parking spot nearly anywhere.

2. You will get better gas mileage. Our custom camper van which is built on the Ram Promaster chassis gets around 17 to 20 miles per gallon depending on the terrain and type of road. Some will get more and some will get less but either way it is much better than the fuel economy you might expect from other classes of RVs.

3. You may be able to park stealthily in them if needed. You would never be able to do this in a larger RV because they stick out like a sore thumb. This is beneficial because you are not stuck with only staying in RV Parks. They are easy to park and they are also easy to drive away if you need to get going.

4. They are easier to drive. If you have ever sat inside a large class A motorhome, you know that they can be intimidating and especially once you get going on a road in a city or in small areas. You won’t have a problem with a camper van since most of them are easy to drive and small enough to fit on any road that a car can drive on.

Disadvantages of a Class B RV

Of course, along with the advantages come disadvantages. The main disadvantage is the size of the RV.  It’s obvious that a class B camper van will not be as large as a full-size motorhome, travel trailer, fifth-wheel.  If you are used to the space that larger RVs provide, you may find the following to be disadvantages.

1. The toilet and shower area, if it is even equipped with one, may be cramped and barely sufficient for most people. Our camper van shower is sufficient for our needs but if you are overweight or larger, you would probably have a hard time with our shower and toilet.

2. You can’t bring as much stuff with you. There are fewer storage compartments and space than a full-size RV would have so you may have to get creative in order to organize items, especially if you are not traveling alone.

3. Gray tanks or black tanks will likely be smaller in capacity than those of larger RVs. If you depend on these water holding tanks you will need to take this into account when planning a trip in a class B.

Who is a Class B For?

If you are an adventurous type and do not have a large family to carry around with you, a class B camper van may be perfect for you. Even people with families may find a layout that works well for them without being too small and suffocating.

On the other hand, if you have a large family and would like to have room to move around, a class B will probably be too small for you.

The following types of people may find a class B to be just the right fit for their needs.

  • Single people who want to travel without the hassle of a heavy load
  • Adventure seekers who need a home away from home
  • Weekenders who are looking for a small camp space and don’t require a lot of stuff
  • Couples who are accustomed to a more minimalistic approach to life
  • People who prefer a more fuel-efficient approach to RVing

I fall into the category of an adventure seeker as well as a weekender who enjoys being out in nature without the hassle of having a large RV to drive around. I enjoy driving my camper van around because it feels just like I’m in a large vehicle like a full-size truck.

I can pull into a spot and fix food, rest, or even sleep for the night and then be gone in no time.

Conclusion

A class B is definitely for a different type of camper than a class A or class C or even a travel trailer, fifth wheel or any other type of full-size RV. Camper vans are for those who are looking for adventure and are not simply seeking a home that can take the place of a standard home.

A camper van is meant to be driven and those who love to explore and travel to exciting places will love the convenience of a class B. These types of RVs are not ideal for those who want something that can be parked for days at an RV park so they can live in it like they would a larger RV.

On the other hand, if you are you looking to travel and maintain some comforts of home along the way, a class B should be plenty for you.