Disclosure: Some of the links in the article below may be affiliate links. This means that I may earn a small commission if you click on them and make a purchase.
Solar Panels are great to use in RVs since they can easily be mounted to the flat roof of the RV. However, it’s not always a good idea to drill holes through the roof. Some people don’t want to do it nor do they feel comfortable doing it. I’m one of those people and I was not very keen on creating additional holes if not necessary. I wanted to figure out a way to mount my solar panels to the roof without having to drill anything or bolt through the metal.
I didn’t want such a permanent solution. Instead, I wanted something that could be removed if needed and discarded if I didn’t want them any longer. I wanted to keep my roof as clean as possible and not create additional entry points where water could potentially enter the vehicle.
The Maxxair fan on my roof was enough hole cutting for me. My solution was to tape the panels to the roof and hope that this would be enough to hold them to the roof for years to come. Many people do this and have no issues so it is possible to make it happen.
If you have chosen to use flexible solar panels, taping them is a viable option.
Below, I’d like to explain the way I went about taping my panels to the roof and how well it has worked. Keep in mind that I am not an expert. I cannot promise that your installation will stay permanently secure so you understand that if you follow the procedure I used, you do so at your own risk.
How Do You Attach Solar Panels To a Van Roof
Let’s look at some options that you may consider. I had considered all of these options myself before settling on taping the panels.
Screw Or Bolt Directly To Roof
The solar panels that you purchase, whether they be rigid or flexible can be screwed directly to the roof. This is probably the easiest way to accomplish it. You simply place the solar panels where you want them on the roof and then use self-tapping screws to secure them. With rigid panels, you will have brackets that will mount to the roof and then the panel itself will attach to these brackets.
Each manufacturer may have a different mount or process for achieving this so refer to the specific instructions for the panels that you have for proper installation.
On flexible panels, you will likely need to screw directly through the panel and into the roof.
If you still have access to the bottom part of the roof of your van, you can choose to use bolts. This may be more secure but will be more difficult to remove if you ever need to. However, doing it this way would almost certainly lock you into always keeping solar panels on the roof. If you decided you no longer wanted solar panels, you would have bolt or screw holes in your roof that would need some attention.
Screwing the panels to the roof is an easy way to mount and allows you to easily remove them but the holes will need to be sealed and maintained regularly so that no leaks occur in the future from those holes. This isn’t difficult to do with a little caulk or Eternabond tape but it is something to consider if you are considering mounting directly to a metal van roof.
Mount To A Roof Rack
I considered this and almost chose this solution for my conversion van. Installing a roof-rack and then installing the solar panels onto the rack. For the RAM Promaster, you can get roof racks that fit onto the built-in mounts that are along the sides of the roof on the van. When you do this, you are left with a place where solar panels could easily be mounted.
The problem with doing this is that the roof racks add additional height to your van. Also, they will make your van less stealthy if you are concerned with this. Stealth wasn’t a concern of mine but I didn’t particularly love the options for roof racks on the market when I was doing my van conversion.
If you can find a low profile, roof rack, or can have one created yourself, this might be a really good option. It’s also good because when you mount the panels to the roof rack, you will get plenty of airflow underneath and around the panels. This won’t be the case if you plan on mounting the panels directly to the roof.
Tape The Panels To Roof
Although taping panels to the roof does create a messy stickiness that you may have to deal with if you ever decide to remove them, it can be done. They can be mounted securely and affordably by using the right kind of tape and or caulk. If you don’t use the right tape, it could be risky having them on your roof considering your van is driving down the road at 70 MPH or more.
Let’s look at how I went about taping my panels to the roof.
Taping Solar Panels To A Van Roof
In order to tape solar panels to the roof, you’ll need flexible panels. These panels are lightweight and will shape to the contours of your van roof if there are any. You won’t be able to use the more heavy rigid solar panels for an installation like this.
Here are the supplies I used to install mine.
- 4-inch Eternabond Tape
- Gorilla double-sided tape
- Clear silicone
- Corrugated plastic
- Renegy flexible solar panels (2)
The first thing to consider when taping to the roof is that you don’t want to mount the panels directly to a metal roof. They do get quite hot in the summer sun and having them mounted directly to the roof will create a situation where there is no airflow. Without spacing between the panels and the roof, heat will not be able to dissipate properly causing a buildup of heat and possible overheating. This could decrease the life of your solar panels.
What’s better is to use something like corrugated plastic underneath the panels. These will help to raise the panels off the roof enough so that there is a cushion of air beneath them. It will sit between the panels and the metal roof. By doing this, you are creating a gap with the plastic and the plastic is not as good of a conductor of heat as the metal roof would be. This will help the solar panels not get as hot as they would otherwise.

Using this method, my solar panels still reach a temperature of over 140 degrees on a hot summer day with full sun.
To install, I cut a piece of corrugated plastic that was slightly bigger than my solar panel. I used one separate piece for each solar panel.
Once you have the plastic cut, you will want to attach the panels to the plastic. I did this by using Gorilla double-sided tape which is very strong. I cut small pieces and placed them in various positions on the panel and then stuck the panel to the plastic. You could also use silicone caulk to achieve this.
Once this was done, I used the same double-sided tape to do the same thing underneath the corrugated plastic. This was to help the panels stick tightly throughout the entire panel rather than just the outer portions where the main tape will be.
With the double-sided tape in place, I positioned each panel where I wanted it on my roof and began taping. I used 4-inch Eternabond tape so that I could get as much surface area as possible. Using the widest tape you can get will help to create a better seal and make sure the panels don’t easily come off. The Eternabond tape is very sticky and only gets stickier in the sun so this tape should hold the panels in place for a long time.

Before taping the panels to your roof, make sure to clean the area where you will be mounting them. It’s a good idea to use a degreaser so that the tape can adhere properly to the roof. I used Krud Kutter as a way to make sure my roof was completely free of grease, dirt, and dust that might make the panels not stick.
To tape the panels, you’ll want to cover as much area as possible around your solar panels without placing the tape on the black part of the panel. You want to be sure that you cover up all areas and make sure you are covering up areas where water could get in. You don’t want water slowly trickling in and accumulating underneath the panels. Do the best you can to close all the gaps and make it watertight.
I ended up placing tape on top of tape in some areas to create even more of a secure hold. This also helped me to seal areas that I thought could use a little extra help from water intrusion.
Installing Cables
Since I decided to tape my panels rather than screw or bolt them, I also wanted to find a way to run my wires without drilling holes. I did this by using my rearview camera housing. If you have a camera housing like this, it’s a great idea to do this. I was able to run my wires from my panels to my solar charger without having to drill through the roof.
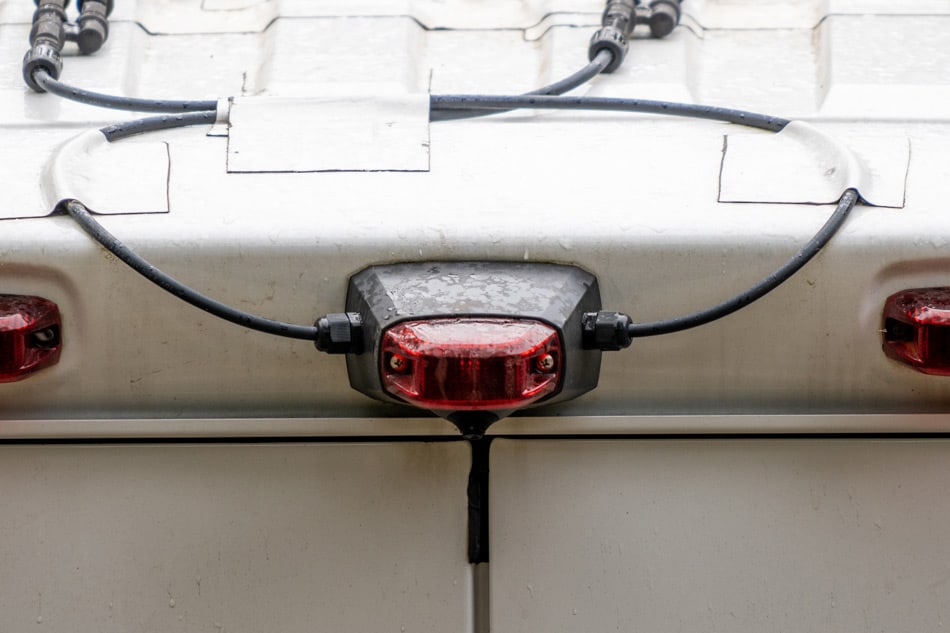
As you can see in the picture, I simply went through the housing and the wires come into my van and then run down the walls to my Yeti 1400 solar generator.
Since you’re probably taping your panels to the roof to keep from having to make more holes in the roof, it also makes sense to find a creative way like this to run the wires down. If you have a camera housing like this, it’s easy to do this way. When I first purchased my Ram Promaster, it didn’t have a rearview camera. I purchased an aftermarket camera that I installed myself that was specifically designed for the Promaster.
I wanted a backup camera so that it would make it easier for backing up but also for this specific reason. Since the camera housing is sealed and there is already a hole for the camera and light wires into the van, it made a good choice for also serving as a place to run solar panel wires. It worked great!
Be sure to tape the cables tightly to the roof as well. You don’t want cables flopping around while you are driving down the road. I used the same Eternabond tape to secure mine in certain areas.

Tips For Taping Solar Panels To Roof
- Don’t tape directly to the roof. Don’t tape flexible solar panels directly to a roof. Instead, using something like corrugated plastic will help to keep the solar panels at a lower temperature.
- Use extra-wide tape. Eternabond comes in different sizes. I used 4-inch tape on mine and recommend using the largest size that you can.
- Be sure it’s water-sealed. Close all the gaps that you can with the tape. Make sure the tape is stuck down flat with no areas that might peel up. If there are stubborn areas that have peeled up around the panels, you can add some caulking to those areas. This will keep them sealed and help keep the tape from peeling up.
Maintaining Flexible Solar Panels

As with anything that is mounted to your roof, be sure and check often to make sure all is well with the installation. If you notice that the tape isn’t sticking well or is lifting up, you will want to fix it before driving. Don’t take a chance of driving down the road. You certainly don’t want them flying off your van and causing damage.
Keep extra Eternabond in your van or RV in case you run into a situation where the tape has come loose. Having this tape on hand will allow you to repair an area if needed. This shouldn’t happen if installed correctly and I have never had a problem with mine after almost two years of use.
Bottom Line
Taping solar panels to an RV roof can be an easy way to attach panels without having to create additional holes in your roof. When you do this, you want to take precautions to make sure you have stuck the panels on tightly so they do not come off easily in the future. I have never had an issue with mine. They are still stuck down as tightly as there were the day I mounted them. I have driven thousands of miles and haven’t noticed anything coming loose.
I check my roof before every trip and multiple times throughout my journey. Taping the panels has worked great for me and they have been mounted to my roof for two years at the time of this writing. There has been no overheating problems and they are still mounted securely.