Building a custom camper van can be a huge challenge. Especially for those who are not proficient in DIY construction projects or those who don’t have tools or a place in which to work.
I know that it can be difficult because I went through the process.
I started from an empty cargo van and ended up with a finished camper van that I am extremely happy with and proud of.
There were many times throughout the process that I considered quitting and just selling the van as-is so that someone else could finish it. It was difficult and was also exhausting as I spent so much brainpower trying to figure everything out.
I worked hard on it but there were times I felt like I was getting nowhere. I set deadlines for each section only to see those deadlines come and pass while I wasn’t even close to being finished with that section.
Yep, my enthusiasm was waning with each day of this build.
I’ll be the first to admit that my build would’ve gone much smoother if I had just settled for certain things. Instead, I was meticulous in the process and wanted my finished van to look as though a professional had done it. I take pride in my work and wanted my camper van to show it.
If you are looking to build a van, I hope the following instructions can help you. I’ve already done the hard work and I hope that I can explain what I have done so that It won’t be so difficult for you.
After all, the hardest part is figuring out how you will do it and the exact tools and products you need.
The outline below details the exact steps and in the same order that I completed them in order to arrive at a finished camper van.
It would be a super long post if I were to go into detail on each item. Instead, I have given a summary and provided a link to a more elaborate post for each section in case you want the entire story.
Parts & Tools I Used
Before we begin, learning what parts you need and the tools that can make the job easier is essential for completing the job with your sanity in place.
I was lost when I first began my build. I thought I knew exactly what I needed but I was way off on some parts. Building a custom camper van is not a standard practice so you will have to search high and low for solutions unless you know specifically what you are doing.
View my list of recommended products and tools
Choosing & Purchasing A Van

The first step in the process was to decide upon a van that I would use for the build. For this, you need to decide what you want. Initially, I planned on purchasing the smallest van I could so that I would have a cheap van that I could use. I didn’t want to spend a fortune on the build.
However, once I really got into it, my needs changed. There were some important questions I had to ask myself during the process to come to a conclusion.
- Do I want a van that I can stand up in?
- Do I want a new van or is a used one ok?
- How small is too small?
- Would I rather have a van that uses gas or diesel?
By asking questions like these, I was able to narrow down my search and learn exactly what I wanted.
My goal was to have a minimalistic solution to a camper van so I didn’t want something huge but it couldn’t be too small either.
The sweet spot van for me was the RAM Promaster 2500 159″ wheelbase.
You can read more here about the journey I went through to find and purchase my van.
Choosing A Van Build Layout

The fun part comes during the layout process where you can dream a little and design your van the way you want it. This is where the benefit of building your own van versus purchasing a manufactured camper van has its benefits.
With a manufactured class B motorhome, you are stuck with whatever floor plan the manufacturer has chosen so if you don’t like one, you have to find a whole new brand or manufacturer.
With a custom build, you have a blank slate and can do what you wish with the space you have.
This doesn’t have to be a difficult process and you don’t need fancy software or an app to perfectly design your van. You just need an idea in your head, a pencil, and paper or a tablet with drawing capabilities (I used the iPad with the Apple Pencil).
Prepping Your Van
If you purchase a used van, there will probably be some work to do before you can get started. There may be commercial shelves installed, holes in the floor or other things that you’ll have to clean up before you can begin.
In my case, my van had tie-downs mounted to the floor. There were also metal tracks and other wood planks mounted to the floor.
I purchased my van used and someone used it to haul a motorcycle and used these tie-downs to strap the bike in. I had to spend a lot of time uninstalling these and then patching the holes and sanding areas that needed it.
After that, I applied a Rustoleum rust-prevention paint to the floor. It looked like a brand new van floor after I was done with all this work.
Subfloor
After my van was prepped, I started on the subfloor and this was my first experience into the van build. The subfloor is the obvious place to start and probably the first place that anyone would start.
You have to do the floor before you can do anything else so this is typically the beginning point to any van build.
My subfloor consisted of 1×2 furring strips to build up an area in which to add insulation and a final 1/2 inch plywood flooring that would allow me to have a straight and even floor throughout the van.
Although many people do not use insulation on the sub-floor, I found it to be a great added addition and besides adding some insulation from heat and cold, it also helped to deaden the road noise making for a quieter camper van.

Read more about my subfloor installation
Roof Fan
If you don’t install a roof fan in your van, you are asking for a hot and stale van in the summertime. A roof fan can be great for allowing airflow whether you are pulling air in or out of the van.
My roof fan works in conjunction with windows to move air through the van. This makes all the difference when you experience a warm summer night and need airflow in which to make the experience more pleasant.
A roof fan can also be used as an exhaust for when you are cooking or taking a shower in your van. My roof fan is used to pull moisture out of my van when I’m taking a shower since it is located right next to it.
It is also close enough to my kitchen that it will pull moisture and cooking odors out of the van allowing me to remove unwanted smells from the living area.
I chose the Maxxair fan for my van and I love it. Although it can be one of the scariest things to install, it’s really simple and I have documented my process.
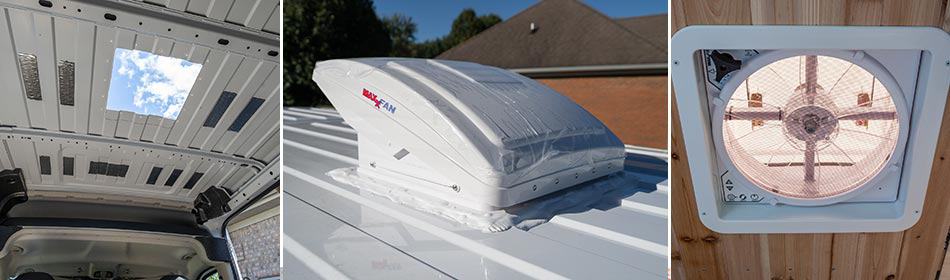
Read more about my Maxxair fan installation.
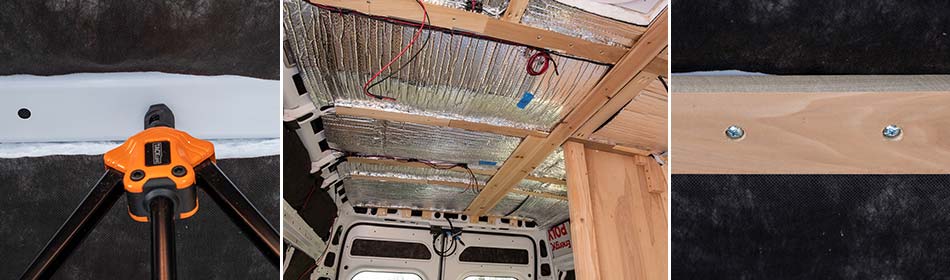
Insulation
Insulation can be a tricky part of the van build because some people skip this or do a minimal job on it. I, however, feel that this part is required if you prefer a more temperature-controlled environment.
Installing insulation doesn’t mean that you are making your van immune to the hot or cold weather. It simply means that you are adding additional layers that allow heat transfer to be slower than it would otherwise.
This can allow your van to stay cooler in the summer and trap heat better in the wintertime.
Many people argue over the best type of insulation because there are many different options that you can use. I used Thinsulate by 3M in my build and I am glad that I went with it.
It was super easy to install and although it was probably one of the most costly ways, I saved a ton of time by using it.
I was able to insulate the ceiling, walls, and floor of my van using a combination of Thinsulate and rigid foam board. I also used quite a bit of Reflectix in the process as well.
The Reflectix was installed over top of the Thinsulate with a small gap in between in order to help keep the heat transfer to a minimum.

Read more about my insulation process
Bed
Perhaps the most important part of the van build is the bed that you will sleep on during your travels. The bed needs to be comfortable and not just a makeshift item.
I wanted my bed to be something that was just as comfortable as what I was used to in my house.
My bed-frame is very simple and was one of the first items that I built in my van. My bed consists mainly of two support braces on each side of the van with three supports spanning between the two support braces.
On top of that, there is a slat system where my mattress rests.
I built my bed high enough so that I can store items underneath it and especially my bikes. I intend to have my mountain bikes with me during my trips because I love to ride.
I finished my bed off with a comfortable memory foam mattress. This mattress works well for my camper van and provides a nice comfortable place for me to sleep while out on the road.

Read about my entire bed build
Ceiling Furring
The next step in my build was to install furring strips on the ceiling so that I could install the cedar wood covering. This is a step that I consider necessary but many people may screw their finished ceiling directly to the metal roof.
Why did I choose to use furring?
- I wanted to create a small gap between the ceiling and roof so the insulation would be more effective and also have room for electrical wires.
- I wanted to utilize the holes in the ceiling braces to install the furring strips. Once the furring strips were installed I could screw my ceiling to it, giving me a more secure final product.
I used poplar wood for the furring strips and was able to utilize the wood that was in my van when I purchased it. I cut them into small strips and attached them to each support of the ceiling in three sections.
This worked great for me and allowed me a sturdy ceiling in which I could easily screw in my cedar planks and also staple wires for my lights.
I was able to utilize the holes that were already in the ceiling supports by using Rivet Nuts. I installed them using a rivet gun so that I could attach the furring strips using bolts.
This meant that I didn’t have to drill any holes. Although, there were a couple of places where I did end up drilling new holes.
The rivet nuts hold strong and gave me a very sturdy base for my ceiling.
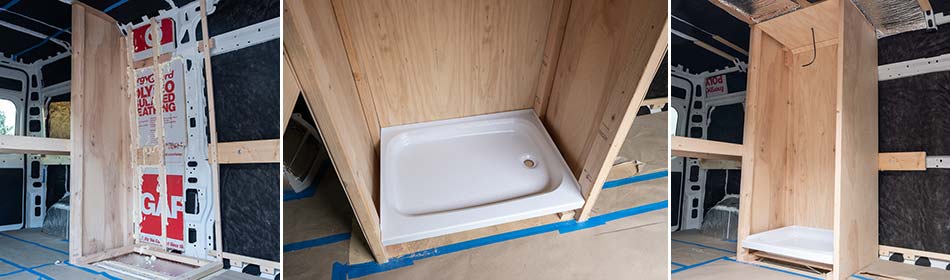
Shower Framing
After the ceiling furring was installed, I wanted to start on framing the shower walls before installing the finished ceiling.
I will have a different finished ceiling in the shower so it made sense for me to do this so that I could build the main area ceiling around the shower.
The shower walls were built and attached to the floor as well as the ceiling furring. Installing the shower at this point allowed me to frame some walls that were completely squared and straight.
Those walls would become the source for aligning other structures that were built later on.
At this point, I built the side walls and the rear wall frames. This included finishing the outside of the shower with 1/4 plywood walls.
I did not close any of the inside walls up because I would still need to install insulation in the walls and run wires for the shower light and switch.
Framing the shower was my first realization that this build was going to be difficult to get things straight and square. It isn’t like a house where you are already starting with a squared structure. With a van, you have to deal with the curvature of the van as well as the likelihood that it will never be level.
Read about my complete shower installation.
Ceiling Wiring
Once the furring strips were in place and the shower framing was installed, the wiring was next. My floorplan had 7 LED lights in the ceiling. I needed to run wires from each of these 7 locations to where the light switches would go.
I made sure to do this before I had installed anything over the walls or ceiling so that I would have full access and space to run the wires.
I used 14/2 wire for this application which is overkill for these types of small voltage devices. However, it’s always better to use the thickest wire you can when you are dealing with electrical devices. At least, that’s my thinking.
The LED lights that I chose use very minimal voltage and current.
Installing the wiring was an easy process. I connected each light in parallel on the circuit where multiple lights were on.
In simple terms, this just means that all lights connected to the circuit by connecting red to red and black to black.
Each circuit went to a switch that will be used to control the lights on the circuit. In my case, I had three different circuits; front lights(4), rear lights(2) and shower light(1).
Now that the wires were all run for the lights, I could move forward with installing the wood covering for the ceiling.

Ceiling Cedar Wood Covering
I chose to use cedar on my van ceiling for a few reasons.
- I love the look and smell of it.
- It is resistant to mold and mildew which is important in a small living area that is prone to moisture buildup.
- It’s very lightweight so it’s perfect for the ceiling.
Installing the cedar wood was easy for the most part. It’s much easier if you have two people doing it but a single person can get it done just as well with a little patience and maybe a few four-letter words.
The cedar planks that I chose were 1/4 inch tongue and groove so the key was to get the first one perfectly straight and then all of the other pieces fit onto this one to provide a straight, perfectly finished ceiling.
I used #6 3/4 inch screws to hold the planks into place and I screwed them directly to the furring strips that I had already bolted to the frame of the van ceiling.
I used a miter saw with a 60 tooth fine-finish blade to cut the planks to lengths as I was installing them.
I also cut holes that were 2 1/4 inches in size in the pieces where the lights would go. The lights that I chose simply push into the holes and hold themselves into place with spring clamps.
This was the first point in my van build that I felt a sense of accomplishment. Looking up at the finished cedar ceiling, made it feel like it was finally taking shape and I was excited to keep moving forward to see how the finished product would turn out.

Read more about the cedar plank ceiling installation
Ceiling Lights
Once the ceiling wood was all installed, I was left with a few holes throughout the van. There were six holes in the main living area and one in the shower.

All of the wires had already been run to each hole so all that was left to do was to connect the wires to the lights and then push the lights into the holes.
Before doing this I had placed some small, 3/4 inch pieces of wood above the cedar wood at each hole location to provide a tiny bit of spacing for the lights. I did this because I did not want the lights touching the insulation.
I wasn’t sure how hot the lights would get so I wanted to make sure there was enough breathing room on the backside of the lights for them to dissipate heat.
You can feel some heat coming off the back of the lights so I didn’t want to take any chances on the lights heating up the Reflectix and causing a fire.
The lights fit perfectly into the holes and the connections were easy to make.
Cabinets
I decided to go with a unique area in the front of my van that would be a combination of different cabinet types. I came up with this idea after a lot of thought on how I wanted the area to be once it was finished.
The top cabinet, as well as the long, floor to ceiling cabinet that is installed next to the shower wall, is designed to enclose an area that will have a bench with a lagoon table as the dining area.
I chose this location because I wanted the bench facing towards the sliding door. There will be a window on the sliding door and I want to be able to sit on the bench with a full view of the outdoors.
Besides that, I can always have the sliding door open on nice days and enjoy full views.
Since I already had installed the shower walls, it was easy to build the floor to ceiling cabinet next to the shower. Once that was built, I just continued another ceiling cabinet towards the front of the van.
These cabinets will provide ample space for storage. The bottom area that comes out the same distance as the shower wall, will be a drawer and also a small area with seating.
Having part of the cabinet set back like it is opens the area up more when you are sitting on the bench. Otherwise, you would feel more closed in without as much of a view towards the rear of the van.
This front cabinet contains one of the electrical outlets that I’ll be installing so a wire was run for this during the process. The wire was run through the cabinet and the shower framing and will be routed to the solar charger under the bed in the rear of the van.
The rear of the van has one wall of cabinets that I added over the bed. I will only have rear cabinets on one side. The other side will need more space to provide plenty of headroom while sleeping.
These are done the same way the front cabinet is utilizing furring strips that I had installed on the wall.

Front Bench – Dining Area
Initially, I found the perfect bench online and considered ordering it. It was a perfect size and would fit perfectly in this area with just a tiny bit of customization. The problem was that it would have cost around $700.
I decided to tackle the build myself and copy the bench I had found. I built it to look almost exactly like the one I had found and after it was built, I installed it in the van. It was a perfect fit and the bench itself adds to the storage in the van.
The bench area raises, revealing an open space for storage and also the back of the bench opens forward to reveal even more space for storage.
I purchased the cushioning online at Ballard Designs which fit perfect. I had built the bench to fit the dimensions of this cushion. For the small square seating area, additional fabric was ordered and I had a small cushion created to match the larger one.
All of the cabinets and the bench were attached to the van using furring strips that I had installed on the wall in this area. I installed furring strips using rivet nuts as I had done on the ceiling.

Read more about my dining area installation
Walls
The walls of my van were not done all at one time. I did them in sections starting with the front of the van. After the front cabinets were installed, I completed that area by closing the wall in using shiplap.

I love the look of shiplap and decided to use it throughout the van. It’s really easy to work with and looks great when finished.
The same shiplap was used in the rear of the van but there was an additional problem in the rear. I needed to create more space at the bottom of the wall where the bed goes. I did this by using furring strips to frame around the van supports on the wall.
It was a challenge getting everything straight but that’s where my creativity came into play and I figured it out. By doing this, I provided more head and foot room when the bed was installed.
This was a great choice to do and I recommend that you try to utilize all the space you can like this if you are going to be installing your bed sideways.
Read more about my shiplap installation
Electrical Outlets & Light Switches
I chose to use simple electrical outlets that have built-in USB ports. These are basically power strips that are made to be mounted like a standard outlet. The other end will plug into a standard plug providing you with an extended outlet.
This works great for my build since I am using the Yeti 1400 from Goal Zero for my power source. This unit has two 120 volt plugs that I simply plugged these outlets into.
I chose to use dimming light switches for the living area and just a standard on/off switch for the shower. It’s nice having the dimmable option because the lights can be a little bright at times and it’s handy to be able to tone it down a bit.
It’s great for setting the mood.
The outlets and light switches were simple to install since I had already run the wires. I just cut the appropriate opening in the shiplap and on the cabinet wall where the outlet would go. They are held in with screws.
At this point, I still had one more switch left to install but it was to be installed in the kitchen cabinet and I had yet to install that.
Solar Panels
I Installed my solar system in various stages. The first step was to mount the solar panels to the roof of the van. When the time was right, I ran the wires from the solar panel to where my solar charge controller will be.
I ran my wires a little unique from the way most people do. Instead of drilling another hole in the roof of my van to run the wires, I utilized the rear back-up camera housing.
By doing this, I avoided the possibility of leaks from a new hole in the roof.
When I installed the wires through the camera housing, I used waterproof pass-throughs that does not allow water to enter.
If I decide to ever get rid of this, I can easily take the wires out of the camera housing, plug them up or even purchase a new camera housing for fairly cheap.

The solar panels are the flexible type and I mounted them on top of two layers of corrugated plastic and then I used double-sided tape along with Everbond to stick them to the roof. Again, I didn’t want to add new holes to the roof by bolting or screwing the panels down.
Tip: if you are installing flexible solar panels, you should use corrugated plastic or something that allows the solar panels to sit up off of the metal roof. This helps them to stay cooler and may increase their lifespan.
Many people have overheating issues with flexible solar panels mounted directly to a metal roof. Do yourself a favor and avoid this mistake.
Rear Half-Slider Window
At this point, I had most of the walls except for a small area in the rear where the window would go. I left this open as I waited for the window I had ordered to arrive.
Installing the window was another scary part of the process because another hole had to be cut. There is no room for error when you cut something like this and I certainly didn’t want to mess up and end up with leaks.
I paid attention and created a template that was a bit on the tight side. If you are going to cut a hole like this, it’s important to always err on the side of being safe rather than sorry.
I traced the template and cut the hole and it ended up being perfect. It was tight but a perfect fit.
After all was said and done, it was really simple to install once you get over the fear of cutting a hole in the side of your van.
Kitchen
My kitchen is pretty simple. It consists of a cabinet with doors and a few drawers and on top of that is the countertop with a sink and faucet.
I chose not to do a built-in grill or anything fancy. I prefer to use a portable propane stove so that it can be used inside or outside whenever I choose.
The hardest part of the kitchen build was the base for the cabinet. This is also called a kitchen sink base and I considered purchasing one unfinished from my local hardware store in the beginning.
However, if I was to do this I would’ve had to cut some of the back of it off and refinish it since the ones designed for homes are deeper than I needed mine to be.
In the end, I chose to build my own. I simply used my kitchen sink base in my house as an example and built it exactly like that except not as deep.
The sink I chose was not very deep but it is deep enough and provides a nice area to wash dishes and do your other normal kitchen activities.
I have plenty of counter space in which to place my grill when I want to use that. Once the kitchen base was installed, I was able to then place the light switch at the end of the base in an area where you can reach it as you walk inside the van. This is a handy spot and gives you access to it quickly as you enter the van.
I used butcher block for the counter and stained it with a honey stain and then covered it with multiple coats of lacquer.
I also installed the electrical outlet and a light switch for the rear lights in the wall behind the counter.
This is a handy area because I can use if for kitchen appliances and also reach it from my bed for charging my phone and using other small devices.
Swivel Seat
A swivel seat has been a difference-maker in the front section of my van. Once installed, it has allowed for a larger area upfront and is used in conjunction with my lagoon table to create a nice dining area.
The only problem is that you have to fight with someone to use it since it is the most popular seat in the house.
Eventually, I will add another swivel seat on the driver’s side but I have not done that yet. The reason I have been hesitant about this is that the swivel seat adds about an inch and a half in height to the seat.
I think that this might be a little uncomfortable for the driver.
However, the benefit of having the extra swivel seat may be worth the added height.
I wrote a long illustrated post on how I installed my swivel seat. Read more about this process.
Finished Flooring
I waited until most of the construction work was done before installing the finished vinyl flooring because I didn’t want to damage the flooring with heavy items or tools. At this point in my build, the floor had been just a 1/2 inch plywood.
I even covered the plywood with a protective construction paper so it would stay pristine. It was time to install the finished flooring once all the built-in items were in place including the shower, cabinets, seating and kitchen base.
I worked around all of these items as I installed the flooring.
I wanted the finished flooring in the van before closing off the bed area and installing the fridge.
The vinyl plank flooring was really simple to install and it turned out great. I installed it on the entire van floor including underneath the bed. I used three 20 square foot boxes of the product and still had some leftover.
I would estimate that the entire van took around 50 square feet.
Learn how I installed it here.
Plumbing
The plumbing was done in various stages since I needed water supply on both sides of the van.
My plumbing system is very simple and consists of one large 16-gallon freshwater container. This container supplies water to my shower as well as my kitchen sink faucet.
I used PEX tubing for my supply lines since it is so easy to work with and if done right, is leak-free. It took me a while to decide to use PEX. Initially, it was a bit intimidating since I don’t know much about plumbing.
Once I started working with it, I realized it was simple to use and perfect for a van build.
For my kitchen gray water, I use a 5-gallon container under my sink that the water drains into and it gets dumped as needed.
For the shower, my current solution is to let the water drain right out of the bottom of the van. This will change in the future as I install a permanent gray water tank underneath the van.
The plumbing isn’t much and didn’t require very long runs of tubing to accomplish.
Refrigerator
One of the more difficult items to install for my build was the refrigerator. I went with a top-loading, Dometic CFX 75DZW.
After all my research, I determined that this one would provide the most refrigerator/freezer space while using the least amount of electricity.
It also allowed me to store it under my bed out of the way. I used full-extension slides to mount it under my bed and then created a shiplap wall that it neatly blends in with.
When you want to open the fridge, you pull it out like a drawer, open it up and get what you need. Once you are finished, just push it back in and it’s out of the way.
I used latches to keep it closed. Although, this may change because the latches that I chose make a little rattling noise while driving.
Initially, I purchased the slide specially made for this refrigerator but I ended up not using it the way it was because it doesn’t have full extension. It was a big letdown and I don’t suggest buying it because it’s easier and cheaper to create your own solution.
I did modify it since I had already purchased it and made it work. In the end, it worked out fine but only after completely modifying it.
Read more about my refrigerator installation
Cabinet Doors & Drawers
I had already taken some trips in my van before I installed any of the cabinet doors. I had no issues with items moving around or falling out but I wanted to complete the cabinetry by having doors on them.
This was a time-consuming process as I had to build each door by hand and paint each one. I also had to install the hinges and align each door properly. I took my time on this because it wasn’t a necessary part of the build in order to use the van.
I stuck with the Shaker style in my design for the cabinet doors which I custom built. It was made easy by using a router with a tongue and groove bit.
It was a challenge getting them to look perfect but I got the hang of it after a while. With the help of a Kregg Jig and lots of clamps, I was able to create doors that I’m happy with.
Final Touches
The final touches on a van will never end but some of the final touches and clean-up I had to do after all was said and done include the following.
- Paint all walls & cabinets
- Install door knobs & handles
- Install latches to hold doors closed
- Patch any remaining nail holes and paint over them
- Cover open areas in sliding door and rear doors with a cloth covering
- Neaten up wires on the electrical system
- Clean up any messy areas
- Add tie-down eyelets in areas where needed (shower, under kitchen cabinet)
- Install paper towel holder
- Install towel holders
- Install front security curtain
- Add running boards on each side of van
The list goes on and on and I’m sure I will find more items to touch up or improve on as time goes by. When you build something custom like this, there’s always something that you can find and improve regularly.
Tips
If you have never built a custom van for yourself or do not have a lot of experience building anything, you are in for a roller coaster ride.
There are many ups and downs along the way and there will be times when you feel like you are not accomplishing anything. On the other hand, there will be different stages of your van build where you will feel as if you have accomplished a lot.
Here are a few tips that I have learned from experience and hopefully they can help you along the way on your conversion.
- Be flexible in your design plans because not everything is going to go as planned and you may need to change things around.
- Don’t spend too much time on insulating your van. I spent way too much time on this and in the end, it doesn’t make that much of a difference.
- Take your time, unless you are in a hurry to get it done. Slow and steady will ensure that you end up with a properly designed and built van.
- Budget more than you think it will cost because it will likely cost more.
- Do everything with the end in mind. Build everything with the knowledge that you could possibly sell it someday. This will help to ensure that you won’t cut corners and it will be done right.
Final Thoughts
Building a van is quite a challenge but is not so difficult that it can’t be done. I’m living proof that a van can be converted to a camper and become a nice living space.
I’m extremely happy with the way my van turned out and I’m proud that I was able to make my plan work out in the end.
I believe that creating a custom conversion van is a great way to acquire a motorhome while spending less money. It gives you a chance to do it your way and create something that suits your needs.
Research and plan accordingly and your build will be much easier. There are many moving parts to a properly converted van so make sure you take your time and plan each system in advance and you will end up with something that you can be proud of.